The Reverse Engineering tool enables you to create a profile from an HL7 log (or HL7 message file). A profile (also known as a specification or message definition) documents the message structure and content, including the use of Z-segments and custom data types.
To open the Reverse-Engineering tool, click PROFILE v2, New, With Reverse-engineerer Wizard... The tool opens to Choose Log Files.
Then click Next to go to the next step. You can also load messages by querying a database.

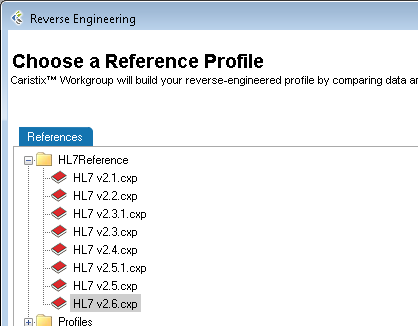
To begin building a profile based on the messages you just loaded, the software needs an established profile to compare against. Select a profile that most closely matches your messages, then click Next. (Note: the software picks up on the HL7 version specified in your messages, but you are free to choose another reference).
The messages load.
(If they load too slowly, you can click the Cancel button in the Loading dialog box and only messages that have loaded thus far will appear.)
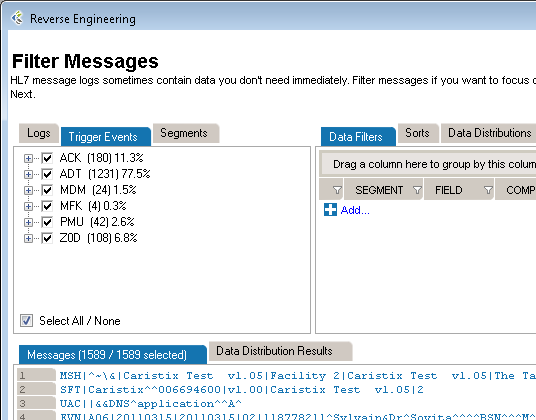
If there are files, events, segments, or other data elements you don’t require for the profile, filter them out in this step (read Filter an HL7 Log to learn more), then click Next to go to the next step. To reverse-engineer all messages without filtering, simply click Next.
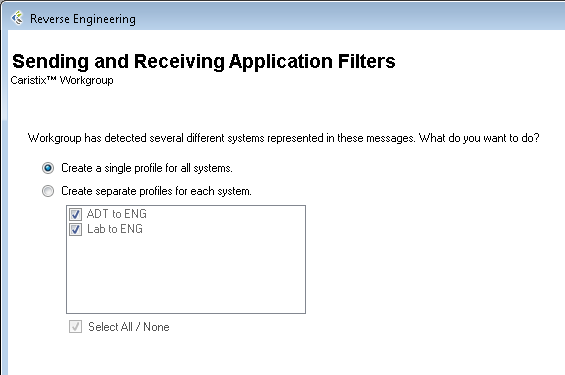
This step is optional. The software will detect all sending and receiving applications present in the messages. If only one combination is detected, this step is skipped.
You have two options here. You can either generate a single profile combining all applications represented in the message file, or you can create separate profiles for each sending and receiving application combination. The second option offers you the possibility to choose specific combinations; it will also run the next 5 steps consecutively for all selected combinations.
The software sets up the reference profile and messages you selected. Once the processing is complete, simply click Next to continue, as specified on-screen.
Choose between Basic and Advanced field analysis.
This choice lets you analyze fields and data values and assign known data types. If Conformance finds data values and fields that do not match known data types, an new data type will be assigned. You can manually edit the data types later, when the reverse-engineering profile appears in the Library.
Select Basic Field Analysis if:
you are not sure that data types are important to your analysis.
you want to speed up your analysis and focus on identifying details in other message elements such as events and segments.
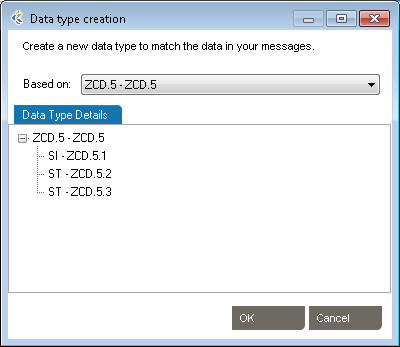
This choice lets you fully analyze fields and data values. Data values and fields that do not match expected data types will be flagged. You will have the opportunity to either create custom data types to handle non-HL7-compliant data, or assign an existing data type.
Select Advanced Field Analysis if:
you need complete data type analysis for your interfacing project
you are comfortable creating new data types for further analysis
This section allows you to set more specific options for data and field analysis.
Once you make your selection in Step 2, click Next.
The software reads through the messages and segments to begin building the profile. When processing is complete, click Next to continue, as specified on-screen.
This step creates the field structure in your profile, assigns data values to user tables, and associates data types to fields and values.
If you selected Basic Field Analysis in Step 3, Basic Mode appears in Step 4. Workgroup processes the fields and data types automatically. When the processing is finished, click Next.
If you selected Advanced Field Analysis in Step 3, Advanced Mode appears in Step 4. Workgroup analyzes each segment for data values and fields that do not match expected data types. In other words, the software automatically performs a conformance check. When non-compliant elements are flagged, the software automatically suggests a data type and field structure. You can accept the suggestion, assign another data type, or create a new data type to handle the non-compliant values and fields.
Edit as needed to reflect maximum field length
Specify usage.
This tab provides a list of the data values that were flagged as non-compliant, as well as how many times they were found in the messages.
When processing is complete, click Next to continue.
This step will collect analyze the message flows in your logs (if you select this option at step 2). These message flows will be stored into the profile and available for future uses, to generate test messages for example.
This is the final step in the Reverse-Engineering wizard. Specify a folder to save the profile to or browse your computer to save it locally. Name the profile. And provide a description if needed. Click Save to close the Reverse-Engineering wizard and go to the Documents pane. (If multiple Sending and Receiving Applications were selected, the wizard will start a new analysis on Step 1)