Overview
De-identification in Cloak works as follows:

Loading HL7 Messages
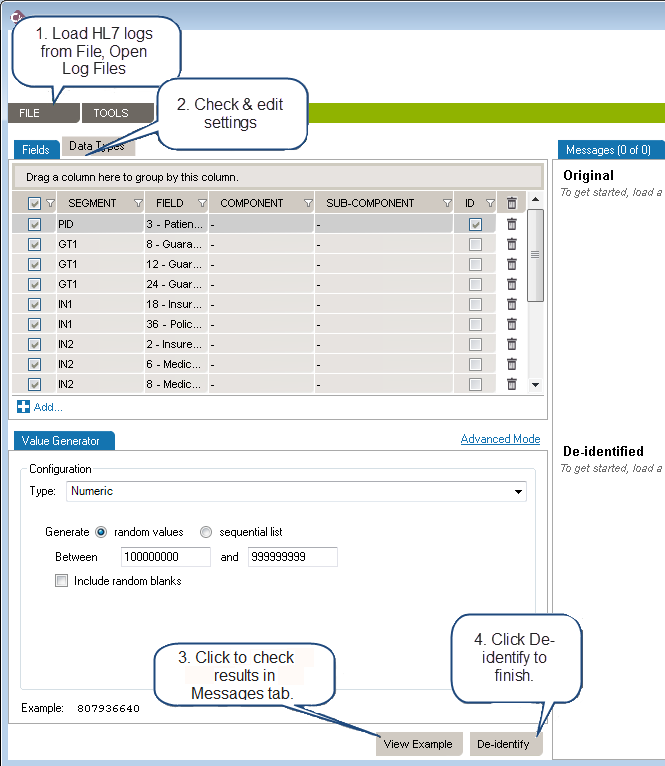
Load the HL7 message that requires de-identification:
- On the menu bar, go to File, Open, Messages…
- In the HL7 Log dialog box that opens, click the plus (+) sign.
- Navigate to your log file and choose the file to be opened. Add more files by clicking the plus (+) sign.
- Click Open.The file name will appear highlighted in the HL7 Log dialog box.
- Click Next to continue.
The log is loaded in Messages tab. The tab also indicates the number of messages in the viewing pane and the total number of messages in the file you loaded. The Original pane displays the log you loaded while the De-identified pane displays the de-identified log. The split screens scroll synchronously so that the data displayed is mirrored in the original and de-identified logs.
Resize vertically to change the quantity of data displayed in the viewing pane. Place the pointer on the line dividing the two panes and drag the window to increase or decrease its size. Click Hide and Show buttons to hide or view panes as needed.
The fields and data types set for de-identification are highlighted in red for easy visibility.
De-identification Settings
On the left side of the screen are the de-identification settings listed under the Fields and Data Types tabs. Cloak loads settings to cover the 18 HIPAA identifiers by default.
Fields Tab
- Checkbox: the checkmark indicates an active rule. Uncheck to deactivate a rule.
- SEGMENT: select a segment.
- FIELD: select a field.
- COMPONENT: select a component, if needed.
- SUBCOMPONENT: select a subcomponent, if needed.
- ID: sets the primary key. This lets you set the data element used to link several messages to the same patient and keep the clinical history unchanged. Check it for any field uniquely identifying the patient. For instance, if patient is identified using PID.3.1 and PID.3.4, make sure there is a rule for each of those 2 fields and check both as being ID. Int he same way, if you want to use patient name, gender and date of birth as patient identifier, make sure the ID check box is checked for all fields. Unchecking it would change how data is generated (a new patient would be created for each message).
- GENERATOR TYPE: sets the data source for de-identified values. Learn about Generator Type settings.
Data Types Tab
- Checkbox: the checkmark indicates an active rule. Uncheck to deactivate.
- DATATYPE: select a datatype.
- COMPONENT: select a component.
- GENERATOR: sets the data source for de-identified values. Learn about Generator settings.
Add or Remove Rules
To add a de-identification rule under Fields or Data Types:
- Click the plus sign at the bottom of the list of selectors. A new line will appear.
- Edit using dropdowns in each column.
To remove a setting, click the trashcan at the end of the line.
View Example and Save a De-identified HL7 Log File
Once you have created and configured all the selectors applicable to the HL7 log to be de-identified, click View Example at the bottom of the left hand pane. A preview of the de-identified log file will appear. Scroll through the log in the viewing panes to verify the potential results of the de-identification process.
Once reviewed and after applying any changes:
- Click De-identify at the bottom of the left hand screen to the right of View Example to save the de-identified log file.
- A Save Results dialogue box will appear with a number of options. Click the appropriate radio button for that log file. Those options include:
- Save the file with the initial file structure
- Divide the file into smaller chunks of a specific size in MB or number of messages
- Not to split the file but to keep it all in one file
- Click Save and browse to the location to store the file. Click Save.
- A window will open tracking the progress of the process.
Results Summary
Once saved, a De-identification Process Report dialogue box will open asking if you wish to create a de-identification process report. Click Yes or No. If Yes is clicked, you will be prompted to choose a location to save the generated PDF and to give a name to the file. Click Save and the file will be saved to the specified location. The PDF of the De-identification Process Summary will open on your desktop for review.
Once a set of selectors have been chosen for the de-identification of a log file, that set can be saved for reuse.
- In the drop down menu under File in the upper menu bar, Click Save de-id rules.
- Choose a location and fill in a file name for the settings and click Save.
Once a log file has been opened, the saved de-identification rules can be applied by clicking Open de-id rules from the drop down menu bar under File in the the top menu bar.