Before starting to use Caristix Test, review Options to ensure your setup is appropriate for your testing and validation.
From the Main Menu, click Tools, then Options in the drop-down menu that appears.
A new Options window opens. 4 tabs are available: Logging, Reference Profile, Default Connections and Preferences.
Enabling this configuration activates internal execution log storage. Internal execution logs are actually xml files and can be open as a test suite so the test can be run again using the exact same configuration, meaning that variables are replaced with the actual values generated at run time.
This is the default profile used to validate and create new messages. Reference conformance profiles based on the HL7 standard are located here. Also, any other profile the organization may have created would be listed here too.
To know more about how to create new customized profiles (including Z-segments and customized fields), refer to the Caristix Conformance or Caristix Workgroup products.
This is where connections to integration engines (or other HL7 systems) and databases are configured. Configuring a default connection for each category has a few advantages:
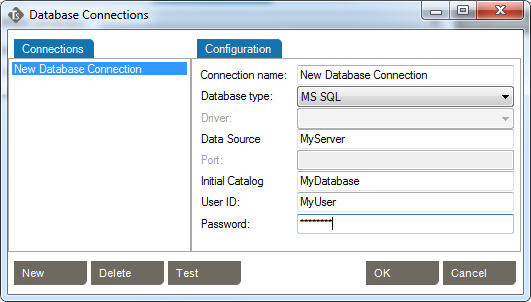
Caristix Test can perform tasks against a database. For instance, you can execute a SQL query to validate against expected results; or you can instantiate a variable from a data set. These settings enable you to set up database connection library and select a default database.
Caristix Test can interact with an integration engine or a system sending HL7 messages. These settings enable you to set up the network connection library and select one as the default.
Choose the default receiving network connection from the list of network connections. To configure a new network connection:
| Property | Description | Example |
| Name | This is the name of the network connection. Later, network connection can be selected using the name. | EMR Simulator Local Listener |
| Host | IP address or hostname listener will listen to. Note: Make sure firewalls are configured so traffic from the message sender computer can reach the host and port the listener is listening to |
127.0.0.1 127.0.0.0 192.168.10.210 |
| Port | Port listener will listen to. Note: Make sure firewalls are configured so traffic from the message sender computer can reach the host and port the listener is listening to |
6661 6543 |
| Timeout | Listener stops listening to the address/port after this period of time (in seconds) even if it did not receive anything | 30 |
Caristix Test can interact with an integration engine or a system receiving HL7 messages. These settings enable you to set up the network connection library and select one as the default.
Choose the default sending network connection from the list of network connections. To configure a new network connection:
| Property | Description | Example |
| Name | This is the name of the network connection. Later, network connection can be selected using the name. | ADT Simulator Local Sender |
| Host | IP address or hostname messages wil be sent to. Note: Make sure firewalls are configured so traffic from the computer running tests can reach the host and port |
192.168.10.210 dev.myorg.com 127.0.0.1 |
| Port | Port messages will be sent to. Note: Make sure firewalls are configured so traffic from the computer running tests can reach the host and port |
6661 6543 |
| Timeout | Connect will stop waiting for acknowledgment messages after this period of time (in seconds) if it didn’t receive anything | 30 |