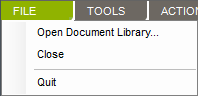
From the Main Menu, click FILE. A number of file management options are available in Caristix Conformance:
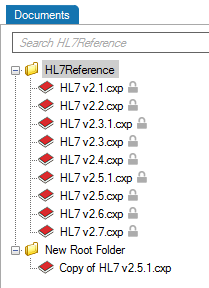
You can add documents (Word, Excel, PDF documents, etc.) to the Library. You can do so using one of the following ways:
Documents will be uploaded to the library and made available from Conformance.
Documents and folders will be uploaded to the library and made available from Conformance.
Document(s) will not be uploaded to the server and will only be available from your computer. Other user from the same library will see the shortcut, but won’t be able to open it. This will act as a normal shortcut in Windows.
There are actions that can be performed on the library via the Main Menu’s Action section, the right-click contextual menu (right-click a node or blank space), and the Gear icon beside the search bar.
When there is no document highlighted, the available actions are:
When a document is selected, the available actions depends on the document type. Common actions are:
 You will need to edit the profile to reflect the specification. Go to Editing a Profile to learn more.
You can also build a profile from individual message elements. This method is useful when the specification you are building is limited to a small subset of an HL7 version and when customization is extensive
You can add a trigger event or message type from one of the HL7 references or from a previously built profile.
In the Document pane, double-click on the profile you want to build out.
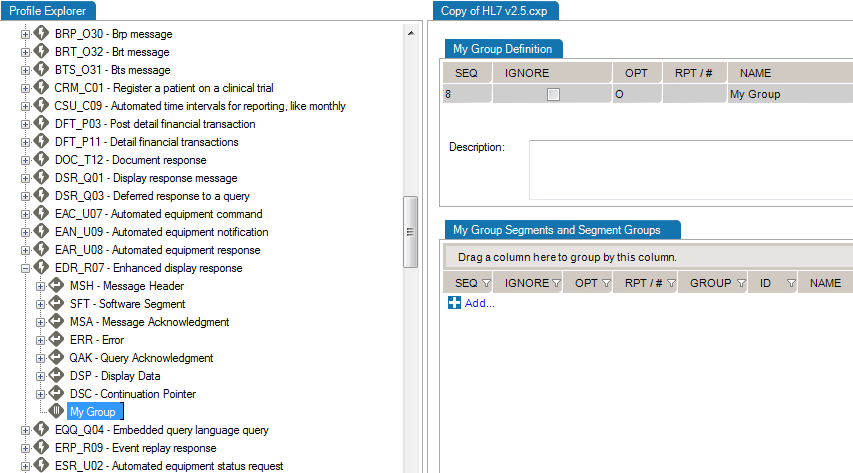
In the Profile Explorer, right-click on the first node.
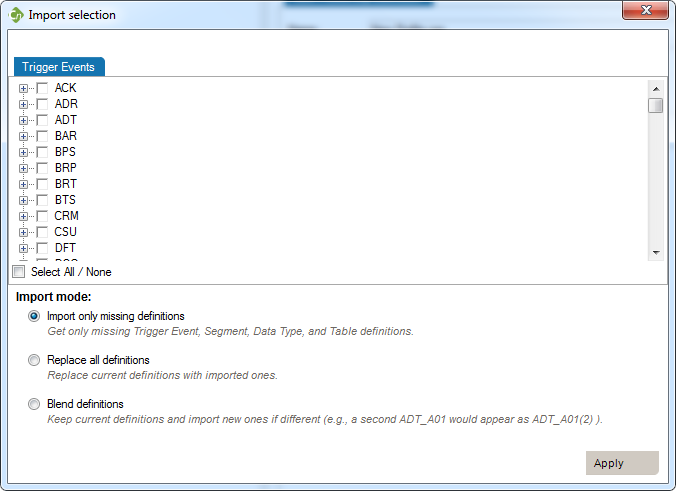
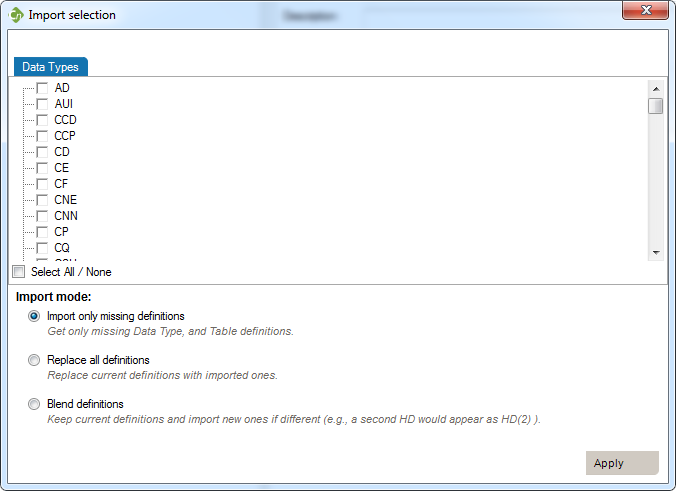
Select Import, Trigger Event... In the Import from a Profile window, select the source Profile you want to import event from. A new window, Import selection, opens. (Click to enlarge image below.)
You can add an event or message without segments, fields, associated data types, or tables. These elements must be to be defined later. Use this method when the event to be specified has not been formally defined in the HL7 standard.
In the Document pane, double-click on the profile you want to edit. Right-click on the first node and select Add, Trigger Event. A new trigger event is added.

Rename the trigger event and add a description.
Once you have added trigger events, you can edit segments, fields, and data types within your profile. See Editing a Profile for more information.
The Reverse Engineering tool enables you to create a profile from an HL7 log (or HL7 message file). A profile (also known as a specification or message definition) documents the message structure and content, including the use of Z-segments and custom data types.
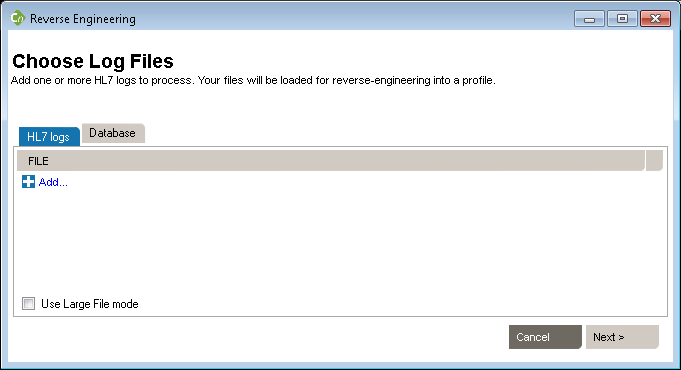
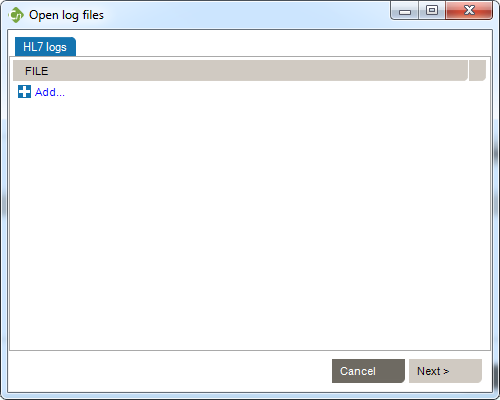
To open the Reverse-Engineering tool, click TOOLS, Reverse-engineerer HL7 Profile... The tool opens to Choose Log Files.
Then click Next to go to the next step. You can also load messages by querying a database.
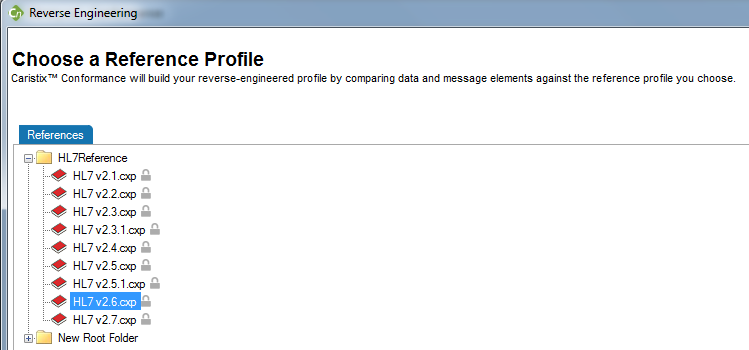
To begin building a profile based on the messages you just loaded, the software needs an established profile to compare against. Select a profile that most closely matches your messages, then click Next. (Note: the software picks up on the HL7 version specified in your messages, but you are free to choose another reference).
The messages load.
(If they load too slowly, you can click the Cancel button in the Loading dialog box and only messages that have loaded thus far will appear.)
If there are files, events, segments, or other data elements you don’t require for the profile, filter them out in this step (read Filter an HL7 Log to learn more), then click Next to go to the next step. To reverse-engineer all messages without filtering, simply click Next.

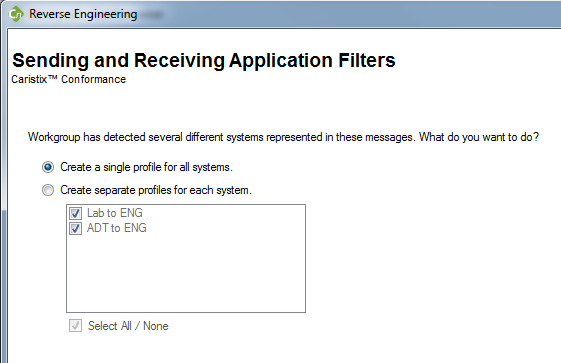
This step is optional. The software will detect all sending and receiving applications present in the messages. If only one combination is detected, this step is skipped.
You have two options here. You can either generate a single profile combining all applications represented in the message file, or you can create separate profiles for each sending and receiving application combination. The second option offers you the possibility to choose specific combinations; it will also run the next 5 steps consecutively for all selected combinations.
The software sets up the reference profile and messages you selected. Once the processing is complete, simply click Next to continue, as specified on-screen.
Choose between Basic and Advanced field analysis.
This choice lets you analyze fields and data values and assign known data types. If Conformance finds data values and fields that do not match known data types, an new data type will be assigned. You can manually edit the data types later, when the reverse-engineering profile appears in the Library.
Select Basic Field Analysis if:
you are not sure that data types are important to your analysis.
you want to speed up your analysis and focus on identifying details in other message elements such as events and segments.
This choice lets you fully analyze fields and data values. Data values and fields that do not match expected data types will be flagged. You will have the opportunity to either create custom data types to handle non-HL7-compliant data, or assign an existing data type.
Select Advanced Field Analysis if:
you need complete data type analysis for your interfacing project
you are comfortable creating new data types for further analysis
This section allows you to set more specific options for data and field analysis.
Once you make your selection in Step 2, click Next.
The software reads through the messages and segments to begin building the profile. When processing is complete, click Next to continue, as specified on-screen.
This step creates the field structure in your profile, assigns data values to user tables, and associates data types to fields and values.
If you selected Basic Field Analysis in Step 3, Basic Mode appears in Step 4. Workgroup processes the fields and data types automatically. When the processing is finished, click Next.
If you selected Advanced Field Analysis in Step 3, Advanced Mode appears in Step 4. Workgroup analyzes each segment for data values and fields that do not match expected data types. In other words, the software automatically performs a conformance check. When non-compliant elements are flagged, the software automatically suggests a data type and field structure. You can accept the suggestion, assign another data type, or create a new data type to handle the non-compliant values and fields.

Edit as needed to reflect maximum field length
Specify usage.
This tab provides a list of the data values that were flagged as non-compliant, as well as how many times they were found in the messages.
When processing is complete, click Next to continue.
This step will collect analyze the message flows in your logs (if you select this option at step 2). These message flows will be stored into the profile and available for future uses, to generate test messages for example.
This is the final step in the Reverse-Engineering wizard. Specify a folder to save the profile to or browse your computer to save it locally. Name the profile. And provide a description if needed. Click Save to close the Reverse-Engineering wizard and go to the Documents pane. (If multiple Sending and Receiving Applications were selected, the wizard will start a new analysis on Step 1)
There are two ways to add segments, depending on your needs. You can either add a segment defined in the profile you’re working on, or add one from a different profile.
Start here:
To create a new Segment definition, click on Add Segment, New. A new Segment definition appears at the bottom of the list.
You can also create a copy of an existing Segment definition by right-clicking on the source definition, select Copy and then right-click again and select Paste. A new Segment definition appears at the bottom of the list.
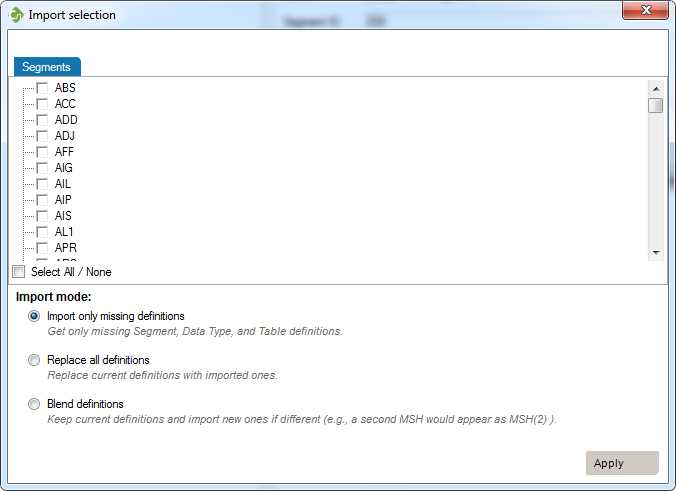
| Mode | Why Choose This Option | Action | Example |
| Import only missing definitions | Choose this if you only want to import element that don’t already exist in your profile. | This will import definitions that are not present in the current profile and all referenced elements. | Your profile doesn’t have a PID segment you’d like to add from HL7 v2.6. |
| Replace all definitions | Choose this if you need to replace all existing definitions with the imported definitions. | Replace existing elements with imported elements. This means that you’ll overwrite current definitions. The segment definition will change to the imported definition. | Your profile has an XPN definition that you would like to replace with the one from v2.6. |
| Blend definitions | Choose this if you need to import a definition from another profile, but also need to keep all definitions from both profiles. | This will import all selected and referenced definitions and will duplicate all elements that are different. | Your profile has a custom ZOD definition from one source system. A second source system uses a different definition. You need to code an interface for both definitions. |
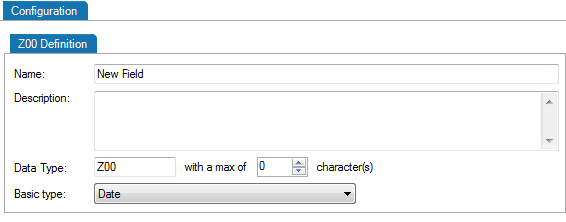
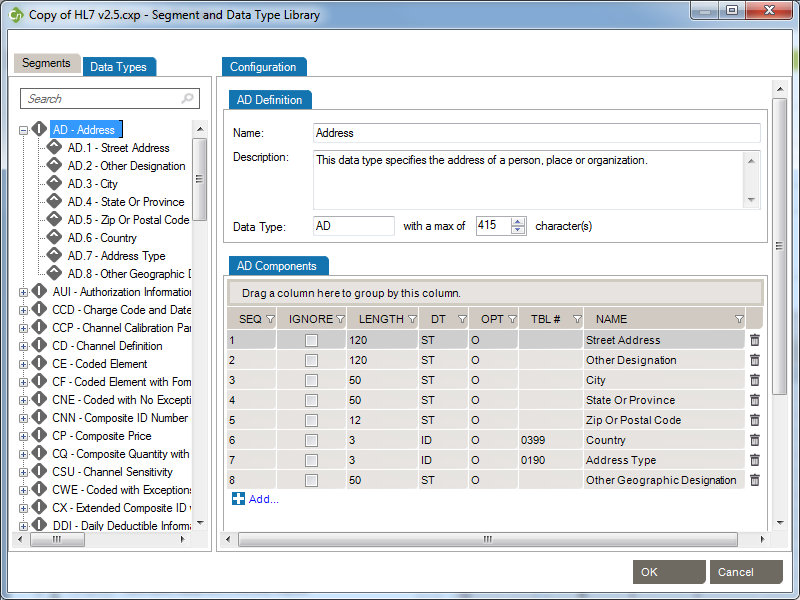
This is useful when you need to add a new data type for a Z-segment or a custom field.
| Mode | Why Choose This Option | Action | Example |
| Import only missing definitions | Choose this if you only want to import elements that don’t already exist in your profile. | This will import definitions that are not present in the current profile and all referenced elements. | Your profile doesn’t have a TS (time-stamp) data type you’d like to add from HL7 v2.6. |
| Replace all definitions | Choose this if you need to replace all existing definitions with the imported definitions. | Replace existing elements with imported elements. This means that you’ll overwrite current definitions. The segment definition will change to the imported definition. | Your profile has an HD definition that would like to replace by the one from v2.6. |
| Blend definitions | Choose this if you need to import a definition from another profile, but also keep all definitions from both profiles. | This will import all selected and referenced definitions and will duplicated all elements that are different. | Your profile has a custom TS definition from one source system. A second source system uses a different definition. You need to code an interface for both definitions. |
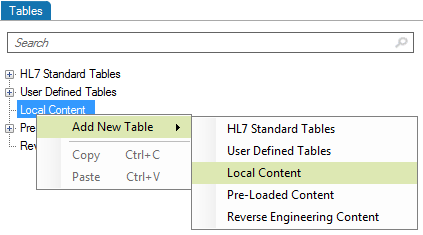
This is useful when you need to add a new table for a Z-segment.

Edit segments and fields, so you capture the data elements pertinent to your specification. Due to the nature of the HL7 standard (HL7 is object-oriented), any changes made are global changes and affect the entire profile.
There are two ways to access segments and fields:
Click the “+” sign to expand a message, then edit the segment.
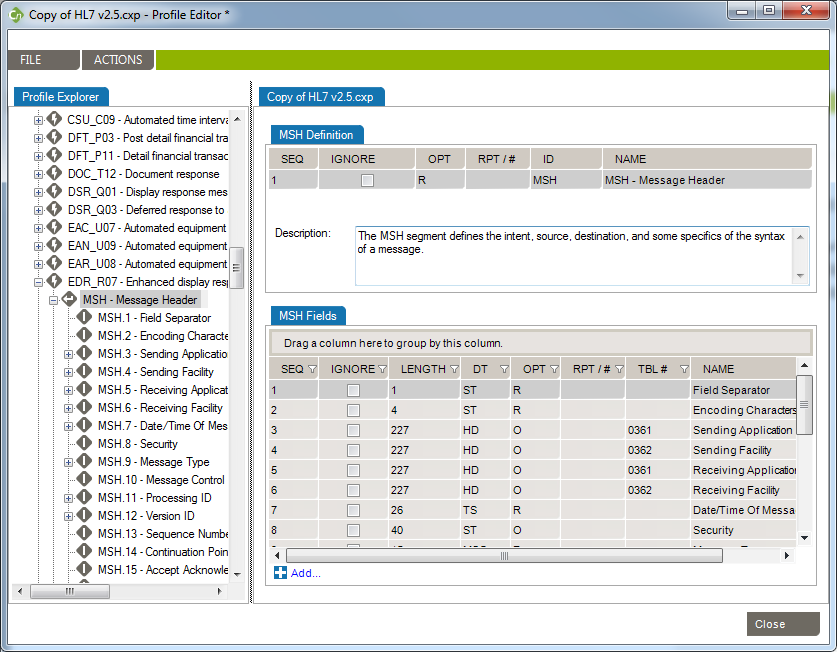
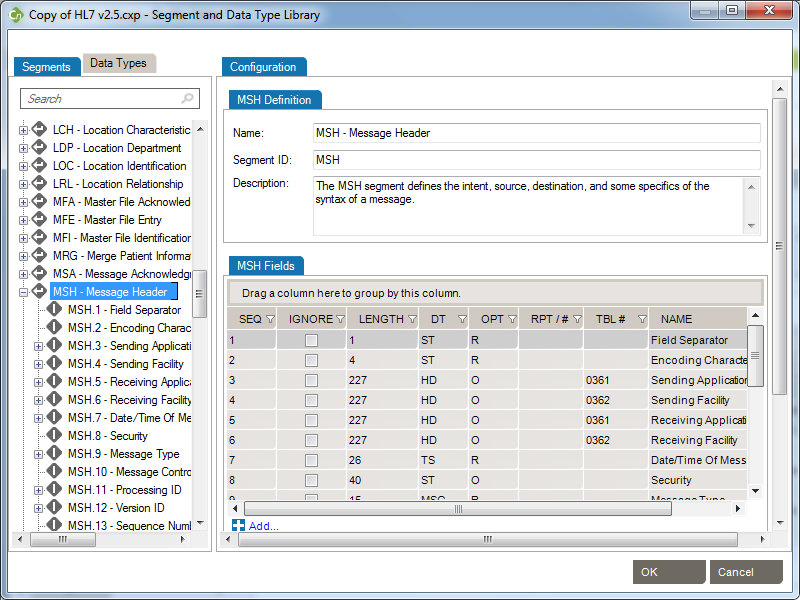
Right-click a message, and select Segment... A separate window displays the Segment Library. Expand the segment you wish to edit by clicking the plus sign.
To edit each field or individual component, click on the title. Under the Configuration tab, make the changes to each field attribute.
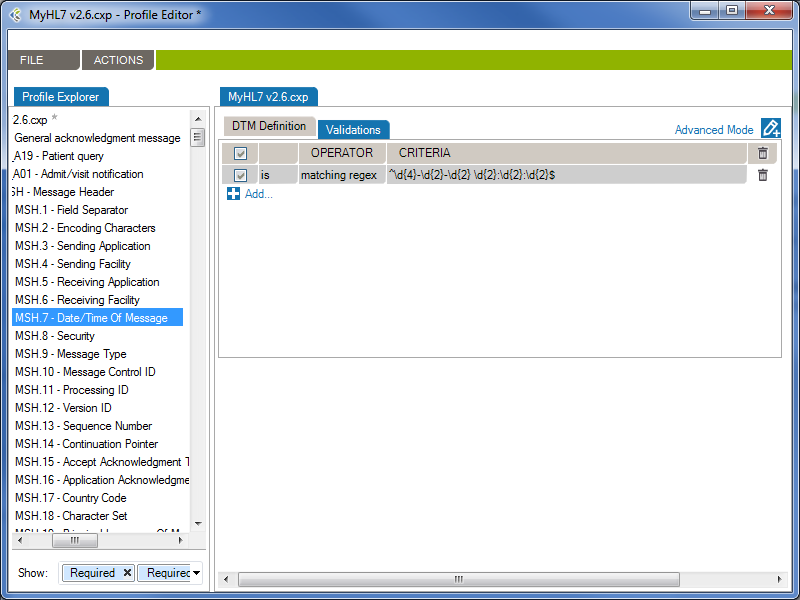
From the Validations tab, you can configure a set of rules that validate message content (data) is conform.
In the following example, the rule will validate (and raise conformance gaps) if the MSH.7 of a message does not conform to the format “yyyy-mm-dd hh:MM:ss”
Gap Analysis Filters are used to remove irrelevant gaps. Each filter contains a set of preset options which will optimize the Gap Analysis detection process in order to show you only the “dangerous” gaps. A Gap Analysis Filter contains:
When you’ll start a new Gap Analysis, after selecting the profiles to compare, you will be asked to select a Gap Analysis Filter.

There are 4 pre-defined Filters that can be used.
This filter should be used when both systems exchange messages between each other.
This filter should be used when the first system sends messages to the second system.
This Filter should be used when the first system receives messages coming from the second system.
This filter should be used when you want to compare profiles representing the same system. Ex: Comparing reverse-engineered profiles coming from sample messages of your development and production environments.
While working with the Gap Analysis Workbench, you can edit computed attributes, options and difference filters. These can then be saved as a Custom Filter, which can be re-used for other Gap Analysis.
In the Gap Analysis Filter Selection window, you’ll be able to Select a “recent Gap Analysis Filter”, or Load a previously saved filter from your Library.
You’ll be able to set your choice of the default filter for your subsequent Gap Analysis and will not be asked to select a Gap Analysis filter again. Whenever you want, you may apply another Gap Analysis Filter in the Gap Analysis Workbench with “File > Gap Analysis Filter > Change Filter…“
Here is a quick look of the Gap Analysis Workbench.
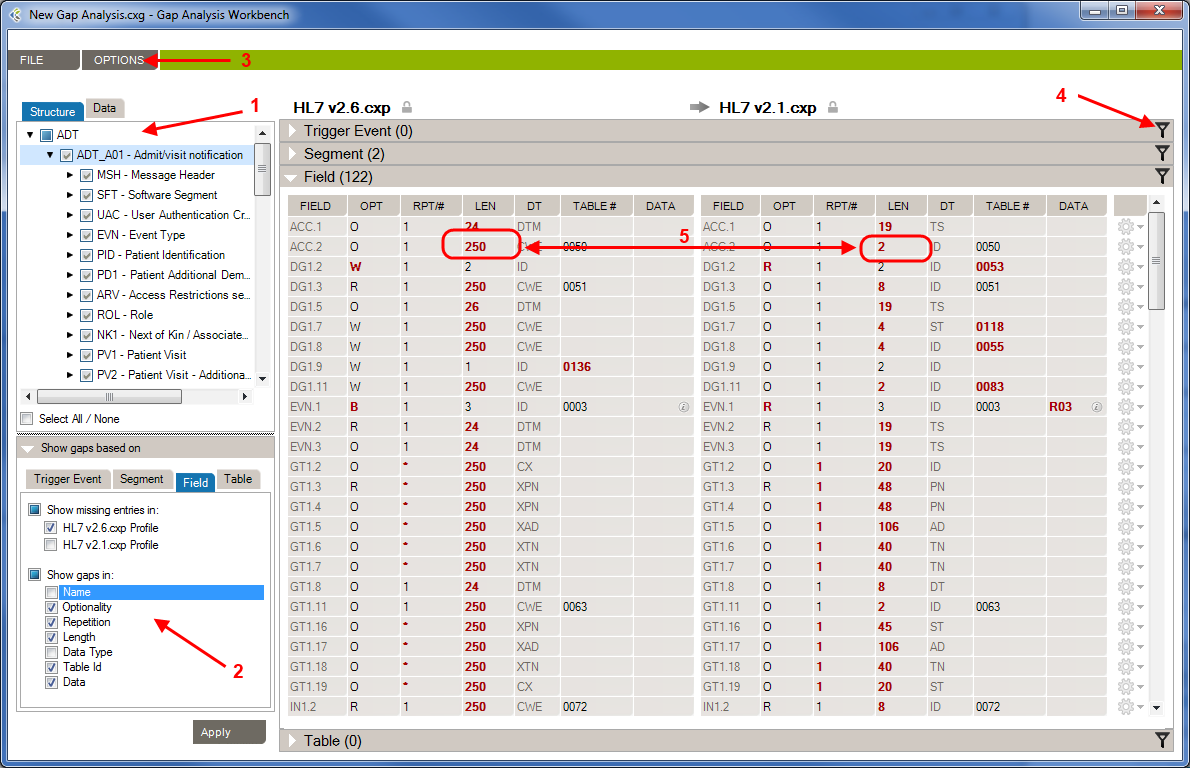
1- Structure/Data Element: In this section, you’ll choose which element from your profiles will be compared.
2- Attributes: In this section, you’ll choose which attributes, from the previously selected elements, will be compared.
3 – Options: In this menu, you’ll be able to set options to improve the accuracy of the Gap Analysis comparison process.
4- Differences Filters: Differences Filters are used to show differences that match some specific criteria. In other words, discard the differences that aren’t relevant to your analysis.
5 – Gap Analysis Results: In this section, you will see all differences between the selected elements of your profiles, based on your Gap Analysis filter (Attribute, Options, Differences Filters).
By default, when you first see the Gap Analysis Workbench, nothing is selected. When you run a Gap Analysis, you select the data elements that matter to your interface.
The Gap Analysis Workbench is split in 2 sections:
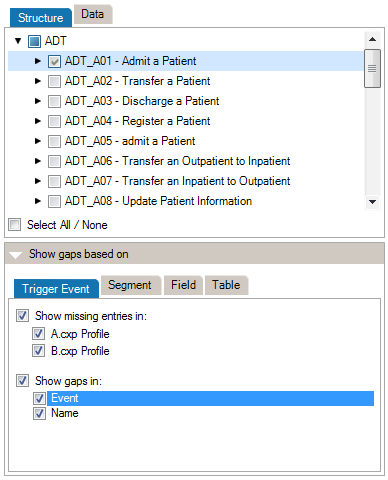
At the top of the Criteria Section, you’ll see the list of the messages, segments, fields, and data tables that are contained in the 2 profiles (or profile and messages) you are comparing. Select an element to include it in the Gap Analysis.
*(Steps prior to these examples)
**Choose HL7 v2.6 as the Reference and HL7 v2.1 as the Compared Profile.
By default, comparisons within Gap Analysis are on all attributes. Depending on your project and/or your context, you might need to focus on a subset of attributes and remove others. You can refine the comparison algorithm to narrow your comparison as follows.
The comparison is updated using the active attributes. Once in the Gap Analysis Workbench, you can refine the criteria used to evaluate gaps.
Each HL7 message element is described by a set of attributes. This list maps attributes per each message element.
| Trigger Event | Segment | Field | Table | |
| Event |  | |||
| Name | | | ||
| Sequence | | |||
| Optionality | | | ||
| Repetition | | | ||
| Length | | |||
| Data Type | | |||
| Table Id | | |||
| Label | | |||
| Comments | |
Refer to the Extra Content and Gap Analysis section for details around extra content and gap analysis.
To change this option:
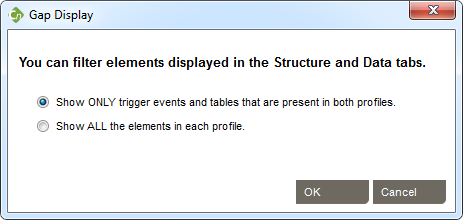
Choose Show ONLY… if you want to view the intersection set events and tables that are common to both profiles. Choose Show ALL… to show the union set.
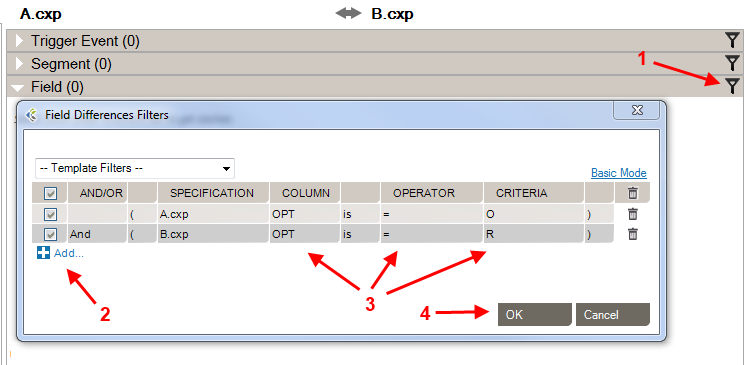
Differences Filters are used to show differences that match some specific criteria. In other words, to discard the differences which doesn’t match these criteria.
This can be used, for instance, to show only differences where the Field is Required in the Receiving Application but Optional (or Missing) in the Sending Application.
If a section contains active filters, the filter button will be shown as a full filter ![]() .
.
| Source: | Select the side from which you want to perform a filter. |
| Column: | Select the column from which you want to get the value to be compared. |
| Is/Is Not: | Include/Exclude differences that match the filter. |
| Operator: | Select the operator that you want the criteria and the column’s value to match. |
| Criteria: | Enter the criteria that you want to compare with the column’s value. |
| Checkbox: | Activate or deactivate filter (toggle on or off). |
| And/Or: | AND: applies both these filters. OR: applies either of these filters. |
| Parentheses: | Used for nested filters. |
| = | Covers values with an exact match to this data (this is like putting quotation marks around a search engine query) |
| > | Greater than. Covers filtering on numeric values. |
| >= | Greater than or equal to. Covers filtering on numeric values. |
| < | Less than. Covers filtering on numeric values. |
| <= | Less than or equal to. Covers filtering on numeric values. |
| containing | Covers messages that include this value. |
| present | Looks for the presence of a particular column. |
| empty | Looks for an unpopulated column. |
| matching regex | Use .NET regular expression syntax to build filters. For advanced users with programming backgrounds. Learn more about regular expressions here: |
| in | Builds a filter on multiple data values rather than just one value. |
| = Other Specification Value | Exact match to the other profile’s column value. |
| > Other Specification Value | Greater than the other profile’s column value. Covers filtering on numeric values. |
| >= Other Specification Value | Greater than or equal to the other profile’s column value. Covers filtering on numeric values. |
| < Other Specification Value | Less than the other profile’s column value. Covers filtering on numeric values. |
| <= Other Specification Value | Less than or equal to the other profile’s column value. Covers filtering on numeric values. |
While editing your filters, you can switch between Basic and Advanced Mode. Advanced Mode shows advanced settings for your filters. These settings help in the construction of more complex filters using AND/OR operators and parentheses for nesting. Otherwise, each filter will be applied one after the other.
If your filters contain advanced settings and you switch back to the Basic Mode, these settings will be lost.
Differences Filters Template are re-usable filters that can be applied to many Gap Analysis. A built-in can be selected from the drop-down list at the top-left of the filters dialog.
You can hide a difference (Gap Analysis Result row) automatically. To do so, right-click the row you want to hide, then click “Hide [row key] difference”. This adds a new difference filter entry and hide the selected row.
The Message Validation tool lets you compare an HL7 log against a profile in order to flag conformance gaps. This is useful when you need to troubleshoot data flow in a live interface that has been documented in Caristix Conformance.
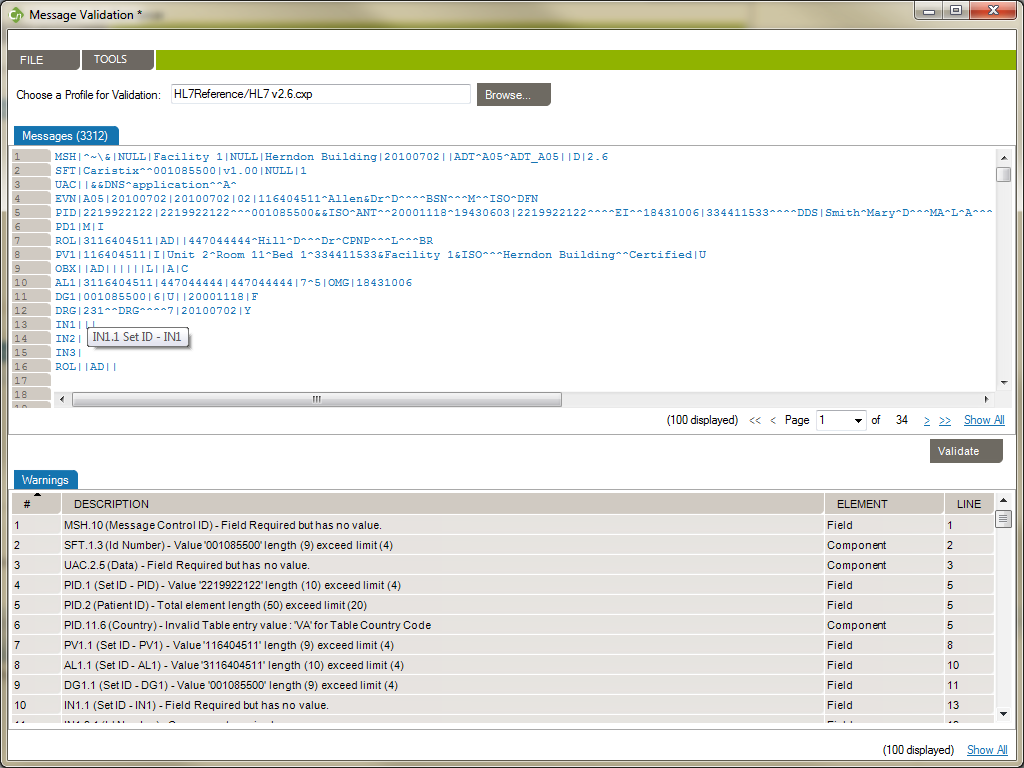
From the Message Validation tool, you can right-click any messages and open the Message Editor tool, or view the Message Definition.
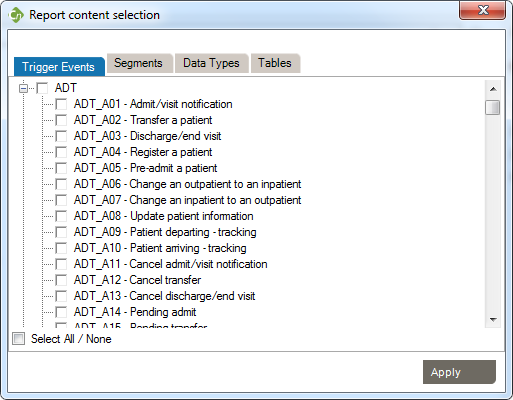
Generate profile reports of an interface specification:
Note: You can also synch your profile. This feature allows a user to update the Word document directly and synchronize the profile library with the upload document content.
From the Main Menu, click Tools, then Options in the drop-down menu that appears.
A new Options window opens.
![]()
Use the “Reset hidden tips” link to restore all hidden tips.