Release Notes – Caristix 3.1

This release is focused on test automation within the Caristix platform. We’ve developed significant new features to accelerate test creation and test execution. This will help you get your interfaces into production faster.

Tutorials

These new features add a lot of power to the Caristix platform. To get started on using them, check out our new test automation tutorial series.

Workgroup

New Test Automation Features

More granular control on test execution

  • Add timing intervals (before and after execution) at the Task level (just like Actions and Scenarios)
  • New option to retry sending on unavailable connection
  • Flag execution errors separately from validation errors
  • Specify segment delimiter to use when sending messages
  • Check if message received is MLLP compliant
  • Warn if messages shown in a Receive task are outdated

Cover more messaging workflow use cases with Task types

  • Receive multiple messages in a single Receive (Inbound) task (until a timeout or ‘x’ messages are received)
  • New HL7 File Reader Task
  • Manual Task lets the user specify a fail reason

Generate real-world test data with improved Variable Generators

  • Test automation variable generators are now as flexible as those in the de-identification function
  • SQL variable generator can be sequential

More code coverage through further validation functionality

  • Combine multiple validation styles
  • Enable message conformance to a profile (check that a message conforms to a profile)
  • Improved Message Comparison validation
  • Exclude/include fields to validate
  • Improved HL7 Validation
    • Use last sent and received messages
    • Support field repetition
    • Access specified index of a list variable (useful for mapping tables)
    • Compare against another field (useful for verifying that a field has been duplicated properly)
  • Validate the number of received messages based on an expected count (i.e. to check for filtered-out messages)
  • Option to validate using different profiles/spec for each task
  • All failed validations are evaluated and shown, not just the first one to fail

Faster test creation

  • Quickly create a test scenario by specifying sent and/or received messages
  • Default Connection option now split into two separate options for Send and Receive connections
  • Enable quick selection of connection by pre-defining connections to use
  • One-click variables: create a variable by right-clicking a field
  • Save validation rules for reuse in other tests

More reporting details for faster troubleshooting, better traceability and certification

  • Added more information to the validation failed error
  • Failed validations are highlighted in red in the message
  • Added more information in the Execution Report
  • Log received and sent messages to file

New De-Identification Feature

  • Field/Data Types can now be added via the Message Definition

New Message Maker Features

  • Export an HL7 message definition and data to an Excel Spreadsheet
  • Support copy-pasting messages
  • Non-compliant messages are now accepted

Cloak

New Feature

  • Field/Data Types can now be added via the Message Definition

Conformance

New Message Maker Features

  • Export an HL7 message definition and data to an Excel Spreadsheet
  • Support copy-pasting messages
  • Non-compliant messages are now accepted

Create a Healthcare Data Test Environment

Tip 15 in the Interoperability Tip Series

Test environment

Once you’ve developed a test plan and test scenarios, you need to configure your interface in a test environment.

Healthcare Data test vs. production

What do we mean by test environment? Essentially, another instance of your interface engine, along with simulations of the clinical systems you’ll be interfacing.

It’s important that you do your testing in a test environment, not in a production environment. It’s easy to think it can’t hurt to test in a live system, but here are three reasons why that’s a big mistake:

  • If you forget to cancel or delete all test transactions once you’re through with testing, you’ll end up with faulty transactions in your production systems.
  • You run the risk of impacting ePHI or HIPAA-protected health data.
  • You don’t want phantom data turning up in a CMS audit. Your clinical systems contain data that constitute a legal record.

So what’s the right way to go about it? Set up your test system using the same configuration as your production system, including the same rights and versions (it’s OK if IP addresses are different). Make sure you upload enough patient data, and that your tests cover your requirements (we can’t say that often enough).

Learn more about test automation

Want to see how Caristix technology automates testing? Check out this 2-minute excerpt on interface testing and validation  from our on-demand demo. See how to prevent costly project rework and delays.

http://youtu.be/J7D1I41zRnY

 Image credit: r.nial bradshaw

What is an HL7 Profile?

We get this question a lot. Over the past few years, we’ve come up with a few answers. Let’s bring this full circle into 3 simple bullet points:

  • A profile captures an interface specification. So profile = spec.
  • Some people use the terms profile, spec, and specification interchangeably.
  • Why build a profile? So that you save time building an interface and getting it into production.

Why build an HL7 profile?

  • The profile or spec also gives you interface documentation you can share with your team or your client.
  • The profile allows you to create a series of test scenarios – which in turn gives you a validation report.
  • Profiles are the core of the interface lifecycle. And the core to getting interfacing work done faster, with fewer moving parts.
  • That’s why profiles are a big part of our software.

The official HL7 International definition

We can also look at the formal definition of profile, introduced by HL7 International in the v2.5 specification. Here is an excerpt from section 2.12:

“An HL7 message profile is an unambiguous specification of one or more standard HL7 messages that have been analyzed for a particular use case. It prescribes a set of precise constraints upon one or more standard HL7 messages.”

In other words, a profile is a description of the data and messages that an interface sends and/or receives. The description covers:

  • data format
  • data semantics
  • message acknowledgment responsibilities

The description must be clear and precise enough so that it can act as a set of requirements.

HL7 profiles make it easy to automate interface management

In the Caristix world, your HL7 profile gives you the ability to automate the production of:

  • A gap analysis or mapping table between two systems. It’s much quicker to build the mapping table from profiles than by hand. It’s more accurate, too.
  • Site-customized interface documentation. Customizing your documentation means support calls go faster, with much less back and forth.
  • A test plan containing a series of validation tasks to automate your testing. This means you catch glitches before they go into production.
  • A validation report for your testing. This means you can show that the work’s been done.

HL7 profiles automate the production of 4 key interfacing artifacts

You can use the profile before the servers, the network connectivity, and the database configuration are set up.

Interface documentation

HL7.org uses the term “Conformance Statement” to cover conformance requirements. At Caristix, we prefer “Interface Documentation” because it doesn’t refer to a specific template or content. Whatever the term, your documentation should be flexible enough to contain whatever information is relevant to the project (and no more) so the documentation can flex with any integration project.

Gap analysis report

Using an HL7 profile, you’ll be able to map the differences between the profiles of the systems you need to connect. A Gap Analysis Report helps you document each difference or gap, providing a list of items the interface will have to address. These might include the data format, location or another requirement. For more on gap analysis, read the Caristix blog on gap types and how you go about performing a gap analysis.

Test plan and validation report

You can also use the HL7 profile to generate valid (and known invalid) HL7 messages so your newly configured interface can be tested automatically. When needed, the profile can help to test the data mapping defined in an interface engine. The profile can also help to validate that data semantics (the meaning of data) is consistent across the board.

HL7 profiles and automation

You can generate profiles and automatically create gap analyses, documentation, test plans, and validation reports using Caristix Workgroup software. Check out Part 1 of our on-demand webinar here:

http://youtu.be/uOBjjEpKLWY

 The full 16-minute webinar

Like what you see in the intro above? The full webinar is available for viewing on-demand right now. Click this link to get to the full video.

For more information about Workgroup, visit the Workgroup product page.

Data Workflows and Interface Testing

Tip 14 in the Interoperability Tip Series

interface testing and data workflows

In last week’s tip, we talked about capturing workflows.

Here’s why. Before you can conduct any  interface testing, you must understand what to expect of your workflows. This should include common workflows – such as a patient being transferred – involving the use of the products that will be interfaced.

For example, in many hospitals, emergency department and in-patient ADTs are two separate systems. A new patient that comes through the emergency department would be registered in the ED’s ADT first. And if she is transferred to Med/Surg, you would need to populate the main ADT, either through an interface or manually by re-entering the data.

Or if you’re creating an interface to move patient charge data from a surgical information system to a billing system, you would need test scenarios in which:

  • Patient demographics and patient ID are incomplete.
  • Billing item information is incomplete.

Interfacing workflows: normal use cases and edge cases

And in fact, this is why is you need to test normal use cases as well as edge cases – where the data is incomplete, or otherwise deviates from the norm.

Interface testing: is the engine behaving?

With that understanding in place, you can test to make sure the interface engine behaves as expected for standard – as well as unexpected – workflows. When it comes to edge cases, you’ll need to consider more possibilities.

 For example, if your interface engine does not accept a certain range or type of data, you’ll need to send such data to it – e.g., a date of birth of 1850 or entered in reverse – and see if the interface triggers an error.

Does the code have new errors when you correct a previous bug?

Are you introducing errors during testing? You’re testing the data format and confirming that you’re not introducing errors.

When you code an interface, your specification will be based at least in part on sample messages. By definition, you know that these messages work. So don’t use only these sample messages in your texts.

The danger of limited test messages in interface testing

Let’s say your test patient in your sample messages is called John Smith – with four characters in the first name. You test your interface using these sample messages, and everything works. But three months from now, your hospital admits a patient named Benjamin O’Donnell, only no one tested for 8 characters in the first name and an apostrophe in the last name. The interface doesn’t like it, and you have a support call (and a none-too-happy clinician) to handle.

This is where test automation comes in

By automating your testing, you will feel freer to test at any time and you’ll be more confident about making changes because you’ll know you can easily test each time you change the interface as you’re coding.

Learn more about test automation

Want to see how Caristix technology automates testing? Check out this 2-minute excerpt on interface testing and validation  from our on-demand demo. See how to prevent costly project rework and delays.

Image credit:  TheTurfBurner, Creative Commons licensed for reuse

HL7 Test Automation: Where’s the Low-Hanging Fruit?

HL7 Test Automation: Low Hanging FruitTesting and validation are important tasks, as we explained in the Interoperability Tip Series and the HL7 Survival Guide.

Shouldn’t interfacing be easy by now?

Testing is what takes the longest when you’re building an interface. So when you hear about interface engines that allow you to get an interface into production in a couple of hours, that’s absolutely true. Coding is quick with modern interface engines. But bear in mind that coding time seldom includes testing. We’ve worked with organizations that can code a change in 15 minutes, but need 2 weeks to actually implement — due to testing.

Given the need to test, test automation can save you a lot of time.

Why Automate Testing?

Simple: the benefits are clear. Organizations that adopt test automation spend less time on project lifecycles. They meet tighter deadlines with less project effort. They uncover more bugs, before end-users are impacted. The code is easier to maintain. In a nutshell, when it comes to software testing, it’s all about “find early, fix cheaply.”. Interfaces are no different; after all, they are simply forms of code.

Why Automate HL7 Testing? 6 Key Reasons

1. Save time – the most obvious benefit.

2. Repeatability. Set a series of tests. Run them as often as needed, without manual intervention. Validate that you didn’t break anything simply by pushing a button. Apart from saving time, you get consistency. If you’re a vendor, you ensure that the most critical tests are run across all sites, regardless of client availability. So you deliver consistent quality. The result is less downtime and increased client satisfaction at lower cost.

3. Avoid frozen interface syndrome, maintain interfaces more easily.

4. Implement changes much faster, so clinicians gain access to newer functionality and information in source and destination systems. Ultimately, this puts you on the path to easier, more agile interoperability.

5. Ensure traceability. Test reports allow you to document that tests succeeded and/or failed over time.

6. Increase test coverage. More testing works out to better quality. Manual testing takes so much effort that you can’t test and retest everything. You end up focusing on just the highest risk items.

What If You’re Busy?

These are great reasons to embark on test automation. The organizations that embark on automation get it. But there are other teams that are so crazy-busy, with their heads practically underwater, that they can’t add any more to their plates.

We get that. New methodologies and new ways to get things done put you on a learning curve. Even if the payoff is worth it, it can be hard to get started.

What if there was low-hanging fruit? There is now. We’ve put together some basic tests/validations that are tedious to run manually but easy to automate. If you’re looking for the low-hanging fruit of HL7 test automation, start with segment and field validation here:

Validate Field1 = value
Validate Field1 = Field2 within the same message
Validate Field is X characters long
Validate Field contains a limited set of characters
Validate Field does not contain a set of characters
Validate Field is a valid date

These tests will get you going. They’re easily set up and run easily. Adapt them to your own test automation software. Or if you want to get HL7-specific, ask for an intro to Caristix software to check them out. They’re quick to set up and run repeatedly.

Interface Test Types

Tip 13 in the Interoperability Tip Series

Last week in Tip 12, we covered when, why, and what to test when you’re working with interfaces. This week, we’re looking at the different interface test types a team needs to perform.

Make sure that your tests cover your interoperability requirements. These will vary depending on the systems you’re working with. Be sure to also cover the following:

1. Workflow

Confirm the interface engine handles your standard workflows as expected.  Just as a reminder, workflows are the series of messages (ADT, lab orders, lab results, etc.) that reflect information flow. You might have dozens, depending on the complexity of the systems and patient care scenarios in your hospital or client site.

2. Edge cases: unexpected values

If you’re testing birth dates, include 1899 as well as 2017. Include dates with the month and day reversed. Try different abbreviations for the days of the week. Check all caps on names. Check accented names. Check hyphenated last names (Lowe-Smith), and those with an apostrophe (O’Donnell). They’re more common than we think, and they can trip up an interface, especially those with customized delimiters.

3. Performance, load, and network testing

Though interface developers don’t normally test network infrastructure, you may want to do this during the validation phase to see how workflows and data are impacting overall infrastructure performance. A high-volume interface may need more load testing than a low-volume interface, depending on your interface engine and connectivity infrastructure.

4. Individual systems

You should test each system on its own, kind of analogous to unit testing in software development. For instance, in addition to making sure the surgical and billing systems handle workflow end to end, make sure they work separately.

Learn More about Test Automation

Want to see how Caristix technology automates testing? Check out this 2-minute excerpt on interface testing and validation from our on-demand demo. See how to prevent costly project rework and delays.

http://youtu.be/J7D1I41zRnY

Healthcare Interface Testing: When, Why, and What to Test

Tip 12 in the Interoperability Tip Series

healthcare interface testing
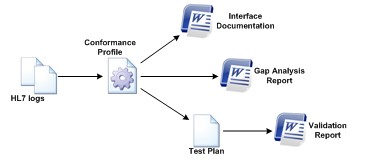
In tips from the past few weeks, we covered two requirements-related artifacts analysts must create: 1) profiles or specs and 2) gap analyses, which include mapping tables.

In this tip, we look at testing an interface. And see how it doesn’t have to be an exercise in frustration.

When to Test: 3 Phases

You need to perform healthcare interface testing at 3 different phases in the HL7 interface lifecycle: during configuration and development; during the formal validation phase; and during maintenance.

Why Test An Interface?

When you start to develop and iterate on your interface, you run tests to avoid introducing new problems – you check and test your code to make sure you are not injecting errors. This is true both during interface development or configuration and while in maintenance mode. This testing helps you determine whether or not the interface makes sense and meets your requirements.

Once you’re satisfied with the interface, you move to validation testing. This is when you determine if the interface will work with and meet the requirements of your clinical workflow. Specifically, you test performance, extreme data cases, and how well the interface supports large volumes. By figuring this out before go-live, you save a lot of implementation headaches, and alleviate the time clinicians need to spend helping you validate the interface once you go live.

What Matters: Reduce the Cycle Time

Healthcare interface testing can be time-consuming. Some organizations find that testing activity is the most time-consuming part of interface development. George, a Caristix client who works for a healthcare vendor, explains, “The implementation process for our product runs several months. Throughout that timeline, we have checkpoints where we need to make sure the feeds are sending data that our product can consume. First, when we scope the feeds, we have to make sure we document all the gaps and work out with the customer how to bridge them. Then the feeds get built. And we test them, and find more gaps. We fix those gaps, and then test, and find more. The cycle repeats as needed until all gaps are resolved.”

That’s the essence of testing.

The Next Step: What to Look for in a Test Tool

So that’s the what, when, and why of testing. But how do you handle testing efficiently? The key is to automate HL7 interface tests.  While you need to spend time during the development/configuration phase setting up the tests, during the validation phase, you can take advantage of automation and save a lot of time. Of course, Caristix offers test automation. Some interface engines include test tools. Regardless of the source of your test software, make sure you can do the following:

  • Be able to connect to web services or a database, such as by calling a web service, and check in the database after sending a message
  • Validate inbound and outbound messages
  • Validate ack and nack
  • Generate values and test messages from a profile or specification, and generate a large volume of data/messages if you’re conducting volume testing
  • Repeat test plans/scenarios, and create reports

We’ll cover more on testing in the upcoming weeks. Stay tuned for guidance on test types, test reports, and test systems.

Learn More about Test Automation

Want to see how Caristix technology automates testing? Check out this 2-minute excerpt on interface testing and validation  from our on-demand demo. See how to prevent costly project rework and delays.

Interfacing Management Maturity Model: Part 2

9 Diagnostic Questions: Interfacing Management Maturity Model

9 diagnostic questions interface managment curveLast week, we introduced a maturity model for interfacing management. We explained how organizations progress through 3 distinct stages: Manual, Message, and  System.

This week, we’ll cover key diagnostic questions. These 9 questions will help you determine which stage you’re in and whether you should consider moving to the next stage.

1. How many sample messages are you using when scoping?

This gives you an idea of which stage you’re at. A handful of messages and you’re likely at the Manual stage of the interface management maturity model. The Message stage is characterized by analysts building out interfaces and interfacing capabilities based on message analysis, usually done by slicing and dicing about 50-100 messages to uncover exceptions to a spec or standard. Is it time to bump up to the next level and enable analysts to run through a larger volume in the 100, 000 to 1,000,000 range?

2. How long to bring an interfacing project to fruition?

Hours, days, weeks, months? Are those multiple iterations and circular processes eating up the time of your developers and analysts? Is your potential revenue sliding down the drain? You gain productivity by moving up the curve. 

3. How is your documentation?

If you’re in the Manual stage, chances are you have little to no documentation such as a list of requirements, a test plan, etc.  But at the Message stage, chances are you have an abundance of documentation, because it mushrooms at this stage: you’ll have requirements, mapping tables, gap analyses, message lists, a unit testing plan, a validation plan, and much more. Not to mention document versioning on each of these. That’s when you’ll want to consider establishing a single document repository that works across all projects. At the System stage, documentation becomes more unified. You’ll use your system-based analysis to have a single source of source of truth – an HL7 profile for instance – and pull out different elements depending on the audience. Your test plans should flow directly from the scoping and profile work.

4. Do you have templates and are they usable?

Templates are part of your documentation process, which really gets going at the Message stage. At the Message level, they tend to multiply. It becomes a headache to manage them. There are often a variety of (sometimes competing) format: Excel. Word. PDF for read-only sharing. Emailing back and forth can become a versioning nightmare. Oftentimes, a manager will look to a shared drive to manage templates and documentation at the Message stage. But this is when it makes sense to move to the System stage and seek out content repositories with multi-user sync capabilities to retain a single source of truth. 

5. Are there unplanned or unexpected delays?

The earlier the stage, the more likely unplanned delays are. But the root causes of delays will vary depending on the stage. At the Manual stage,  delays can crop up because of a lack of requirements-gathering allows potential show-stoppers to slip through. At the Message stage, delays have to do the volume of work. At the System level, delays are few and far between. The key consideration: understand if your project scoping is adequately identifying your timeline and anticipating potential areas of concern so you can fill in needed information before the concerns become critical.

6. Can you estimate costs?

At the Manual stage, it’s hard to. The lack of process at this stage leads to a lack of predictability. What teams often do is log project hours and FTE costs, and attempt to use retrospective data to predict next project. But if the requirements for the next project are different (and unknown), the ability to predict remains low. At the Message stage, the organizations with strong project management capabilities often can estimate costs. Some can even do it per interface type. But the cost curve keeps rising.  At the System stage, they are not only estimating costs accurately, they are also bending the cost curve.

7. How many projects?

As a rule of thumb, the further along the maturity curve, the more projects a team can handle. You should expect the same headcount to be able to handle a greater volume of interfacing projects as the organization goes up the curve.

8. How long does testing take?

At the Manual stage of the interface management maturity model, testing is often ad-hoc. There might not even be testing plan; the interface is simply unit tested until it works. There is no way to really gauge testing effort, although there may be a heroic effort to get it in by a deadline. At the Message stage, a testing plan is in place — probably a rigorous testing plan. So much so that a 10 minute change to the interface code can take 2 weeks to test before it goes into production. At the System stage, your requirements drive testing. You’re also able to automate the testing, so a 10 minute change to the code takes 2 minutes to test through a series of test scripts.

9. Is go-live ever delayed?

At the Manual stage, it’s entirely possible not to even have a target date, or have a target date that will flex. At the Message stage, the team will often scramble to meet a deadline. And at the System stage, thorough scoping with system-based HL7 profiles and gap analyses lead to more accurate, more confident project planning. These teams hit the go-live dates comfortably because they have a handle on the entire interface lifecycle.

 Your Feedback

We’ll be adding to the model over the coming weeks. We’ll address the process deliverables, metrics, and organizational needs and impact. Are there other topics you’d like to see? Let us know in the comments.

Download the HL7 Survival Guide

Download the HL7 Survival Guide

Interface Gap Analysis: 3 Reasons Why You Can’t Skip It

Tip 11 in the Interoperability Tip Series

3 Reasons Why You Can't Skip Interface Gap Analysis

Last week, you learned about doing a gap analysis – mapping differences  between the systems you’re interfacing. Today, we’ll cover why you need this artifact.

1. Interface Requirements

No interface matters unless those coding the engine can accurately scope the interfaces they need to build. You need a way to communicate who does what on an interface. Is the vendor changing a field? Is the interface engine handling the field transformation? It’s critical that you pin all this down in an interface gap analysis before interface development begins, or you will be wasting time iterating through multiple changes later in the interface lifecycle.

2. The Timeline

Without a gap analysis that details your requirements, you’ll end up implementing a generic interface that doesn’t address your organization’s unique needs. Your end users will be frustrated that they can’t easily access all the information they need. And you’ll end up wasting time, money, and effort troubleshooting after going live. With a gap analysis, you can avoid extended go-live periods, significant maintenance at increased cost, and unhappy clinician end-users who are unable to access the data they need to deliver appropriate patient care.

3. Predictable Effort

Gap analysis work upfront, before the interface is built, lets you stay on track, reduce defects during the build, and get into production faster.

Downloadable Interface Gap Analysis Template

Looking for more guidelines? Use this sample interface gap analysis template to get started.

[caristixbtn style=”green” text=”Download Template Now” url=”https://hl7-offers.caristix.com/hl7-interface-gap-analysis/” blank=”1″]

Introducing an Interfacing Management Maturity Model

It’s clear that the needs around interfacing and integration are exploding. To match that need, Caristix is introducing an interfacing management maturity model. If you’re reading this, you know that there is a lot of implementation expertise available from analysts, developers, and consultants. But at the organization level, capabilities vary. Many organizations are seeking benchmarks to see where and how they can grow and adapt to meet their needs. That’s where our model can help.

This interfacing management maturity model is not about the engine or the standards. This model zeroes in on organizational capabilities. We look at an organization’s ability to use interfacing to meet their needs around data exchange, interfacing, and interoperability. The key question: how does a team scalably support their organization’s needs to share or exchange data while controlling costs? As organizations mature, they aim to act quickly to meet strategically driven integration needs, support ongoing operations, and support initiatives such as Meaningful Use.

Below are descriptions of what teams do at each stage. Over the following weeks, we’ll be filling out this model with further points.

Getting Started with Interfacing and Integration

Before you hop on the interfacing management maturity curve, there is a learning curve to get through.

The learning curve with integration is deep and steep. Many smaller vendor organizations who haven’t yet had to deal with interfacing or data exchange start here. CIOs, integration architects, and VPs of R&D have to make calls that are going to decide the future of their organizations or businesses here. They make critical architecture decisions at this stage. The key activity at this stage is learning and training. And the key deliverable is fundamental: integration architecture.

So it pays to get educated. It pays to get training and bring on a consultant with healthcare integration expertise to help with the decision-making.
 

Manual Stage

Once you’re past the Learning Stage, you start to get your feet wet with building interfaces.

Building and coding the first few will seem intuitive. If the team is working with a modern interface engine, it should be.

At this stage, you might see little or need to gather requirements or do any scoping. Some analysts reach out for sample messages from either a system vendor or the hospital team. They will make do with just a dozen or so — one or two of each message type you’ll be needing for the project.

Once the interface is built, the developer connects the systems. And surprise: the interface doesn’t work. Messages aren’t transmitted, they populate unexpected fields. So the analyst and the developer spend time validating and fixing defects. It’s nearly impossible to predict end dates and timelines, and the team (or client) doesn’t have a firm grasp on the effort required to get to a production-grade interface.

Message Stage

Once you’re past the Manual Stage, you’ve learned about the power of scoping and requirements gathering.

At this stage, you’re building out interfaces and interfacing capabilities based on message analysis. To gather interface requirements, the team works at the message level to slice and dice to uncover exceptions to a spec or standard. Sample questions: are there z-segments? Are there exceptionally long field lengths?

Requirements-gathering is based on getting to good-enough – say about 80% of the way.

Unfortunately, 80% isn’t good enough. Requirements gathering during the Message Stage follows an unexpected (and unwelcome) twist on the 80-20 rule, turning it into the 80-20-80 rule.

80-20-80 goes like this:
•    Analysts uncover 80% of interfacing requirements by slicing and dicing at the Message level.
•    Developers get the remaining 20%  during interface coding.
•    But that hidden 20% will account for 80% of actual coding work

The project slows down because of rework and a need for extensive validation. Validating the interface is  characterized by an unpredictable number of versions and iterations –because the team can’t realistically predict effort or project duration. If time isn’t a factor and low-volume interfacing is acceptable, the team can stay in the Message Stage indefinitely. Likewise, if you’re maintaining stable interfaces and not building new ones or updating source and destination systems, remaining at the Message Stage may work for the organization.

The System Stage

After the Message Stage comes the System Stage. This is a conceptual leap.

For most teams, it’s a mental-model leap to go from messages and message validation to system analysis and working directly with specs or profiles.  Many analysts and their managers are used to thinking in terms of message analysis.

But the ones who are leaping forward to profiles are seeing gains in productivity.

For instance, some profile builders (such as the one we build in Workgroup) enable analysts to run through a large volume of messages  — in the 100,000 to 1,000,000 range. This enables analysts to capture requirements more completely and cover more use cases contained in the data. As the interface is developed, it needs much less rework what you find in the Message Stage. As a result, testing and validation is smoother. The bottlenecks encountered in message-based validation disappear in the Profile Stage. Projects are more predictable, with fewer iterations and less project effort. Project managers can confidently hit target dates with allocated resources.


Your Feedback

We’ll be adding to the model over the coming weeks. We’ll address the process deliverables, metrics, and organizational needs and impact. Are there other topics you’d like to see? Let us know in the comments.

Download the HL7 Survival Guide

Download the HL7 Survival Guide