Interfacing Capabilities and Costs

When you first start researching the interfacing capabilities of each engine vendor, you might be overwhelmed. If you’re in a startup, small company, or a hospital with fewer than 100 beds, get ready for sticker shock. Interfacing and integration don’t come cheap.

And if you’re in a bigger organization and you need a new engine, get ready for complexity and value propositions that may be overkill.

healthcare interoperability maturity curve

 This post will help you match your needs to the capabilities in the market. And we’ll look at the hidden costs beyond the engine technology.   
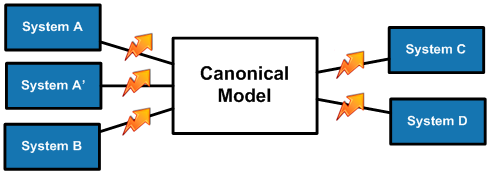
Point to point

If you’re just getting started with interfacing, you’ll want to consider simple point-to-point connections. These are interfaces that are custom-built between two systems, and they don’t go through an engine. The advantage? You can get up and running quickly. But this technique is hard to scale beyond a handful of systems, since every connection requires its own interface. Also, watch for HIT vendor costs. One thing that suprises teams that are new to interfacing is that many EMR and HIT vendors charge for access. Even if you build your own interface, they will charge a licensing fee for 3rd party access to the data in their systems. And if you rely on these vendors to change or add new interfaces, the cost rises quickly.

Interfacing capabilities

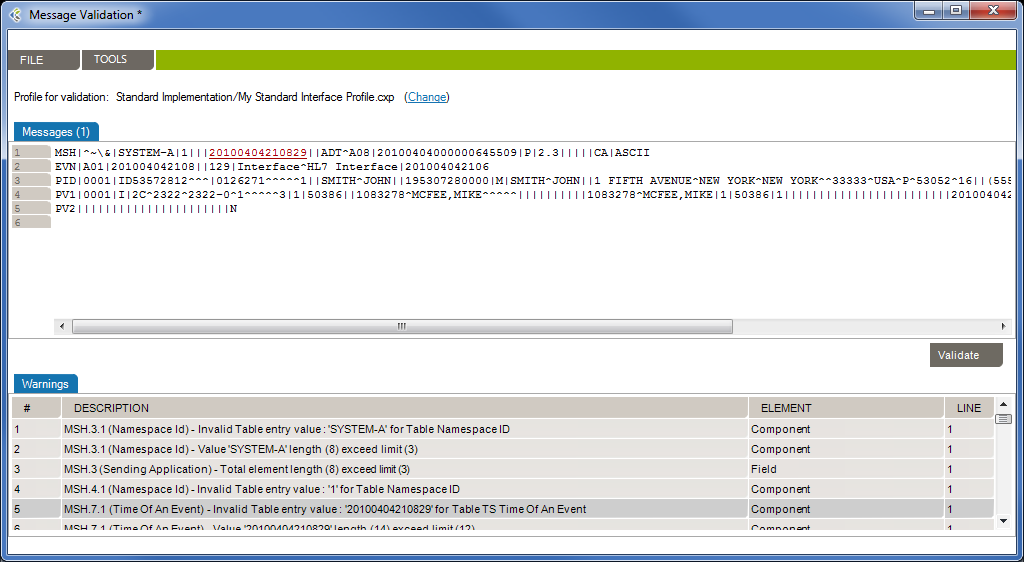
Once your needs expand beyond a handful of interfaces, you’ll look for an interface engine. While the complexity of coding varies from one engine to another, expect a learning curve and expect to invest time to get up to speed.

On the other hand, you’ll find that engines make it easier to handle changes from one transport protocol to another – for instance, blending TCP/IP and web services. And you’ll find that per-interface costs can drop, since you’ll reduce your dependency on EMR and HIT vendors for changes to their message formats.

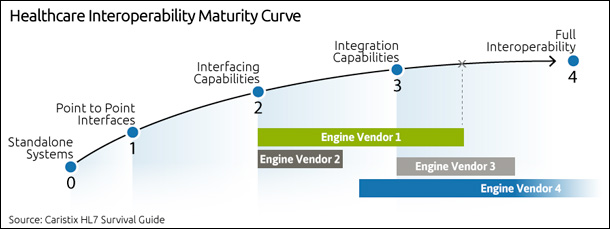
Integration, workflow management, and analytics

To meet the growing needs of IDNs and HIEs, many engine vendors now offer greater integration and workflow management capabilities. So for instance, you’ll find workflow management features that allow an interface to change as clinical workflows shift.

Another capability? Data analytics. Over the past 18 to 24 months, some vendors have been promoting their ability to work directly with the data flowing through the engine. You can query clinical and operational data directly to improve processes, decision-making, and care. This is powerful. But where you may run into issues is in the infrastructure. Just be aware that your infrastructure may need expensive upgrades in order to use these capabilities.

The real costs

Now that we’ve looked at the capabilities, let’s turn to the costs. Sure, you’ll invest in licensing and infrastructure – software and hardware. But your biggest line item will be the development costs.

What are the hidden development costs?

First, some interfaces are just more complex than others. For instance, a lab order interface may take twice as long to create as a registration or scheduling interface. But overall, interface development costs fit a pattern, which breaks down as follows.

Research and specification development

  • Reviewing product specs, developing a documentation template for project communications and populating it.

Gap analysis, mapping tables

  • Reviewing codes in both systems. Understanding differences in code sets. Creating mapping tables.

Interface build or coding

  • Actually writing the interface in the engine or coding by hand.

Unit testing

  • Testing each piece as you build the interface. This iterative process can take 10% of your coding time.

Integration testing

  • Testing clinical or operational workflows that the interface enables, in the test environment, before go-live.

Script development

  • Are there scripts that have to be developed for your interface to work? Expect development time and costs if this is the case.

Documentation

Communications costs

  • A hidden cost that can escalate, especially if you don’t have a collaboration platform to keep track of versioning.

Post go-live support

  • The more applications you have, the higher the costs will be.

Reducing development costs

You can reduce your development costs by incorporating interface lifecycle management into your technology stack. Interface lifecycle management software can reduce the time and cost of research and specification development, gap analysis, testing, and more. As your requirements become more complex, the more you’ll bring your costs down with interface lifecycle management best practices and software.

Check out Caristix Workgroup for a full interface lifecycle management suite  (16-minute on-demand demo available).

What is De-identification?

Young Man with a blank paper hiding his face

De-identification is a technique to mask or remove protected health information (PHI) from sensitive patient data. If you need to use production HL7 data, you’ll need to find a way to protect PHI. De-identification is a good choice when you need to:

  • Troubleshoot an interface
  • Populate a test system
  • Gather data for analytics

Why de-identify?

There are a number of reasons you should consider de-identification.

1. Leverage the richness of production data

When you test a system or an interface, you’ll cover the most realistic test scenarios with realistic data. What is “realistic data”? Customized fields, Z-segments, the code sets that your health system (or your customer) really uses. De-identifying production data will get you realistic data. Learn more about HL7 testing in Chapter 9 of the HL7 Survival Guide.

2. Support HIPAA, protect patient identifiers

Based on HIPAA, you need to protect 18 types of information that could potentially identify a patient. This covers a range of items: names, locations, phone numbers, social security numbers, even medical device numbers. Before you use the data, make sure you these identifiers are protected. De-identification will remove the data for you, and in some cases, replace it with realistic dummy data.

3. Safeguard data

Even if you sign and enforce Business Associate agreements, data in transit – via email or a laptop — is at risk. Reduce the risk by de-identifying data within the Covered Entity system before moving it to the BA.

How to de-identify HL7 data

You have some options when it comes to de-identifying data.

Manual removal
Some analysts de-identify data manually by loading messages in a text editor then scanning, removing, and replacing data in HL7 fields, components, and sub-components. This works if you’ve got a small batch to process – say 10 messages or fewer – and you can get someone to check over your work to make sure you haven’t missed a data element.

Scripts
Some developers write custom scripts to deal with a batch of messages. If you have the time and the skills, this can be a good option; however, when you take into consideration the time to both write and test the script for a complex de-identification, this option becomes expensive.

Software
Finally there are teams that use de-identification software to get the job done.  If you’re shopping for software, look for these capabilities:

  • Easy to use – if it takes a week to set up and train on the de-identification, that’s going to slow you down. Keep looking.
  • Ability to remove data and also replace it with random yet realistic data.
  • The data replacement should be flexible. For instance, if you’re removing date of birth in a data for patients over 65, make sure the replacement data generated by the software doesn’t turn them in NICU patients.
  • Tracking: keep track of what you’ve de-identified. You’ll want to keep a record of your de-identifications: which fields and segments were affected, when the de-identification took place, who did it, etc.

De-identification Software Free Trial

De-identify HL7 data in minutes. Download a Cloak software trial now.

The HL7® Survival Guide – 2 Year Anniversary

It’s been 2 years this fall that we started publishing the HL7® Survival Guide chapter by chapter. It’s proven to be our most popular download and has been called “truly awesome reading for a true practitioner”.

The HL7® Survival Guide helps you get in control of the entire interface lifecycle. Move beyond the basics with a go-to guide full of real-world practice advice on effective interfacing. The HL7® Survival Guide helps you cut non-value-added tasks and focus on the essential.

Take this opportunity to download the complete HL7® Survival Guide, available as a single PDF.

Inside the HL7® Survival Guide:

  • Introduction
  • Ch.1. How to Integrate and Exchange Healthcare Date
  • Ch. 2. Pros and Cons of Interfacing Capabilities
  • Ch. 3. The Heart of the Matter: Data Formats, Workflows, and Meaning
  • Ch. 4. How to Work with Vendors and Developing Your EHR Strategy
  • Ch. 5. Vendors, Consultants, and the HL7® Interface Specification
  • Ch. 6. Interfacing Artifacts: HL7® Conformance Profiles or Interface Specifications
  • Ch. 7. Interfacing Artifacts: Gap Analysis
  • Ch. 8. Interfacing Artifacts: Test Scenarios and Test Systems
  • Ch. 9. Interfacing Artifacts: Message Samples and Test Messages
  • Ch. 9. Interfacing Artifacts: Message Samples and Test Messages
  • Ch.10. Process and Workflow
  • Ch. 11. Maintenance, Troubleshooting, and Monitoring
  • Ch. 12. Definitions
  • Ch. 13. Contributors and Resources

Download the HL7® Survival Guide

Download the HL7 Survival Guide

Check out the Caristix Workgroup on-demand demo to see how Caristix technology solves the challenges of the entire HL7® interface lifecycle described in the HL7 Survival Guide. 

What are HL7 requirements?

Requirements Thinkinginterfacing-project-assets

What are HL7 requirements? First, in the world of software engineering, requirements refer to documented needs that an application or system must perform. Requirements are critical for both designing the software and verifying that it works.
 
In the world of HL7 interfacing, requirements thinking is the right way to build an interface. The problem is, traditional HL7 requirements-gathering leaves serious gaps.

Traditional HL7 Requirements Approach

  • Key technique: manual analysis and pipe counting in message samples
  • Small data samples
  • Incomplete and/or outdated documentation

The result is a series of low-fidelity, low-trust requirements that raise more questions than they can answer easily:

“What exactly is connected here?  Which messages, and which data structures?”

“What is optional in which workflow?”

“Which data sets are applicable?”

“Is the meaning the same in both systems?”

And this means analysts and developers end up with a best-guess interface and fix issues as they pop up. They enter a trial and error cycle.

Traditional Trial and Error Pain

The pain around trial and error extends beyond analysts and developers. Slowdowns impact everyone who is dependent on smooth information exchange within the healthcare organization. Without good requirements, it becomes impossible to accurately forecast integration project effort, timelines, and (worst of all), costs. Similarly, you can’t assess risk accurately. Go-lives become a nightmare, since that interface will continue to be tweaked once the new systems are in production.

Recommendation: Better HL7 Requirements

When we work with our clients and their integration teams, we recommend they generate 3 key requirements documents at the start of a project:

System specifications

Create a system specification (for each system in the interface), or what we call a profile. This will give you a run-down of the data and messages that an interface sends and/or receives. One way to create a profile or spec from your system data is reverse-engineering. Read about reverse-engineering and why you might want to consider this technology for your next integration project.

Gap analysis

Also create a gap analysis – a list of all the differences between the two systems you’ll be interfacing. In essence, a good gap analysis will give a series of mapping tables – which data elements need to be mapped, transformed, or somehow communicated or manipulated from one system to the other. Read more about gap analysis.

Workflows

Finally, you’ll want to document your clinical workflows. Your interface will need to support your clinical and administrative processes, which are mirrored by how the messages flow. Does an ED admit work differently than a med-surg admit? Make sure you capture that; the interface must handle both workflows. If a patient is transferred, does the LIS need to know? If so, capture that. Workflows impact your interface configuration – and they affect your test plan. Read more about workflows and why you need to map them.

How Caristix Software Handles HL7 Requirements

When you create requirements documents, you need a way to track them and update them. Check out the Caristix Workgroup on-demand demo to see how Caristix technology solves this problem.

Extracting Maximum Value from Your Artifacts

Tip 25 in the Interoperability Tip SeriesExtracting maximum value from your artifacts

This is our last tip in the Interoperability Tip Series. Read the entire series here.

The fact is that the value of your interface-related artifacts increases over time. While they’re useful for development and go-live, they are essential down the road, in a year or two or more. Follow the 4 best practices for extracting maximum value from your artifacts and get the most from them.

1. Work with real-world messages.

When you’re developing deliverables such as profiles, it’s important to start with real-world messages for reasons we covered earlier on HL7 interface specifications. You will refer back to these deliverables over and over throughout the interface life cycle. If you start with placeholders or fictitious information, you’ll struggle when it comes time to troubleshoot issues.

2. Share your work. Share your artifacts.

Encourage diligence in documenting all aspects of your interface project. Consider a common scenario – the interface project wraps up and a key analyst or engineer leaves your organization. You want the new employee to be able to easily take over for the departing employee. And that means having all related documentation on hand. This practice helps in another way: by documenting what changes have been made to the interface over time, it’s much easier to quickly troubleshoot any issue. And keep an on-going to-do list, especially around gap analysis as this will help you better approach maintenance tasks. Make it easy for people to share their work and documentation. Use SharePoint, or look for collaboration functionality in the software you purchase.

3. Archive your work.

Upgrades and updates to the interface engine will happen. You don’t want to get stuck being the victim of Frozen Interface Syndrome, which occurs when you are trying to implement a new interface and need all participants to switch over at the same time but can’t get their cooperation. You also want to avoid Black Box Syndrome, when you lack full visibility into all the work that has gone into interface development handled by a third party, making it nearly impossible to upgrade, tweak, and manage the interface without spending lots of money and time. Don’t make the mistake of thinking you won’t need certain documentation in the future. In fact, you’ll probably re-use it for your next project or for an interface or system update.

4. Understand content management.

Effective documentation requires that you think beyond message structure and troubleshooting. You need to think about clinical content and how it changes over time. For example, lab orders have their own codes and these codes get updated over time. You want ready access to the most up-to-date list as needed. And you need them reflected in your HL7 tables. That means you need to plan from the start how you’ll map the code sets to the right fields and build that into your interface and the system at go-live.

Lifecycle Management Software

Check out Caristix Workgroup for a full interface lifecycle management suite (16-minute on-demand demo available).

What is Reverse-Engineering?

Why consider reverse-engineering? Lack of accurate specs

reverse-engineering

If you’ve worked on an interfacing team or for HIE, one of the issues you’ll hear about is a lack of accurate interface specifications. For instance, the vendor spec might be missing. Or the source or destination spec on hand might no longer match the production version.

So what do you do?

Lack of specs: what’s the impact on your ability to deliver?

Well, you might be facing weeks of digging and research. You’re missing a lot of information about the source and/or destination system you’re interfacing. You and your team will have to spend time getting that information, either in a series of kickoff and liaison meetings with the customer, or going back and forth with whichever application team is responsible for the system. And in a worst-case scenario, you’ll get piece-meal information that will allow you to get rough-draft style interface in place, and spend weeks testing and tweaking until it works.

If you’ve been through this process, you know that weeks can drag into months.

What if you could skip all that?

This is where reverse-engineering comes in.  So just what is reverse-engineering?

Reverse-engineering: create your own specs

Reverse-engineering is a technique and technology that we developed and incorporated into the Caristix platform. In a nutshell, reverse-engineering allows you to take sample messages from a source or destination system, and create a spec in a matter of minutes.

Reverse-engineering gives you a full list of application-specific elements and attributes:

  • Message types
  • Segments, including z-segments
  • Fields
  • Data types, including custom types
  • Code sets, including custom elements
  • Message-specific code sets (ability to differentiate field content A01 vs A08 messages, for instance)

What this means for your work

We’ve listed the data elements you obtain via reverse-engineering. Having them at your fingertips can transform how you and your team work.

Take code sets, for instance.

If you’re creating a lab interface, you’re probably working with a set a set of customized code sets. And these may change from time to time. Without reverse-engineering, you’d have to ask the lab system application manager to pull these codes manually. With reverse-engineering, you’d pull these codes automatically from the data itself – and the list would be complete.

That’s the advantage of reverse-engineering. A complete list of the structure and content elements. A lot less trial and error. And faster time to implementation.

Further resources

If you’d like to do a deep dive on Caristix reverse-engineering capabilities, check out the product help documentation:

https://caristix.com/help-center/v3/workgroup/profiles-scoping-and-updating-interface-specifications/creating-a-profile/reverse-engineering/

To see how reverse-engineering works, check out the video below.

See the whole Caristix platform in action in our 16-minute on-demand demo.

Why Document HL7 Profiles (or Specs)? Part 2

Tip 24 in the Interoperability Tip Series

Read Part 1 here

In our previous tip we asked: why document HL7 profiles and specs. In beginning to answer that question, we explained that profile documentation is critical for troubleshooting and maintenance.

Another benefit to documenting profiles is that it streamlines processes when you are performing a system upgrade. Let’s say you’re changing or upgrading your pharmacy system – that change affects the interface of any other system that communicates with the pharmacy system. Imagine ten different systems connect to your pharmacy system – you’d need to tweak those ten interfaces.

But you’re smart and you already documented the pharmacy system and the other systems through the use of profiles/specifications. That means all you need to do is create a new profile for the new/changed pharmacy system. Then when you redo the associated 10 interfaces, you will perform a new gap analysis, but the hard scoping work (those specs) will already be done.

Many people are using the canonical model as an intermediate layer to make this work easier in cases such as the example described above. For this, all pharmacy interfaces would be converted to an intermediate model (a profile) so that each system is loosely coupled. If one system changes, it’s easy to adapt the system so that the message is transformed to the canonical model.

Document your HL7 profiles and specs

Once your interfaces are in place, you want to monitor them to ensure they’re supporting your processes as designed. The value of monitoring is that it empowers you to be proactive in troubleshooting issues. You can set up thresholds and then be alerted to potential issues. For example, you could say that only a certain number of messages should pass through the system for a certain process and if that number is exceed, you get alerted.

Many interface engines include monitoring capabilities but some are limited to that particular engine. If that’s all that you have at your disposal, take advantage of it. But if you have the option and your environment includes multiple interface engines, look for vendor-agnostic solutions that cover the entire integration environment. That’s the easiest way to get a global overview of your environment.

Just remember – when you’re sharing data across your infrastructure, sometimes an HL7 message is the problem. But the network or a specific system could also be the problem. For example, perhaps a nurse is not seeing orders in the pharmacy system. This may be because the network is down. Or it could be an issue with the ADT system or with the medication admin system. Or one HL7 message could be holding up the queue. You want to be able to quickly eliminate the HL7 message as the issue. Just remember that ideally your monitoring should link back to your test cases and interface specifications.

Lifecycle Management Software

Check out Caristix Workgroup for a full interface lifecycle management suite (16-minute on-demand demo available). Workgroup helps by providing a way to document the canonical model (profile), each system model (profile) and transformation needed (click to enlarge).

Document your HL7 profiles and spec

Why Document Your HL7 Profiles and Specs? Part 1

Tip 23 in the Interoperability Tip Series

The last few tips have been about what to document and how to document. This one and the next explain why documenting your HL7 profiles and specs is so important.

When you document your HL7 profiles and specs, you can much more easily troubleshoot issues and tweak configuration once your interface is live. Plus, if you created electronic – i.e., machine readable – versions of your profiles, you can use them in your monitoring. For example, you could shoot a message through a profile using the Caristix Message Player to see if there’s anything anomalous, such as an extra segment or a field that is too long. Or you could run problematic messages against the test scenarios you developed during the validation phase of the interface lifecycle.

All that’s good and well but no one can use your profiles and spec unless they’re readily available. So be sure to store them in a central repository for your support team. Make the files read-only if necessary. What’s important is that anyone can quickly access them when needed.

By using the assets you built in the earlier phases of the interface lifecycle, you can quickly and proactively address issues and avoid additional costs. Plus you can keep users happy. Imagine rapidly troubleshooting an issue to avoid downtime rather than forcing clinicians to log a help desk ticket because the interface went down.

Lifecycle Management Software

Check out Caristix Workgroup for a full interface lifecycle management suite (16-minute on-demand demo available).

Document Your HL7 Profiles and SpecsUse Workgroup to do the message/profile validation. Pick a profile from the library and a set of message. Run the validation and a list of errors/warnings will be displayed (click to enlarge).

Overcoming CDA and CCD Barriers

Overcoming CCD and CDA Barriers


In the design of Meaningful use, C-CDA – especially CCD – was supposed to solve the pressing issues in healthcare concerning interoperability and data exchange problems. But it’s just not turning out that way.

Emerging Major Data Exchange Problems

One recent study found 11 interoperability barriers relative to C-CDA. This is of concern and it’s a concern that integration analysts and developers will have to address in their work.  How does an organization deal with the mismatch of specific patient information? What about the potential delays in Meaningful Use incentives? How can the risk involved in implementing these new documents be mitigated?

The new Caristix whitepaper, Overcoming CDA and CCD Barriers, takes a look at the key techniques and technology integration analysts and developers can use to overcome these barriers today. Specifically, we’ll investigate the biggest issue with C-CDA implementation, gap analysis, and provide a framework for analysts, developers and their managers to deal with this challenge.

Gap Analysis: Why Is It So Important?

The gap analysis is a critical requirements document. Without one, you won’t uncover your systems’ unique needs before development, so testing and validation will drag on. Every single difference or customization will require extra time, money, and effort to troubleshoot and resolve. The result cascades into extended go-lives, more expensive maintenance, and unhappy end-users.

  • Check out the 8 questions your gap analysis process/software must answer during the gap analysis process.
  • Explore 6 major resources on CDA, CCD, and consolidated CDA that will help you get a handle on the issues.

Download Overcoming CDA and CCD Barriers

 Ocercoming CDA and CCD Barriers


Image credit: Alan Stark under a Creative Commons license

Managing Interoperability and Interfacing Assets

Tip 22 in the Interoperability Tip Series

Managing Interoperability and Interfacing Assets

In the previous tip, we talked about documenting your interfaces and workflows – especially important for HIE organizations. This tip is all about our recommendations for what to look for when you’re planning out how to organize your assets – documentation, requirements, test scenarios, and the rest.

4 Capabilities to Seek Out

  • Visualize all of your interoperability assets, from multiple interface engines to the interfaces themselves.
  • Cover the entire interface lifecycle.
  • Access a library of interfacing assets and manage assets so you can take an instant inventory.
  • And it should provide all this regardless of the interface engine you’re using

Tips for Artifact Management

Interfacing artifacts can grow over time. You maintain two profiles for your source and destination system. You conduct a gap analysis and your engine handles message transformation. But message transformation is part of workflow. You need test plans and test data. Keep all these artifacts together and include workflow. As you develop and implement interfaces, these can grow. In terms of managing interoperability and interfacing assets, you should keep them in a central repository.

Caristix Resources

Track assets using our Interface Asset Template. 

Consider Caristix Workgroup software when you need to share these assets across a team.View the 16-minute on-demand demo.