Interface Engine Selection: Reducing Migration Risk

reducing migration riskNew interface selection: a big decision

Is your team selecting a new interface engine? If so, you’re in good company. With DataGate/eGate and eBiz at the end-of-life mark, many hospitals and health systems are faced with major conversion and migration decisions. The engines they have in place now are responsible for the flow and orchestration of financial, administrative, and clinical data. They can’t afford to disrupt their current capabilities. And the smartest organizations are working to expand their interoperability.

This leaves hospitals and IDNs with some major decisions. Which vendor should you go with? What should the selection committee look for? When you implement, what should you prioritize? The wrong decision can have a devastating impact on interoperability and how data flows – short-term and long-term.

Interface engine selection guidance

Which is why there is a lot of guidance out there on how to pick a new engine. One of the better resources we’ve come across (and it’s vendor-neutral) is a 37-page white paper from OTB Solutions, a consulting firm. The paper pays a lot of attention not just to technical requirements but also business requirements. And it offers great advice on communicating the selection and the accompanying change management. Download the OTB Solutions white paper on interface engine selection.

High risk: interface migration

One area we see a need to expand on: the actual migration process. It’s a risky process.  And depending on your needs, not all engine vendors are created equal here. You have to pay attention to documenting your needs and your requirements.

How do you reduce risk and cost?

When you’re purchasing a new interface engine, the biggest investment isn’t the engine software licensing or your incremental hardware costs. Your biggest line items will be the development and implementation time – labor costs. Look for solutions that will reduce complexity and development risk, and you’ll automatically impact cost.

Just as Agile methodologies have reduced project risk in software development, interface lifecycle management can reduce risk with interface development. And it starts with better requirements. Read this article on HL7 requirements to learn more.

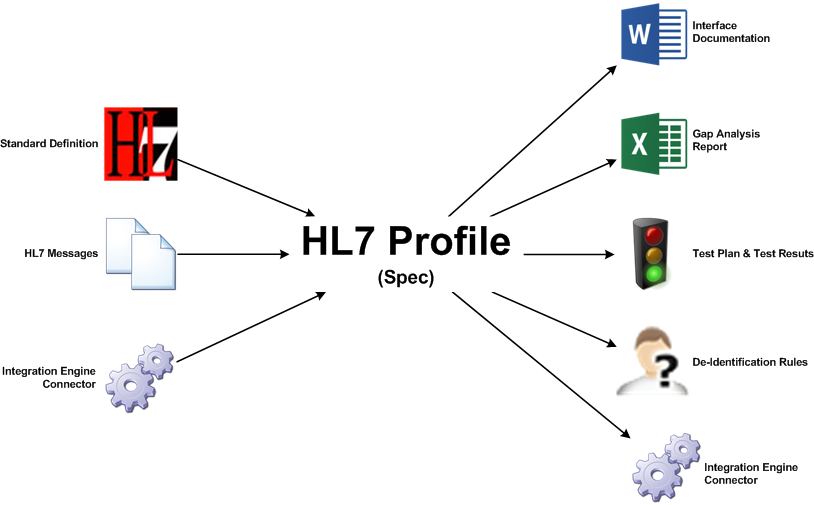
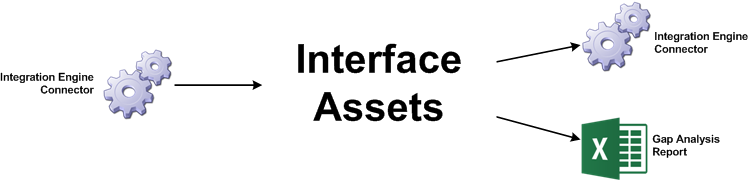
Also, consider purpose-built software such as connectors and converters. You can automate the migration process by pulling messages and schemas directly from the legacy engine, and generate requirements, including specifications for new development easily. Learn more about interface conversion projects and connectors.

What are some ideas you’ve successfully used to overcome migration risk? Let us know in the comments.

5 key interface lifecycle concepts

Inteface lifecycle concepteLast week, we talked about how you can do more with less by applying a lifecycle approach  to your interface and interoperability work. By managing the lifecycle (instead of developing via trial and error), you’re able to forecast timelines, resources, and costs with more accuracy – and better outcomes and margins.

Start by getting a firm grasp on the key interface lifecycle concepts behind interface lifecycle management. This post will give you a solid foundation.

HL7 requirements

You need requirements thinking to build an interface. In other words, you document the needs that the interface must meet: messages, content, format, workflows. Sounds simple, right? Not really. Traditional requirements-gathering leads to trial and error pain, slowing down both system and interoperability implementations.

Learn about the right way to gather HL7 requirements. 

Reverse-engineering

HL7 requirements include accurate specifications of the systems you plan to connect. What do you do if the vendor spec is missing? Or if a PDF spec no longer matches the production version? There’s a way to generate the spec automatically from production messages, so you get a list of system-specific attributes such as message types, segments, fields, data types, and code sets. It’s called reverse-engineering, and it’s a technique that we developed at Caristix.

Learn about reverse-engineering and how it can impact your interface development.

Gap analysis

Another requirement document you need for building an interface is a list of gaps the interface will bridge: a gap analysis. A good gap analysis will map differences in message structure and content in the source and destination systems. You can either do this work manually or use automated software to speed the process and gain accuracy.

Learn about gap analysis.

De-identification

De-identification is a technique to mask or remove PHI from patient data. Surprisingly, it’s a life-saver in HL7 interfacing. You’ll want to consider de-identifying HL7 messages whenever you’re faced with troubleshooting a system or interface, populating a test system with realistic messages, and gathering data for analytics.

Learn about de-identification.

Validation

Validation is about checking the interface: does it meet the requirements you captured at the start of the project? Traditionally, validation is done manually: creating test messages, sending them, and checking the workflow. But manual work can be a recipe for disaster, which is why we recommend automating validation and testing tasks.

Learn more about validation and automation.

Other concepts?

Can you think of other concepts we should cover in an upcoming blog post? Leave a comment to let us know.

For a review of the key phases of interface lifecycle managment, check out our last blog post, Interface lifecycle managment: do more with less.

Interface lifecycle management: do more with less

Caristix white paper lifecycle managment
Caristix White Paper: HL7 Integration: From Trial and Error to Predictable Project Outcomes and Margins

If you’re responsible for interfacing within a hospital system, a consulting organization, or an HIE, you know one thing: you need to do more with less. With EHR implementations slowing down, the big HIT implementation budgets are drying up. But so much of the promise and value of those systems is tied to interoperability and data exchange, and you’re still accountable for delivering those capabilities. So what do you do?

In this situation, you want to consider a lifecycle approach to your interoperability programs. Interface lifecycle management removes waste from the work by getting rid of ad hoc processes. You’ll be able to do more with less, and as a result, sustain your operations and meet demands for interoperability more easily.

The major phases and potential pitfalls

We’ve outlined the major phases of the interfacing lifecycle below, along with the some of the pitfalls you might encounter.

 Scoping

In the scoping stage, the first step is to understand what systems are in place, what data is available, when it is available, and in what format. Management may underestimate the amount of effort for this phase, since people who not hands-on assume the HL7 standard helps streamline this process. But the standard is such a loose framework that, used on its own, it leads to a lot of trial and error in the next phases. The lifecycle really starts with strong requirements-gathering practices right here in the scoping phase.

Configuration

The next step is to configure or code the interface, or build a bridge that connects two systems. In most cases, developers use an interface engine to handle the mapping and transformation. Even with the use of an interface engine, your team will need good requirements from the scoping phase in order to eliminate waste during this phase.

Validation

In the validation phase, developers (or quality testers) test the interface before it goes into production. If the underlying requirements from the scoping phase aren’t strong, the configuration and subsequent validation will be subject to multiple trial and error cycles – wasted time and effort. What’s worse, you may not discover gaps until the system is in production, affecting data quality, user adoption, and potentially quality of care. From a project management point of view, you also can’t predict the project end-date because it’s impossible to anticipate the defects testers will uncover.

After Go Live, support and maintenance

Is the data flowing as expected? Are new bugs emerging? Use the work your team did in the scoping, configuration, and validation phases to manage and maintain the interface. If you’ve got multiple interfaces, make sure the work from previous phases is readily available to consult in a shared repository. Those requirements from the scoping phase are especially important.

Upgrade decision

Whenever your leadership decides to proceed with a version upgrade of a source or destination system, you’ll need to evaluate the impact on the interfaces that connect those systems. In most cases, an upgrade will mean you start the interface lifecycle all over again. Without the artifacts – requirements, tests, queries – from the previous cycle, you’ll be starting from scratch.

Download white paper on interface lifecycle management

Learn more about interface lifecycle management in this whitepaper from Caristix: HL7 Integration: From Trial and Error to Predictable Project Outcomes and Margins. You’ll get a deep dive on the phases we touched on above, and you’ll come away with a better understanding of the collaboration and operational benefits of adopting interface lifecycle management.

What the data in HL7® messages can tell you

Pinoint

You already know that HL7® messages are a rich source of actionable insight about your clinical and financial operations.

To get to that insight, start by inspecting, analyzing and querying your messages. You can do this manually via text editors and their basic search features. Or you can check out Caristix software.

Here are some HL7® message inspection and analysis tutorials to get you started using Caristix Pinpoint software. And get your data working for you.

Download Pinpoint

To use these tutorials, download a trial version of Pinpoint.

Once you’ve installed Pinpoint, launch the application. Get ready for these tutorials by loading HL7® messages; learn how in our Online Help.

Tutorial 1: Determine field position

What to do

Hover over a field to view its HL7® position.  Use this feature when you’re assessing where a field or nested subcomponent might fit in a message.

Example

You’re looking up a patient address in the PID segment. Don’t count pipes. Just hover over the address, and “PID11.3 Patient Address > City” pops up.

Tutorial 2: Check field names and values

What to do

Load messages, then right-click a segment to see the full HL7® definition (click “Segment Definition”). Use this feature when you need to check field names and values at a glance.

Example

You’re looking up a PV1 segment in a message. You’re looking at Admit Sources. Rather than counting over to PV1.14, just get the Segment Definition and check SEQ 14.

Tutorial 3: Troubleshoot empty fields

What to do

Find an empty field or component in a problem message, as follows:
1)    Load messages and hover over the field (or component) you want to query.
2)    Right-click and select Add Data Filter.
3)    Change the Operator to Empty, and click once outside the grid. You’ll get all the messages with empty values in that field.

Example

You have 24 hours of messages to look through, and you need to identify empty PID-8 fields. Set a filter (as above) in a few mouse-clicks. It’s much faster than counting pipes and carets.

Tutorial 4: Determine field presence

What to do

Find out if a field is present in a batch of messages – and how often the field occurs. This is helpful when you’re troubleshooting complex interfaces.
1)    Load message logs and hover over the field (or component) you want to query.
2)    Right-click and select Add Data Filter.
3)    Change the Operator to Present, and click once outside the grid. You’ll get all the messages with fields that are present.

Example

You have 24 hours of messages to look through, and you need to identify which messages have ZCD-23 fields. Set a filter as above, and avoid scripting.

Tutorial 5: Isolate the right data values

What to do

Look up values and isolate the data you need. Use the Data Distribution feature to look up values.
1.    Load messages and hover over the field you want to query.
2.    Right-click and select Data Distribution.  Click Show All, then Table View.
3.    You’ll get all the values in that field and the number of times they were used. Copy values to Excel or Word as needed.

Example

You need to set up lookup tables for a new interface. You could port all the old values from the legacy interface engine. But this would include many out-of-date codes. Instead, get a batch of messages from the current engine, and perform a Data Distribution in Pinpoint to get the currently used values.

Caristix Pinpoint for HL7® Message Analysis

We hope you find these brief tutorials helpful. Let us know how they’re working for you in the comments!

Download Pinpoint

Need HL7® message samples? Google isn’t the answer

HL7® message samples should be system-specific   

HL7 messagesWhen you build interfaces, you need HL7® message samples and test messages for your validation workflow. It’s tempting to simply hit Google for generic samples, or check on Stack Overflow or another tech discussion forum. But there are problems with that approach.

For one thing, you’ll end up with messages that don’t fit your systems – your ADT, your LIS, the applications personalized for your environment. What’s more, if you use just a handful of messages, that volume won’t be enough for thorough HL7® interfacing testing.

The danger with shoddy testing practices

Without the right messages and the right volume, you won’t be able to validate that events are exchanged appropriately, code sets are transmitted or transformed correctly, and optionality is handled as expected. What’s worse: if these validations tasks are skipped, developers can spend hours or days in a break-fix cycle during go-live.  

Need HL7® Message Samples? Consider 3 Solutions

  1. Create them manually. You can always extract a handful of production HL7® message samples, remove the PHI manually, add dummy patient demographics, and use those messages in your testing. But this is painstaking and error-prone. And you won’t solve the volume problem for performance testing.
  2. De-identification. Many of our clients use their production data for testing and validation. But before they do, they remove PHI and replace it with clinically valid fake data.  Read more about de-identification here.
  3. Test automation. Our clients also use test automation software to generate HL7® message samples. Test automation software (such as the Caristix solution) can generate messages on the fly, based on interface specs representing both source and destination systems. Learn more about test automation here.


Mix Them Up

Depending on your needs, you may need a mix of these techniques. If you have time and a tiny use case, consider manually creating your messages. If you have established production-based applications, de-identifying messages from those systems will work for you. And if you’re connecting brand-new systems, you’ll want to include messages generated via a test automation solution.

Caristix Workgroup

The Caristix platform includes features to de-identify messages and automate your tests while generating messages on the fly. Learn more today with the 16-minute on-demand demo of the Caristix Workgroup platform.

HIEs and Interface Testing

Interoperability barriers and HIE business models

HIEs and interface testingIn a previous post, we talked about the interoperability barriers facing HIEs (healthcare information exchanges). What are they? Primarily 1) cost and 2) complexity. That is, the cost of interface development, and the technical difficulty involved. These are especially in context of the business model switch, as HIEs move from startup grant-based funding to self-generated revenue based on membership fees and services.

The problem is, self-generated revenue is tricky to achieve at best. In some cases, the fees barely cover costs. So how do smart HIE leaders make it work? For one thing, they aren’t focused on cutting headcount (because in many cases, these are lean operations), but they are focused on speed and quality. They drive down cost by increasing speed to interface delivery without sacrificing quality.

Why requirements are critical

They increase speed and quality both by ensuring that their interfacing teams focus on requirements. Not just any requirements – the right requirements. The right interfacing requirements, gathered at the right time, set the stage for clearer communication and expectations.

Read more about HL7 requirements.

How to reduce costs while increasing speed and quality

Good requirements are one side of the interface delivery coin. The other side: testing. Once HIE leaders have put in place a strong requirements culture, they tackle interface testing and validation, which is the process of ensuring that the interface works per the requirements.

Read more about what can wrong with HL7 interface validation. It applies to HIEs and their interface testing.

HIE leaders focus on testing and validation because the interfaces they deliver must broker key workflows between partners: hospitals, physician practices, labs, immunization registries, cancer registries, and more. The good thing is that many workflows and requirements are standard (or near-standard) across sites. The bad thing is that data structure and data content will vary.
 
How do you know you’re hitting your requirements? Testing and validation. Most HIEs do this. The problem is, small changes to an interface can take a long time to test and validate. For instance, a 15-minute coding change can take 2 weeks to validate.

The best way to reduce time spent on testing and validation is to automate the process. So that 2-week test cycle can be reduced to 1 hour.

And that’s exactly what smart HIE leaders are doing: they are finding ways to automate testing. This ensures that interfaces are delivered faster – and with more quality and confidence.

Caristix and HIE interface testing

The Caristix platform automates testing and validation for interfaces. Check out our tutorials for common validation scenarios.

Watch the on-demand demo of the Caristix Workgroup platform. You won’t be disappointed.

What is HL7 Interface Validation?

What is validationThe purpose of HL7 interface validation

In the interface lifecycle, validation is critical. HL7 interface validation is about checking the interface you’ve developed: making sure it works and that it meets the requirements you captured before interface development.

The most important requirements are around clinical workflow. In essence, validation is about testing against your workflows. You should test performance, message volume, and edge use cases, all before the applications and interface go live.

Need more detail on what you should test? Get an HL7 interfacing checklist here.  

What can go wrong?

There are two ways HL7 interface validation can go wrong.

First, if you’re pressed for time, you might be tempted to cut corners and skimp on validation. This is a bad idea because go-live will be a disaster. Without checking workflow, edge cases, and performance, you are setting yourself up for downtime and frustrated clinicians who can’t access the data they need. Avoid this problem by documenting a validation plan based on your requirements, at the start of the project.

Second –ironically enough — good validation practices can put you in a trial-and-error, break-fix nightmare. We’ve worked with teams that faced this issue. Because they were thorough testers, a 30-minute code update required 2 weeks of testing and validation to ensure the interface met requirements. This is the danger with manual validation practices.

But you can solve this problem with automated HL7 interface validation and testing.

3 reasons you should automate validation

  1. Run validations over and over again. Once you set up the scenarios, you can repeat them endlessly. So that 3-week trial-and-error cycle can be compressed to a few hours.
  2. Generate the test data you need. When you automate, you get to cover both common and uncommon workflows, work with plain-vanilla (expected) and weird-and-wonderful (unexpected) data and patient information, just one message or thousands of them.
  3. You’ll gain accuracy. With automation, there is no temptation to skip validation scenarios. You also have a record of what was tested. The record is a by-product of the validation process, so there is no extra work to get this information.


Validation How-Tos

The Caristix platform automates HL7 interface validation, enabling you to set up test scenarios and run them as often as you need. We’ve put together a list of tutorials and how-tos for common validation scenarios. Check them out. You can use them as-is with Caristix software, or adapt them to your own test environment.

See HL7 interface validation tutorials.

Release Notes – Caristix 3.2

Caristix release 3.2 is a broad release of additional features through the range of Caristix products from Workgroup through the individual HL7 modules, Cloak, Conformance, Pinpoint and Test.  We’ve put some additional focus on Test as we continue to add features that accelerate test creation and test execution to help you get your interfaces into production faster.

Workgroup

New HL7 Messaging Feature

  • Support file drag-and-drop in the Message Gap to quickly compare message files

New DeId Features

  • Preformat the source value of a generator or ID field
  • Generate value for an empty field
  • Specify a character set through an option in the String generator
  • Generate Lorem Ipsum text with the String generator
  • Search for an empty field and replace it by a value

New Profile Editor Features

  • Quickly navigate to the result of a search
  • Use filter column options available in Find and Replace

New Validation Feature

  • Search for an empty field and replace it by a value

New Search and Filter Features

  • Create report using HL7 message fields data, to facilitate viewing and analyzing the data contained within the messages
  • Search for an empty field and replace it by a value

New Test Scenario Features

  • Validate against HL7 messages in a Task from another Action or Scenario
  • Validate messages against call results (ACK)
  • Purge pending messages before starting a receiving Task
  • Validate that no messages are received (filtered out)
  • Validate HL7 message files stored in the Document Library
  • Clear the information from the last Test execution
  • Specify a character set to be used by the String generator
  • Generate Lorem Ipsum text with the String generator

Bug Fixes

  • Sending multiple messages via a Send File Task works consistently
  • Improved validation for Tasks with multiple messages to validate

Cloak

New Features

  • Preformat the source value of a generator or ID field
  • Generate value for an empty field
  • Specify a character set through an option in the String generator
  • Generate Lorem Ipsum text with the String generator
  • Search for an empty field and replace it by a value

Conformance

New Profile Editor Features

  • Quickly navigate to the result of a search
  • Use filter column options available in Find and Replace

New Validation Feature

  • Search for an empty field and replace it by a value

Pinpoint

New Features

  • Create report using HL7 message fields data, to facilitate viewing and analyzing the data contained within the messages
  • Search for an empty field and replace it by a value

Test

New Features

  • Validate against HL7 messages in a Task from another Action or Scenario
  • Validate messages against call results (ACK)
  • Purge pending messages before starting a receiving Task
  • Validate that no messages are received (filtered out)
  • Validate HL7 message files stored in the Document Library
  • Clear the information from the last Test execution
  • Specify a character set to be used by the String generator
  • Generate Lorem Ipsum text with the String generator

Bug Fixes

  • Sending multiple messages via a Send File Task works consistently
  • Improved validation for Tasks with multiple messages to validate

What Can HIEs Do to Overcome Interoperability Barriers?

Cost and technical barriers?

Overcoming interoperability barriers

As soon as you hear the word “interoperability” in healthcare, “cost” and “complexity” are right around the corner. If you’re a technical leader at an HIE, this won’t come as a shock. In a recent survey, 59% of HIEs see the cost of interface development as a barrier. And another 38% view technical difficulty in interfacing as their biggest hurdle.

So what’s the solution? 

For starters, there is no easy technical fix. Direct messaging can tackle some use cases. You can look at FHIR down the road. And maybe regulators will scrap the use of standards that are still under development (C-CDA, we’re looking at you).

But there’s no waving a magic wand and making HL7 v2.x interfaces disappear.

Here are 5 recommendations to deal with the core need and make it easier to develop and manage interfaces and overcome interoperability barriers:

  1. Get a hold of the requirements process. Better HL7 requirements give you better communication, with more trust and confidence around what the team is actually developing – and less revisiting the obvious. Read more about HL7 requirements
  2. Agree on testing upfront. Here’s a testing checklist to get you started
  3. Document workflows for your interfaces. Not convinced it’ll help? Read why you should
  4. Make sure the test environment is set up right. Here’s how to get started
  5. Documentation HL7 profiles and specs. Not just for development requirements but also for the rest of the interface lifecycle. Read our two-part series on documenting HL7 profiles and specs: Part 1 and Part 2.

 
Caristix software and HIEs: interface lifecycle management 

You can cut interface development time – and cut waste from the entire interface lifecycle with Caristix software. Learn more via the Caristix Workgroup on-demand demo.

Interface Conversion Projects and Connectors

Interface Conversion Projects: 10 or More Steps

What are connectors?

If you’ve ever worked on converting from a legacy interface engine to a new one, you know one thing: this is one complex project. With a lot of moving parts. You’re easily facing 10 or more different workflow steps — per interface.  The workflow can start with simply backing up the legacy production interface and can end with testing and deploying the new interface. But between Step 1 and 10, there is a lot of room for error and rework.

Documenting the legacy interface

After backup, you document the legacy interface. And that can be a chore. Some engine vendors simply state, “Open a text file.” Then you’re supposed to get a copy of the application specification from the application vendor (just bear in mind that the spec isn’t always available) and start reading to get a sense of which messages and content types are involved.

Was the spec fully implemented? No

Of course, you’ll also be aware that more often than not, the spec was either not fully implemented in the legacy interface or it was customized during implementation. So, with your text file still open and the specification on the screen, you have to go to the schema or definition in the old engine and start noting transformation rules, message structure, and message content including code sets.

Implement the new interface via trial and error

Once you’ve documented your interface, you’re supposed to re-read your notes. You then hunt through their HL7 standard library, and pick a schema that’s kind of close to your message structure. You start your coding based on this library schema.

Add more code and stir

Then you add transformations, routing, transport protocols.
And you’re meant to spend the next few days and weeks first, tweaking the schema, and second, coding until….

Then test

Finally you get to test. The testing is iterative. You test so you can check if your new interface comes close to matching the legacy interface.

What does this get you?

For all this work, you end up with:

  • Incomplete requirements. Incomplete documentation. And no way to really compare your legacy interface with the new one.
  • A lot of trial and error – especially since this whole process is manual. And that means you can end up introducing new errors with the click of a button. That’s the real slowdown.

There is a better way: automate conversions

With Caristix technology, you can automate and streamline this entire process. The technology that lets you do this is called a connector.

A connector lets you pull messages and schemas directly from the legacy interface engine into the Caristix platform, where you can generate a specification (what we call a profile) automatically. Some Caristix connectors can also extract the transformation and mapping code.

Using a connector for your new interface engine, you can generate a schema to import directly into the engine, saving multiple trial-and-error cycles.

The connector and platform also let you automate your requirements gathering. Learn more about HL7 requirements in this post.

As an add-on to Caristix Workgroup and other Caristix products, this technology can save an analyst hours during a conversion project and streamline the entire process. An IDN organization with 80 hospitals used Caristix connector technology on a major 1000+ interface conversion project. They saved 18 hours per interface – which multiplied out to millions in project savings. Interface conversion projects and connectors are an effective solution to the trial-and-error approach.

Connectors map

Connectors and interface assets

Learn more about Caristix connectors, including the engines we support.  And contact us for a demo