Caristix Cloak is designed to help interface analysts and engineers to accurately de-identify HL7 data, covering all 18 HIPAA identifiers. Data can then be safely shared for such purposes as porting realistic data to a test system or staging area, providing realistic sample HL7 messsages for interface scoping, and providing data for clinical and financial analytics.
Cloak software provides the following features and functionality:
The easiest way to get your feet wet with Cloak is to read about how to de-identify HL7 Messages.
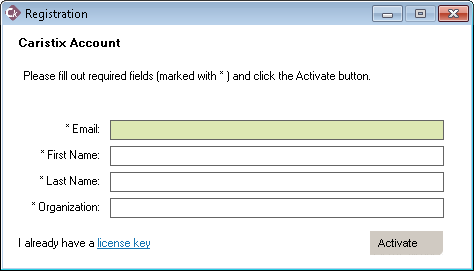
If you have a trial version, you will need to purchase an annual license to continue using Cloak after the end of the trial period.The de-identification settings in the Fields and Data Types tabs can be saved and reused. Cloak loads the last used de-id rules file when the program is opened. The default de-id rules will be used the first time, it contains the fields and data types that cover the 18 HIPAA identifiers that must be de-identified.
These are the HL7 messages you load in Cloak for de-identification.
One of the most important issues in healthcare IT is the protection of patient data. Regulation addresses patient privacy and the use of health information in many countries. In the US, HIPAA regulates the use of PHI (protected health information).
While protecting patient data, HL7 analysts need to share or redistribute HL7 production data for such purposes as porting realistic data to a test system or staging area, providing realistic sample HL7 messages for interface scoping, and providing data for clinical and financial analytics.
The Department of Health and Human Services (HHS) provides a HIPAA Privacy Rule booklet (PDF) that highlights the 18 criteria that can be used to identify patients. All 18 identifiers are categories of data that must be protected. Besides easily recognized personal information, care must be given to protect device identifiers and even IP addresses. De-identification techniques must cover all 18 identifiers.
This term refers to removing or masking protected information. The de-identification removes identifiers from a data set so that information can no longer be linked to a specific individual. In terms of health care information, all identifiers are removed from the information set including both personally identifiable information (PII) and protected health information (PHI).
As a subset of de-identification, pseudonymization replaces data elements with new identifiers. After that substitution, the initial subject cannot be associated with the data set. In terms of health care information, patient information can be pseudonymized by replacing patient-identifying data with completely unrelated data resulting in a new patient profile. The data appears complete and the data context is preserved while patient information is completely protected
A pseudonymized data set can be restored to its original state through re-identification. In re-identifying data, a reverse mapping structure (constructed as the data was pseudonymized) is applied. As an example, a pseudonmymized data set could be sent for processing to an external system. Once that processed information is returned, the data could be re-identified and pushed to the correct patient file.
Identifiers are data elements that can directly identify individuals.This includes name, email address, telephone address, home address, social security number, medical card number, among others. Two identifiers may be needed to identify a unique individual.
Data elements of this type do not directly identify an individual but may provide enough information to narrow the potential of identifying a specific individual. Genders, date of birth and zip/postal code have been studied extensively in this context. There is a dependent relationship between quasi-identifiers and the type of data set of which they are a part. As an example, if all members of a data set are male, gender cannot be a meaningful quasi-identifier. In addition, quasi-identifiers are categorical in nature with a finite set of discrete values. It’s relatively easy to search for individuals using quasi-identifiers.
Non-identifiers may contain an individual’s personal information but aren’t helpful in reconstructing the initial information. For example, an indicator of an allergy to pollen would be a non-identifying data element. The incidence of such an allergy is extremely high in the general population. Therefore this factor is not a good discriminator among individuals. Again, non-identifiers are dependent on data sets. In the right context, they may be used to identify an individual.
De-identification in Cloak works as follows:
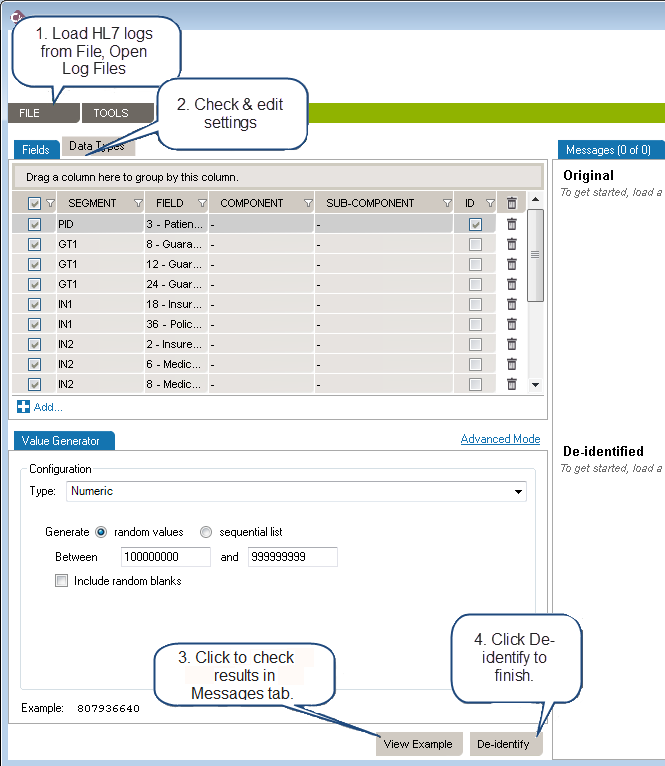
Load the HL7 message that requires de-identification:
The log is loaded in Messages tab. The tab also indicates the number of messages in the viewing pane and the total number of messages in the file you loaded. The Original pane displays the log you loaded while the De-identified pane displays the de-identified log. The split screens scroll synchronously so that the data displayed is mirrored in the original and de-identified logs.
Resize vertically to change the quantity of data displayed in the viewing pane. Place the pointer on the line dividing the two panes and drag the window to increase or decrease its size. Click Hide and Show buttons to hide or view panes as needed.
The fields and data types set for de-identification are highlighted in red for easy visibility.
On the left side of the screen are the de-identification settings listed under the Fields and Data Types tabs. Cloak loads settings to cover the 18 HIPAA identifiers by default.
To add a de-identification rule under Fields or Data Types:
To remove a setting, click the trashcan at the end of the line.
Once you have created and configured all the selectors applicable to the HL7 log to be de-identified, click View Example at the bottom of the left hand pane. A preview of the de-identified log file will appear. Scroll through the log in the viewing panes to verify the potential results of the de-identification process.
Once reviewed and after applying any changes:
Once saved, a De-identification Process Report dialogue box will open asking if you wish to create a de-identification process report. Click Yes or No. If Yes is clicked, you will be prompted to choose a location to save the generated PDF and to give a name to the file. Click Save and the file will be saved to the specified location. The PDF of the De-identification Process Summary will open on your desktop for review.
Once a set of selectors have been chosen for the de-identification of a log file, that set can be saved for reuse.
Once a log file has been opened, the saved de-identification rules can be applied by clicking Open de-id rules from the drop down menu bar under File in the the top menu bar.
Generators refer to the data sources used to set de-identification values in Workgroup.
| Generator | Recommended Use |
| String | Insert a randomly generated string or static value. You can set the length and other parameters. |
| Boolean | Insert a Boolean value (true or false). |
| Numeric | Insert a randomly generated number. You can set the length, decimals and other parameters. |
| Date Time | Insert a randomly generated date-time value. You can set the range, time unit, format, and other parameters. |
| Table | Pull data from HL7-related tables stored in one of your profiles, useful for coded fields. |
| SQL Query | Pull data from a database based on an SQL query. You’ll be able to configure a database connection. |
| Text | Pull random de-identification data from a text file — for instance, a list of names. Several file formats can be used: txt, csv, etc |
| Excel | Pull random de-identification data from an Excel 2007 or later spreadsheet — for instance, a list of names, addresses, and cities. |
| Use Original Value | Keep the field as-is. No de-identification rules will be applied. |
| Copy Another Field | Copy the contents of another field. |
| Unstructured Data | Find and replace sensitive data in free text fields — for instance, find and replace a patient’s last name in physician notes. |
Each generator has its own settings, which you can edit from the Value Generator tab. Click on the generator name to navigate to the setting details.
Allows you to use more than one generator for a single field, edit the output format or preformat the source value. You can also set preconditions to conditionally apply the de-identification rule.
(Only available in Advanced Mode)
Use this to format the original value before it is processed.
This is useful for generators that include the original value or ID fields. Here are two usage examples:
a) In an unstructured data field, you may wish to remove a value that is not contained elsewhere (not already cloaked in another field):
If you know the field may contain a reference to an ID defined as ‘ID-999999’, you would:
1. Cloak the field using an Unstructured Data generator.
2. Set the following preformat for the unstructured data:
Find what:
ID-\d+ (Search for a text, anywhere in the field value, starting with 'ID-' and followed by one or more numbers.)
Replace by:
ID-XXXX (We set a static text to hide the ID but still keep the context of the text.)
b) If you have the same patient ID number in two systems, but formatted differently, you could format them so that both systems change to the same ID format and can both be recognized as the same patient. Having the same ID will provide continuity of the message flow for a patient (messages will be cloaked using the same fake data):
If, for example, PID.2 is defined like this for the two systems:
First system: ID:123456
Second system: 123-456
You would need to:
a) Set the field PID.2 as an ID (by checking the ID column).
b) Define two preformats like this:
Find what:
^ID-(?<ID_Number>\d+)$ (We find an exact match for the format and set the numbers only in a group variable named 'ID_Number')
Replace by:
${ID_Number} (We set only the number, removing the superfluous text)Find what :
^(?<ID_Number_Part_1>\d+)-(?<ID_Number_Part_2>\d+)$ (Find an exact match for the format and set the numbers only in a group variable named 'ID_Number')
Replace by:
${ID_Number_Part_1}${ID_Number_Part_2} (Only the number, remove the superfluous text)Now both systems will treat PID.2 as being ‘123456’ and match and cloak the messages properly as being the same patient.
This generator creates a uppercase character string to be used to set a static value.
How to use the “String” generator to create random value:
How to use the “String” generator to set a static value:
How to use the “String” generator to set a Lorem Ipsum text:
| Example #1: | Generated Values | ||||
|
| ||||
| Example #2: | Generated Values | ||||
|
|
How to use the Boolean generator:
| Example #1: | Generated Values | |||||
|
|
This generator creates a number.
How to use the “Numeric” generator:
| Example #1: | Generated Values | |||||
|
| |||||
| Example #2: | Generated Values | |||||
|
|
This generator creates date and time values.
How to use the “Date time” generator:
| Example #1: | Generated Values | Description | ||||||||||
|
| |||||||||||
| Example #2: | Generated Values | Description | ||||||||||
|
| |||||||||||
| Example #3: | Generated Values | Description | ||||||||||
|
| |||||||||||
When the generator exceeds the maximum value (30), the sequence is reset starting at the minimum value (0). | ||||||||||||
| Example #4: Manipulate date of birth | Original field Value | Generated Value | ||||||||||
|
| |||||||||||
This generator pulls data from HL7-related tables stored in a profile. Read how to set the profile.
How to configure the generator to use the appropriate HL7 table:
| Example #1: | Generated Values | |||||
|
| |||||
| Example #2: | Generated Values | |||||
|
|
This generator pulls data from an SQL-accessible database.
How to configure this generator to use SQL query results as de-identified values:
| Example #1: | Generated Values | |||||
|
|
This generator pulls data from a text file (*.txt, *.csv, etc).
How to configure this generator to use text file content:
Note: If more than one field is configured using the same text file, the same line will be used within the same message. In other words, you can use a text file to ensure several values will be used together. This can be useful when linking a a city with a zip code or a first name with a gender.
The examples below use the following content in a file C:MyDocumentsmyFile.txt
| Example #1: | Generated Values | ||||||
|
| ||||||
| Example #2: | Generated Values | ||||||
|
|
This generator pulls data from an Excel 2007+ file (*.xlsx).
How to configure the generator to use Excel file content:
Note: If more than one field is configured using the same worksheet, the same row will be applied across a message. In other words, you can use an Excel file to ensure that several values will be used together. This can be useful when link a city with a zip code or a first name with a gender.
The examples below use the following content from a file named C:MyDocumentsmyExcelFile.xlsx
| 1 | Road Runner | M | ACME | Anycity | 12345 |
| 2 | The Coyote | M | ACME | Anycity | 12345 |
| 3 | Sylvester The Cat | M | ACME | Anycity | 12345 |
| 4 | Tweety Bird | M | ACME | Anycity | 12345 |
| 5 | Jane Doe | F | Anothercity | 98765 | |
| 6 | John Smith | M | Anothercity | 98765 |
| Example #1: | Generated Values | ||||||
|
| ||||||
| Example #2: | Generated Values | ||||||
|
|
This generator is to be used when you don’t want a data element to be changed. Here
are two use case examples.
If the data type Extended Person Name (XPN) is part of the list of data
types to de-identify, you might need to preserve some of the fields using this data
type.
| Data Type | Component | Generator |
| XPN | 2 – Given Name | Excel File |
| FN | 1 – Surname | Excel File |
| Segment | Field | Component | Subcomponent | ID | Generator |
| PV1 | 7 – Attending Doctor | Use Original Value |
Using this configuration, you would make sure all names are de-identified except
the attending doctor’s name.
Prevent de-identifying a field that is defined as a ID |
| Field IDs must have a generator associated with them but, if for some reason you prefer having the original value, you can set this to avoid any changes in that value. |
Re-use the original data and combine it with other generators |
| In Advanced Mode, you can de-identify the original value by specifying several generators, but you could also include the original value to combine it with other generated values. |
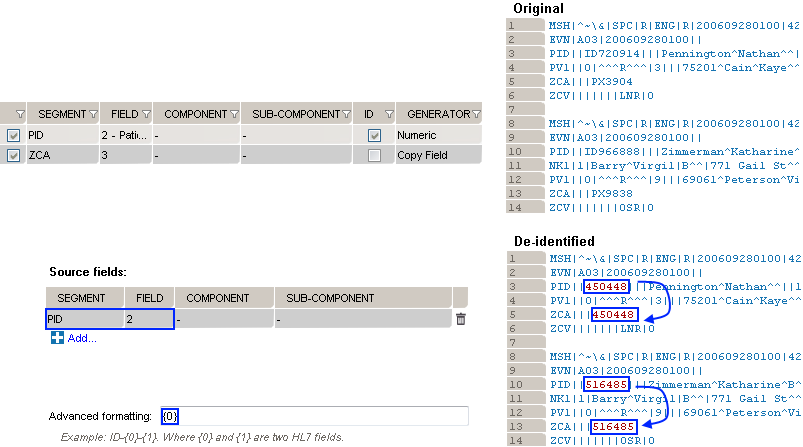
This generator replicates the value from another de-identified field.
How to use the “Copy Another Field” generator:
Example 1: copy the replacement MRN value from PID. 2 to ZCA.3
This generator will replace any piece of information found in another message field that is set for de-identification.
In the following message, the name of the patient is mentioned in the patient update note (NTE.3).
If the patient name (PID.5.1 field) is listed among the de-identification rules, you can configure a new field to detect the patient name within NTE.3
| Segment | Field | Component | Subcomponent | ID | Generator |
| PID | 5 – Patient Name | 1 – Family Name | Excel File | ||
| NTE | 3 – Comment | Unstructured Data |
Using these settings, the de-identified message will look like this:
If the patient name (PID.2 field) is listed among the de-identification rules, you can configure a new field to detect the patient ID within NTE.3
| Segment | Field | Component | Subcomponent | ID | Generator |
| PID | 2 – Patient ID | Numeric | |||
| PID | 5 – Patient Name | 1 – Family Name | Excel File | ||
| NTE | 3 – Comment | Unstructured Data |
Using these settings, the de-identified message will look like this:
Sometimes, a field may be Base64-encoded, as seen below.
In the above message, the decoded value of the NTE.3 field is “Mr. Smith provided new phone numbers”. To detect and de-identify the patient’s name, in addition to including the patient name (PID.5.1 field) into the de-identification rules, you need to tick the “Decode message field from base 64 format before De-Identifying” checkbox. This will decode the field, de-identify it, and then re-encode it into Base64.
| Segment | Field | Component | Subcomponent | ID | Generator |
| PID | 5 – Patient Name | 1 – Family Name | Excel File | ||
| NTE | 3 – Comment | Unstructured Data |
Using these settings, the de-identified message will look like this:
The decoded value of the above NTE.3 field is “Mr. Doe provided new phone numbers.”
When creating a de-identification rule, you can optionally create and apply a precondition to decide whether or not to apply the rule to a given field. Preconditions are scripts that are written with our JavaScript API.
You can add a precondition to an existing de-identification rule by going into Advanced Mode and selecting “Add Precondition.” This will open a window that allows you to write the script for the precondition and to test it by supplying messages in the Test Data window.
To decide whether or not the precondition is satisfied, use the callback() method. The callback() method accepts a boolean (true or false) which determines whether or not the precondition is satisfied. If the precondition is satisfied, the de-identification rule will be applied to the given field. If it is not satisfied, the de-identification rule will not be applied.
During HL7 message de-identification, the JavaScript engine context is updated, allowing you to access the current element being validated. The context has the following properties you can refer to:
The following is an example of a precondition.
Suppose that you only wanted to apply a de-identification rule to the PID.3.1 – ID Number component in a message if the ID was a medical record number. In other words, if the value of the PID.3.5 – Identifier Type Code component was “MR.” The precondition you’d use would like this:
var patientIdTypeCode = context.field.get('5');
callback(patientIdTypeCode == 'MR');
Here, the precondition context’s field is the PID.3 – Patient Identifier List field.
This generator will replace any piece of information found in another message field that is set for de-identification.
In the following message, the name of the patient is mentioned in the patient update note (NTE.3).
If the patient name (PID.5.1 field) is listed among the de-identification rules, you can configure a new field to detect the patient name within NTE.3
| Segment | Field | Component | Subcomponent | ID | Generator |
| PID | 5 – Patient Name | 1 – Family Name | Excel File | ||
| NTE | 3 – Comment | Unstructured Data |
Using these settings, the de-identified message will look like this:
If the patient name (PID.2 field) is listed among the de-identification rules, you can configure a new field to detect the patient ID within NTE.3
| Segment | Field | Component | Subcomponent | ID | Generator |
| PID | 2 – Patient ID | Numeric | |||
| PID | 5 – Patient Name | 1 – Family Name | Excel File | ||
| NTE | 3 – Comment | Unstructured Data |
Using these settings, the de-identified message will look like this:
Sometimes, a field may be Base64-encoded, as seen below.
In the above message, the decoded value of the NTE.3 field is “Mr. Smith provided new phone numbers”. To detect and de-identify the patient’s name, in addition to including the patient name (PID.5.1 field) into the de-identification rules, you need to tick the “Decode message field from base 64 format before De-Identifying” checkbox. This will decode the field, de-identify it, and then re-encode it into Base64.
| Segment | Field | Component | Subcomponent | ID | Generator |
| PID | 5 – Patient Name | 1 – Family Name | Excel File | ||
| NTE | 3 – Comment | Unstructured Data |
Using these settings, the de-identified message will look like this:
The decoded value of the above NTE.3 field is “Mr. Doe provided new phone numbers.”
Caristix Cloak allows you to de-identify HL7 messages using a command line. This allows you to automate operations, such as data conversion, de-identification, test execution, etc. To automate operations, you will be able to use the CloakConsole executable located in the software’s installation folder (typically C:\Program Files (x86)\Caristix\Caristix Cloak).
You can open a command prompt and type the following command to get a list of available commands
CloakConsole.exe help
To get help on a particular command, type
CloakConsole.exe help <command-name>
This command will de-identify HL7v2-XML messages.
To get help with this command, type: CloakConsole.exe help De-Identify-XML
C:\Program Files (x86)\Caristix\Caristix Cloak>CloakConsole.exe help De-Identify-XML ** De-Identify-Xml ** e.g. De-Identify-Xml C:\first-document.xml D:\second-document.xml -de <or> -DeIdentificationR ules "C:\My DeIdentification rules.cxdx" [-cp <or> -ConformanceProfile "C:\HL7Reference\CCD ( Continuity of Care).cxpx"] [-pi <or> -PersistentIdentities "D:\persistence-xml.dic"] [-r <or> -Results "D:\results\"] [-lp <or> -LogsFilePath "C:\logs.txt"] Source files : The documents to De-Identify (can also be folders). -de required : DeIdentification rules file path. -cp [optional] : Conformance Profile file path. -pi [optional] : Persisted identities file path (if the file already exists, the context will be loaded from it). -r [optional] : Result folder path. The value has to be a folder [default: .\Results]. -lp [optional] : Logs file path.
Cloak has a number of options that can be set. From the main menu bar, click Tools, then Options. In the Options dialog box that opens, there are three categories: Reference Profile, Windows Service Settings, Delimiters, Settings and Preferences.
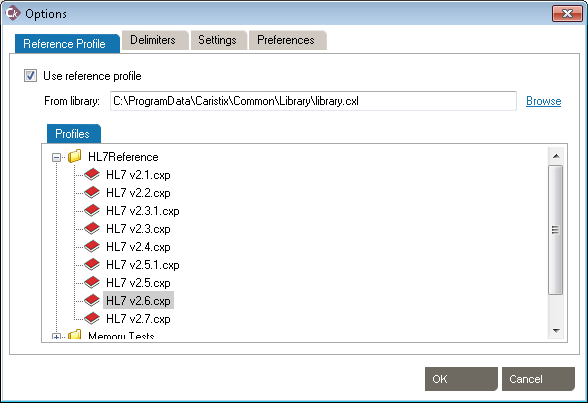
These settings allow the use of HL7 reference profiles to parse logs. Open the Reference Profile tab.
These settings allow the addition of specific delimiters to the log file to assist with manageability and readability. They include:
Click OK to save the delimiters.
Click OK to save the settings.
Click OK to save the Preferences.
Welcome to the “De-Identifying HL7 Messages” tutorial. This will show you how to use Caristix Workgroup to remove PHI from a stack of HL7 messages.
The application would replace PHI with new patient data generated at run-time, keeping patient history but removing any link with the actual patients.
To get started, let’s open the de-identification module and load a file containing HL7 messages. Message could also be loaded from a database or directly from your interface engine if you have the connector installed.
Open HL7 v2.x messages you want to de-identify:
Click FILE → Open → Messages… → +Add…
Choose the files containing the messages. If it is saved on your computer, click Browse My Computer.
The chosen file will be added to the file list.
Click Next > to load the file content.
Your message will appear in the Original section and an example of your message de-identified will appear in the De-identified section.
(0:35) All de-identified data in messages is in red so you can see the actual message and the result.
(0:41) The application comes with a set of de-identification rules. It covers all standard HL7 fields HIPPA identified as containing sensitive data. If messages contain customized fields or Z-segments, go ahead and customize rules.
If needed, you can modify the de-identification rules. Look at this video if you need help.
Once all rule configurations are as wanted, click View Example. You can see an example of the result in the De-identified section. If anything is not as expected in the response, continue customizing the rules.
Set the dictionary:
Click TOOLS → Option… → Settings → Enable Re-apply rules and replacement data across multiples files.
You can create as many dictionaries as needed. For this tutorial, let’s create a new dictionary called HL7Deid. Replace the file name with: C:\ProgramData\Caristix\Carisitx Cloak\Temp\HL7Deid.dic
(0:58) Once de-identification rules are set, it’s time to launch it so all messages are de-identified and stored in files. At the end of the processing, if needed, an audit PDF file can also be created, documenting all settings de-id was done with.
Click OK → De-identify. → Choose where to save the result. Click Browse My Computer to save it onto your computer. → OK → Yes if you want to create a De-identify Process Report in PDF.
(1:14) This ends the “De-Identifying HL7 Messages” introduction tutorial. If you have any question, feel free to contact us. We love questions and feedback!
Thanks for watching