HL7® Survival Guide: Chapter 12, Definitions

Anonymization

This is a type of de-identification where all sensitive data is removed.  More details and a definition of anonymization are available in a previous blog post.

Code set

Also referred to as HL7® tables, vocabulary or code table. It is a list of codes and their meanings used to codify information included in HL7® messages. Codes could be defined by the HL7® standard itself or information systems.

For instance, here is the list of suggested values for patient gender as proposed by HL7® v2.6

Code Value
 M Male
 F  Female
 U  Unknown
 A  Ambiguous
 O  Other
 N

 Not Applicable


Component

The basic building block used to construct a data type. In the case of complex data types, each data element is a component.
Example: Patient Family Name (PID.5.1) is a component of Patient Name (PID.5)

Conformance Profile

A description of the data and messages that an interface sends and/or receives. Also known as an HL7® specification or profile. The description covers the data format, data semantics and acknowledgment responsibilities. The description must be clear and precise enough so that it can act as a set of requirements for data exchange.

Data Type

From the Health Level Seven International (HL7®) official site: “The basic building block used to construct or restrict the contents of a data field.” In other words, a data type will describe the format of field data elements (components). Example: Personal names are constructed using several pieces of information and should maintain the same structure across the board. The XPN data type describes such structure.
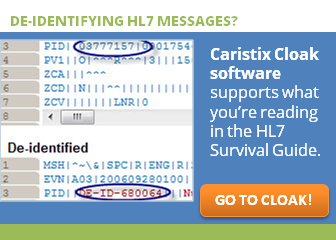
De-Identification

De-Identification occurs when all identifiers and quasi-identifiers (IDs, names, addresses, phone numbers, genders, etc.) are removed from the information set. This protects patient identity while most of the data remains available for sharing with other people/organizations, or for related uses.  See our post on de-identification basics for more details.

ER7 encoding

This is a representation of an HL7® message using message, segment, field, component and sub-component delimiters. This encoding is usually referred to as a “pipe delimited” message.

Example:

MSH|^~\&|MegaReg|XYZHospC|SuperOE|XYZImgCtr|20060529090131-0500||ADT^A01^ADT_A01|01052901|P|2.5
EVN||200605290901||||200605290900
PID|||56782445^^^UAReg^PI||KLEINSAMPLE^BARRY^Q^JR||19620910|M||2028-9^^HL70005^RA99113^^XYZ|260 GOODWIN CREST DRIVE^^BIRMINGHAM^AL^35 209^^M~NICKELL’S PICKLES^10000 W 100TH AVE^BIRMINGHAM^AL^35200^^O |||||||0105I30001^^^99DEF^AN
PV1||I|W^389^1^UABH^^^^3||||12345^MORGAN^REX^J^^^MD^0010^UAMC^L||678 90^GRAINGER^LUCY^X^^^MD^0010^UAMC^L|MED|||||A0||13579^POTTER^SHERMAN ^T^^^MD^0010^UAMC^L|||||||||||||||||||||||||||200605290900
OBX|1|NM|^Body Height||1.80|m^Meter^ISO+|||||F
OBX|2|NM|^Body Weight||79|kg^Kilogram^ISO+|||||F AL1|1||^ASPIRIN DG1|1||786.50^CHEST PAIN, UNSPECIFIED^I9|||A

The other allowed encoding uses HL7-XML.

Field

According to Health Level Seven International (HL7®), a field is a string of characters. Fields for use within HL7® segments are defined by HL7®. A field is the basic building block used to construct a segment. By default, fields are delimited by the “|” character (see the above example) and are built with one or more components.  Patient name (PID.5) is an example of a field.
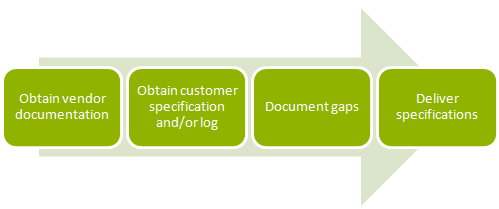
Gap Analysis

Gap analysis is the phase in a deployment project where analysts map the data elements between the product they are installing to the elements in the hospital’s existing information systems therefore detailing the gaps existing between the two sources.  The result is usually a list of differences between data definitions.  This list would then be used to configure/develop data transformation routines.

HL7®

HL7® is an international community of healthcare subject matter experts and information scientists collaborating to create standards for the exchange, management and integration of electronic healthcare information.

The name “Health Level-7” is a reference to the seventh layer of the ISO OSI Reference model, also known as the application layer.
Hospitals and other healthcare provider organizations typically maintain many different computer systems for everything from billing records to patient tracking. All of these systems should communicate with each other (or “interface”) when they receive new information but not all do so. HL7® specifies a number of flexible standards, guidelines, and methodologies by which various healthcare systems can communicate with each other. Such guidelines or data standards are a set of rules that allow information to be shared and processed in a uniform and consistent manner. These data standards are meant to allow healthcare organizations to easily share clinical information. Theoretically, this ability to exchange information should help to minimize the tendency for medical care to be geographically isolated and highly variable.

HL7-XML Encoding

This is a basic XML representation of an HL7® message where XML elements represent HL7® messages constructs like segments, fields and components. The other allowed encoding is ER7.

Example:

<ADT_A01>
	<MSH>
		<MSH.1>|</MSH.1>
		<MSH.2>^~\&</MSH.2>
		<MSH.3>
			<HD.1>MegaReg</HD.1>
		</MSH.3>
		<MSH.4>
			<HD.1>XYZHospC</HD.1>
		</MSH.4>
		<MSH.5>
			<HD.1>SuperOE</HD.1>
		</MSH.5>
		<MSH.6>
			<HD.1>XYZImgCtr</HD.1>
		</MSH.6>
		<MSH.7>
			<TS.1>20060529090131-0500</TS.1>
		</MSH.7>
		<MSH.8 />
		<MSH.9>
			<MSG.1>ADT</MSG.1>
			<MSG.2>A01</MSG.2>
			<MSG.3>ADT_A01</MSG.3>
		</MSH.9>
		<MSH.10>01052901</MSH.10>
		<MSH.11>
			<PT.1>P</PT.1>
		</MSH.11>
		<MSH.12>
			<VID.1>2.5 </VID.1>
		</MSH.12>
	</MSH>
	<EVN>
		<EVN.1 />
		<EVN.2>
			<TS.1>200605290901</TS.1>
		</EVN.2>
		 […]
	</EVN>
	<PID>
		[…]
	</PID>
	 […]
</ADT_A01>


HL7® v2.x Message

HL7® version 2 defines a series of electronic messages to support administrative, logistical, financial and clinical processes. The v2.x standards are backward compatible (e.g., a message based on version 2.3 will be understood by an application that supports version 2.6).
HL7® v2.x messages use a human-readable (ASCII), non-XML encoding syntax based on segments (lines) and one-character delimiters. Segments have composites (fields) separated by the composite delimiter. A composite can have sub-composites (subcomponents) separated by the sub-composite delimiter, and sub-composites can have sub-sub-composites (subcomponents) separated by the sub-sub-composite delimiter. The default delimiters are vertical bar or pipe (|) for the field separator, caret (^) for the component separator, and ampersand (&) for the subcomponent separator. The tilde (~) is the default repetition separator. The first field (composite) in each segment contains the 3-character segment name. Each segment of the message contains one specific category of information. Every message has MSH as its first segment, which includes a field that identifies the message type. The message type determines the expected segment names in the message. The segment names for a particular message type are specified by the segment grammar notation used in the HL7® standards.

Sample of a v2.2 message with customized segments:

MSH|^~\&|MegaReg|XYZHospC|SuperOE|XYZImgCtr|20060529090131-0500||ADT^A01^ADT_A01|01052901|P|2.5
EVN||200605290901||||200605290900
PID|||56782445^^^UAReg^PI||KLEINSAMPLE^BARRY^Q^JR||19620910|M||2028-9^^HL70005^RA99113^^XYZ|260 GOODWIN CREST DRIVE^^BIRMINGHAM^AL^35 209^^M~NICKELL’S PICKLES^10000 W 100TH AVE^BIRMINGHAM^AL^35200^^O |||||||0105I30001^^^99DEF^AN
PV1||I|W^389^1^UABH^^^^3||||12345^MORGAN ^REX^J^^^MD^0010^UAMC^L||678 90^GRAINGER^LUCY^X^^^MD^0010^UAMC^L|MED|||||A0||13579^POTTER^SHERMAN ^T^^^MD^0010^UAMC^L|||||||||||||||||||||||||||200605290900
OBX|1|NM|^Body Height||1.80|m^Meter^ISO+|||||F
OBX|2|NM|^Body Weight||79|kg^Kilogram^ISO+|||||F
AL1|1||^ASPIRIN DG1|1||786.50^CHEST PAIN, UNSPECIFIED^I9|||A

HL7® v3 Message

V3 is the latest version of the HL7® message standard. It is not backward compatible with the v2.x standard. Instead it implements a completely new top-down design approach based on the Reference Information Model (RIM) for better consistency and extensibility. HL7® v3 messages are XML documents exchanged between systems. Tags are defined through a suite of modeling mechanism. We see some adoption of this message standard around Clinical Document Architecture (CDA). However, most systems continue to exchange data using v2.x messages.

Integration Engine

An integration engine is middleware built specifically to connect systems by using a standard messaging protocol. The integration engine is responsible for mediating protocols, orchestrating message workflow, transforming message formats and guaranteeing message delivery.
Integration engines simplify system interoperability by allowing message feed management. In other words, you don’t need to manage system-to-system connections. Instead, messages are sent to the integration engine. Messages will be forwarded to any system meant to receive those messages using the protocol supported by the given system. If needed, transformation can be applied so a message is translated to the expected message format.

Interface

Hospitals and other healthcare provider organizations typically maintain many different computer systems for everything from billing records to patient tracking. All of these systems should communicate with each other (or "interface") when they receive new information but not all do so. HL7® specifies a number of flexible standards, guidelines, and methodologies by which various healthcare systems can communicate with each other. Such guidelines or data standards are a set of rules that allow information to be shared and processed in a uniform and consistent manner. These data standards are meant to allow healthcare organizations to easily share clinical information. Theoretically, this ability to exchange information should help to minimize the tendency for medical care to be geographically isolated and highly variable

Integration as a Service

Based on the SaaS model, this is a delivery model where a provider provides all required infrastructure to interface systems. Usually, instead of charging for licenses and hardware, the provider will charge per message.

Message

A message is the atomic unit of data transferred between systems. In the HL7® world, it comprises a group of segments in a defined sequence. Each message has a message type that defines its purpose. For example the ADT Message type is used to transmit portions of a patient's Patient Administration (ADT) data from one system to another. A three-character code contained within each message identifies its type.

Optionality

According to Health Level Seven International (HL7®), optionality refers to whether the field, segment or segment group is required, optional, or conditional in a segment.

Point to point

Direct integration between two systems where system A and system B directly exchange information without an intermediate system or middleware.

Pseudonymization

This is a type of de-identification.  This process replaces data-element identifiers and quasi-identifiers with new data elements so that the relationship to the initial object is replaced by a completely new subject. After the substitution, it is no longer possible to associate the initial subject with the data set. In the context of healthcare information, we can “pseudonymize” patient information by replacing patient-identifying data with completely unrelated data. The result is a new patient profile or identity. The data continues to look complete and the data semantics (the meaning of the data) is preserved while patient information remains protected.  Read more about pseudonymization in a previous post.

Repeatability

According to Health Level Seven International (HL7®), repeatability refers to whether the segment or field may repeat. The value set is the maximum number of allowed occurrences; if unspecified, there is only one occurrence, i.e., it cannot repeat.

Segment

A segment is a logical grouping of data fields. Segments of a message may be required or optional. They may occur only once in a message or they may be allowed to repeat. Each segment is given a name. For example, the ADT message may contain the following segments: Message Header (MSH), Event Type (EVN), Patient ID (PID), and Patient Visit (PV1).

Two or more segments may be organized as a logical unit called a segment group. A segment group may be required or optional and might or might not repeat. As of v 2.5, the first segment in a newly defined segment group will be required to help ensure that un-parsable messages will not be inadvertently defined. This required first segment is known as the anchor segment.

Sub-Component

The basic building block used to construct a component. In the case of complex data types using complex data type as components, each data element of the component is a sub-component. Example: Patient Own Surname (PID.5.1.1) is a sub-component of Patient Name (PID.5)

Trigger Event

Health Level Seven International (HL7®) defines a trigger event as “A real-world event creating the need for data to flow among systems. For example, the trigger event a patient is admitted may cause the need for data about that patient to be sent to a number of other systems. The trigger event, an observation (e.g., a CBC result) for a patient is available, may require that observation to be sent to a number of other systems. When the transfer of information is initiated by the application system that deals with the triggering event, the transaction is termed an unsolicited update.”

Read More in the HL7® Survival Guide

Introduction
Chapter 1: How to Integrate and Exchange Healthcare Data
Chapter 2: Pros and Cons of Interfacing Capabilities
Chapter 3: The Heart of the Matter: Data Formats, Workflows, and Meaning
Chapter 4: How to Work with Vendors and Developing Your EHR Strategy
Chapter 5: Vendors, Consultants, and HL7® Interface Specifications
Chapter 6: Interfacing Artifacts: HL7® Conformance Profiles or Interface Specifications
Chapter 7: Interfacing Artifacts: Gap Analysis
Chapter 8: Interfacing Artifacts: Test Scenarios and Test Systems
Chapter 9: Interfacing Artifacts: Message Samples and Test Messages
Chapter 10: Process and Workflow
Chapter 11: Maintenance, Troubleshooting, and Monitoring
Chapter 12: Definitions
Chapter 13: Contributors and Resources

Caristix Workgroup software for integration teams

HL7® Survival Guide: Chapter 11 Maintenance, Troubleshooting, Monitoring

Now we’re coming full circle. Throughout Chapters 6 through 10, we talked about creating interfacing artifacts, assets, and documentation: profiles, gap analyses, test plans, test messages, test systems, and workflow maps. In this chapter, we explain how you can get maximum value from all the work you put into creating all of those.

Why Document?

By documenting your profiles and specs, you can much more easily troubleshoot issues and tweak configuration once your interface is live. Plus, if you created electronic – i.e., machine readable – versions of your profiles, you can use them in your monitoring. For example, you could shoot a message through a profile using the Caristix Message Player to see if there’s anything anomalous, such as an extra segment or a field that is too long. Or you could run problematic messages against the test scenarios you developed during the validation phase of the interface lifecycle.

All that’s good and well but no one can use your profiles and spec unless they’re readily available. So be sure to store them in a central repository for your support team. Make the files read-only if necessary. What’s important is that anyone can quickly access them when needed.

By using the assets you built in the earlier phases of the interface lifecycle, you can quickly and proactively address issues and avoid additional costs. Plus you can keep users happy. Imagine rapidly troubleshooting an issue to avoid downtime rather than forcing clinicians to log a help desk ticket because the interface went down.

Maintenance, Monitoring and Troubleshooting

Another benefit to documenting profiles is that it streamlines processes when you are performing a system upgrade. Let’s say you’re changing or upgrading your pharmacy system – that change affects the interface of any other system that communicates with the pharmacy system. Imagine ten different systems connect to your pharmacy system – you’d need to tweak those ten interfaces.

But you’re smart and you already documented the pharmacy system and the other systems through the use of profiles/specifications. That means all you need to do is create a new profile for the new/changed pharmacy system. Then when you redo the associated 10 interfaces, you will perform a new gap analyses, but the hard scoping work (those specs) will already be done.

Once your interfaces are in place, you want to monitor them to ensure they’re supporting your processes as designed. The value of monitoring is that it empowers you to be proactive in troubleshooting issues. You can set up thresholds and then be alerted to potential issues. For example, you could say that only a certain number of messages should pass through the system for a certain process and if that number is exceed, you get alerted.

Many interface engines include monitoring capabilities but some are limited to that particular engine. If that’s all that you have at your disposal, take advantage of it. But if you have the option and your environment includes multiple interface engines, look for vendor-agnostic solutions that cover the entire integration environment. That’s the easiest way to get a global overview of your environment.

Just remember – when you’re sharing data across your infrastructure, sometimes an HL7® message is the problem. But the network or a specific system could also be the problem. For example, perhaps a nurse is not seeing orders in the pharmacy system. This may be because the network is down. Or it could be an issue with the ADT system or with the medication admin system. Or one HL7® message could be holding up the queue. You want to be able to quickly eliminate the HL7® message as the issue. Just remember that ideally your monitoring should link back to your test cases and interface specifications.

4 Best Practices for Extracting Maximum Value from Your Artifacts

The fact is that the value of your interface-related artifacts increases over time. While they’re useful for development and go-live, they are essential down the road, in a year or two or more. Here’s how to get the most from these artifacts.

  • Work with real-world messages. When you’re developing deliverables such as profiles, it’s important to start with real-world messages for the reasons we covered earlier in this chapter on HL7® interface specifications. You will refer back to these deliverables over and over throughout the interface life cycle. If you start with placeholders or fictitious information, you’ll struggle when it comes time to troubleshoot issues.
  • Share your work. Share your artifacts. Encourage diligence in documenting all aspects of your interface project. Consider a common scenario – the interface project wraps up and a key analyst or engineer leaves your organization. You want the new employee to be able to easily take over for the departing employee. And that means having all related documentation on hand. This practice helps in another way: by documenting what changes have been made to the interface over time, it’s much easier to quickly troubleshoot any issue. And keep an on-going to-do list, especially around gap analysis as this will help you better approach maintenance tasks. And make it easy for people to share their work and documentation. Use SharePoint, or look for collaboration functionality in the software you purchase.
  • Archive your work. Upgrades and updates to the interface engine will happen. You don’t want to get stuck being the victim of Frozen Interface Syndrome, which occurs when you are trying to implement a new interface and need all participants to switch over at the same time but can’t get their cooperation. You also want to avoid Black Box Syndrome, when you lack full visibility into all the work that has gone into interface development handled by a third party, making it nearly impossible to upgrade, tweak, and manage the interface without spending lots of money and time. Don’t make the mistake of thinking you won’t need certain documentation in the future. In fact, you’ll probably re-use it for your next project or for an interface or system update.
  • Understand content management. Effective documentation requires that you think beyond message structure and troubleshooting. You need to think about clinical content and how it changes over time. For example, lab orders have their own codes and these codes get updated over time. You want ready access to the most up-to-date list as needed. And you need them reflected in your HL7® tables. That means you need to plan from the start how you’ll map the code sets to the right fields and build that into your interface and the system at go-live.


Checklist collaboration software for HL7 integration

To make all easier for your organization to take full advantage of its interfacing artifacts, assets, and documentation, download this checklist of what to look for when you’re researching collaboration software.

Read More in the HL7® Survival Guide

Introduction
Chapter 1: How to Integrate and Exchange Healthcare Data
Chapter 2: Pros and Cons of Interfacing Capabilities
Chapter 3: The Heart of the Matter: Data Formats, Workflows, and Meaning
Chapter 4: How to Work with Vendors and Developing Your EHR Strategy
Chapter 5: Vendors, Consultants, and HL7® Interface Specifications
Chapter 6: Interfacing Artifacts: HL7® Conformance Profiles or Interface Specifications
Chapter 7: Interfacing Artifacts: Gap Analysis
Chapter 8: Interfacing Artifacts: Test Scenarios and Test Systems
Chapter 9: Interfacing Artifacts: Message Samples and Test Messages
Chapter 10: Process and Workflow
Chapter 11: Maintenance, Troubleshooting, and Monitoring
Chapter 12: Definitions
Chapter 13: Contributors and Resources

Caristix Workgroup software for integration teams

HL7® Survival Guide: Chapter 10 Process and Workflow

In the last chapter, we explained what to aim for in test messages and message samples. Next you need to map out your processes and workflows to understand how your interface can support them.

For example, your clinical workflow may look like this: a patient is admitted in the Emergency Department via the departmental ADT system. The doctor on duty orders lab work and the patient is admitted to the hospital. The admission is now recorded as an in-patient in the standard ADT system. The attending doctor orders medications via the hospital’s pharmacy system. The night nurse administers medications, and records this via the barcode medication administration. Not satisfied with the patient’s progress, the attending doctor orders new labs and after receiving the results, decides to perform a procedure, which requires that the patient be transferred to another location. The doctor’s orders and the transfer are recorded in the in-patient ADT. The patient improves and is discharged – this event is captured in the same ADT. Finally, thanks to Meaningful Use, the patient’s family doctor receives a discharge summary via the local HIE.

All of these events comprise a workflow representing a patient stay or visit. While some workflows are optional, some always happen in a certain way. What’s important is knowing where the data is going and how it’s going to be used.

Why You Need to Map Processes and Workflows

If you’ve documented your workflows and systems, it’ll be easier to connect the next system because you won’t need to start from scratch. Workflows also impact your test plan. For instance, all your destination systems might require different inputs from a single source system. As part of your scoping and requirements planning, you’ll need to understand the workflow – for instance, who does what: a physician, a nurse, or a pharmacist? Capturing workflow is also critical for network monitoring down the road so, for example, your IT team will know right away when a system goes down what workflows and processes are affected. (We’ll discuss network monitoring in Chapter 11 .)

Start with a Spreadsheet?

Many developers list their interfaces and workflows in a spreadsheet. You’ll find examples of what to track in the HL7® Interface Asset Template here. While a spreadsheet provides a good start, you need to go beyond to capture the details and interconnections. After all, in most hospital environments, you’ll be dealing with multiple workflows and systems, meaning your systems will be exchanging different sets of data. To efficiently and accurately test and manage all of this over the interface lifecycle, you need a clear mapping of workflows and processes – something that’s nearly impossible to capture in a spreadsheet.

Here’s what you should capture when documenting your interfaces and workflows:

  • Interface names
  • Systems that are linked
  • Connection information (IP address, credentials, port, connection type, location (location may be by unit or by data center)
  • Security: SSL, VPN, firewalls, and any required certificates .
  • Trigger events: List all trigger events and note which ones are used by which systems based on your spec.
  • Connection types: could include database, web service, TCP, HTTP, file, FTP .

Note: here’s why it may make sense to note the data center location. Let’s say you run systems out of two data centers for redundancy, one in Skokie, IL and the other in Hyde Park, IL. If your Skokie, IL data center experiences failures, but your Hyde Park data center is still operating, you’ll know it makes sense to start your troubleshooting in Skokie.

Consider one workflow in which data entered through an interface is first pushed to a database, then to an external system through a web service, and finally to archives or an enterprise warehouse. Without a diagram of this workflow, it’s difficult – if not impossible – to track the data flow. Four months after deploying your interface, you may find that no data has been pushed to the archives.

Monitoring Beyond the Interface Engine

Some interface engines let you view workflow within the engine. But what happens with external systems, such as an HIE transmitting to an internal engine, or multiple systems from different providers connecting across a region? Monitoring workflow is a major issue in interoperability – even bigger than interfacing. You need a way to monitor beyond the engine.

While you can track interfaces and workflow to some extent with spreadsheets, and can use a tool like Visio to diagram it all out, you ultimately need a tool that maps process and workflow. Such a tool lets you truly grasp your data and interfaces – not just your interface engine plumbing.

4 Capabilities to Seek Out for Monitoring

  • Visualize all of your interoperability assets, from multiple interface engines to the interfaces themselves.
  • Cover the entire interface lifecycle.
  • Access a library of interfacing assets and manage assets so you can take an instant inventory.
  • And it should provide all this regardless of the interface engine you’re using.

Tips for Artifact Management

Interfacing artifacts can grow over time. You maintain two profiles for your source and destination system. You conduct a gap analysis and your engine handles message transformation. But message transformation is part of workflow. You need test plans and test data. Keep all these artifacts together and include workflow. As you develop and implement interfaces, these can grow.

Interface Asset Template: What to Capture

Interface asset template


We can’t emphasize it enough: profiles and spreadsheets are just a start; in order to fully cover workflow, you need software to map process and workflow. Nonetheless, we’d like to help you get started with a baseline spreadsheet. Our Interface Asset Template is a handy download that will show you what you need to track.

Read More in the HL7® Survival Guide

Introduction
Chapter 1: How to Integrate and Exchange Healthcare Data
Chapter 2: Pros and Cons of Interfacing Capabilities
Chapter 3: The Heart of the Matter: Data Formats, Workflows, and Meaning
Chapter 4: How to Work with Vendors and Developing Your EHR Strategy
Chapter 5: Vendors, Consultants, and HL7® Interface Specifications
Chapter 6: Interfacing Artifacts: HL7® Conformance Profiles or Interface Specifications
Chapter 7: Interfacing Artifacts: Gap Analysis
Chapter 8: Interfacing Artifacts: Test Scenarios and Test Systems
Chapter 9: Interfacing Artifacts: Message Samples and Test Messages
Chapter 10: Process and Workflow
Chapter 11: Maintenance, Troubleshooting, and Monitoring
Chapter 12: Definitions
Chapter 13: Contributors and Resources

Caristix Workgroup software for integration teams

HL7® Survival Guide: Chapter 9 Message Samples and Test Messages

In the previous chapter, we covered what you need to know when testing your interface. While the right test tool is helpful, you need to feed it the right message samples and test messages. After all, messages impact the entire interfacing lifecycle.

So what makes messages “right”? Namely, you need message samples and test messages that reflect your environment: your ADT message flow, your specific lab codes, and your case mix – whatever information your interface is intended to share.

Just as you need sample messages elsewhere in the interfacing lifecycle (for instance, scoping), you need them for testing, too. (As a reminder, sample messages give you custom formats, structure, and data values).

For example, imagine you’re interfacing LIS and ADT. You’ll want to look at the issues that were highlighted during the gap analysis . Your test messages need to cover your use cases and the following:

  • Events that are exchanged
  • Code sets/vocabulary and varying field lengths
  • Optional segments and fields, especially varying optionality  

Go with Production Data

Now about the sources of your messages: we’re going to come right out and say it – you need production data. Here’s why: Once you have the right message samples and test messages, you need to make sure you have a sufficient volume of quality test data. And your production data accurately reflects the data you work with day in and day out, both in data type and format as well as volume. And that means you’ll be able to accurately test for load and performance, and avoid message workflow problems that can bring down interfaces.

It All Starts with De-identification

That said, you obviously can’t use real production data. You need to find a way to remove protected health information (PHI). That’s where a technique known as de-identification can help. You keep the clinical workflow in the messages, but you remove patient identifiers and replace them with fake values. You can also replace them with off-the-wall fake values for edge cases .

And remember – even employer information can contain PHI. For instance, if two of your patients work for say, a 5-person law firm, it would be pretty easy to search publicly available information sources and re-identify them. You must remove their employer names – or insert replacement names – if you want to use this data safely.

(For more on de-identification, check out these blog posts.

Here’s what to keep in mind when you de-identify your production data:

  • Satisfy HIPAA. Remove the 18 identifiers designated by HIPAA as protected health information (PHI).
  • Maintain message flow. If “John Doe” in your production data becomes “Michael Smith” in your test log, ensure that Michael Smith in your A01 admission message is the same Michael Smith upon discharge.
  • De-identify data in z-segments. PHI can hide in z-segments.
  • Log volume. Aim for at least a week’s worth of messages and ideally a few months’ worth.
  • Traceability. Record which data was de-identified and which fields and data types were transformed.

Without the right message samples and test messages, you’ll run into the issues we discussed in the last chapter, namely lack of updated vocabulary and potential for downtime if messages contain unexpected values.Caristix Cloak for de-identification Remember, these messages are how you test the data format and confirm that you’re not introducing errors. For example, you don’t want to find out after go-live that your interface doesn’t recognize a last name with an apostrophe.

Don’t Fall into the Beginner’s Trap

If you’re just getting your feet wet with clinical and medical applications, you might think: “What’s the big deal? I’ll just hit Google for some sample HL7® messages and get started that way.”

Don’t do that! If you do, you’ll get some basic structures right – like pipes and carets. But you won’t have any information about the interface you’re trying to build: the message types it uses, the segments and fields, positions, optionality. Yet developers need the information in messages in order to build a solid set of requirements for the actual interface. That’s why real-world messages are the best option.

Consider that you’re interfacing with a lab system. The lab is often the area of a hospital with the largest number of custom data values. After all, how you treat a lab order and lab results varies by hospital and by vendor. To develop a viable interface, you need to work with realistic messages.

At the same time, many hospitals employ email security measures that block the sending of any emails containing HL7-formatted content – even if it is de-identified. So whatever you find on the Internet is likely to be so generic that it will be practically useless.

Your Feedback Welcome

We’ll be publishing chapters from the HL7® Survival Guide over the upcoming weeks and months. See a topic that needs more detail? Have a different perspective on interfacing and interoperability? Tell us in the comments!

Read More in the HL7® Survival Guide

Introduction
Chapter 1: How to Integrate and Exchange Healthcare Data
Chapter 2: Pros and Cons of Interfacing Capabilities
Chapter 3: The Heart of the Matter: Data Formats, Workflows, and Meaning
Chapter 4: How to Work with Vendors and Developing Your EHR Strategy
Chapter 5: Vendors, Consultants, and HL7® Interface Specifications
Chapter 6: Interfacing Artifacts: HL7® Conformance Profiles or Interface Specifications
Chapter 7: Interfacing Artifacts: Gap Analysis
Chapter 8: Interfacing Artifacts: Test Scenarios and Test Systems
Chapter 9: Interfacing Artifacts: Message Samples and Test Messages
Chapter 10: Process and Workflow
Chapter 11: Maintenance, Troubleshooting, and Monitoring
Chapter 12: Definitions
Chapter 13: Contributors and Resources

Caristix Workgroup software for integration teams

HL7® Survival Guide — Chapter 8: Test Scenarios and Test Systems

HL7 Interface Lifecycle Management
The HL7® interface lifecycle. You need to test during Configuration, Validation, and Maintenance.

In the last two chapters, we covered some of the requirements-related artifacts you need. Now it’s time for testing, which you conduct at different phases in the interface lifecycle: during configuration and development; during the formal validation phase; and during maintenance.

“Why test?,” you ask. When you start to develop and iterate on your interface, you run tests to avoid introducing new problems – you check and test your code to make sure not injecting errors. This is true both during interface development or configuration and while in maintenance mode. This testing helps you determine whether or not the interface makes sense and meets your requirements.

Once you’re satisfied with the interface, you move to validation testing. This is when you determine if the interface will work with and meet the requirements of your clinical workflow. Specifically, you test performance, extreme data cases, and how well the interface supports large volumes. By figuring this out before go-live, you save a lot of implementation headaches, and alleviate the time clinicians need to spend helping you validate the interface once you go live.

What to Look for in a Test Tool

So that’s when and why you should test. But how do you handle this efficiently? The key is to automate your tests. While you need to spend time during the development/configuration phase setting up the tests, during the validation phase, you can take advantage of automation and save a lot of time. In fact, some interface engines include built-in test tools. Regardless of the source of your test software, make sure you can do the following:

  • Be able to connect to web services or a database, such as by calling a web service, and check in the database after sending a message
  • Validate inbound and outbound messages
  • Validate ack and nack
  • Generate values and test messages from a profile or specification, and generate a large volume of data/messages if you’re conducting volume testing
  • Repeat test plans/scenarios, and create reports

What to Test

So what test scenarios should you use? You need to test both normal use cases and edge cases.

That said, before you can conduct any testing, you must understand what to expect of your workflows. This should include common workflows – such as a patient being transferred – involving the use of the products that will be interfaced. For example, in many hospitals, emergency department and in-patient ADTs are two separate systems. A new patient that comes through the emergency department would be registered in the ED’s ADT first. And if she is transferred to Med/Surg, you would need to populate the main ADT, either through an interface or manually by re-entering the data.

Or if you’re creating an interface to move patient charge data from a surgical information system to a billing system, you would need test scenarios in which:

  • Patient demographics and patient ID are incomplete.
  • Billing item information is incomplete.

With that understanding in place, you can test to make sure the interface engine behaves as expected for standard – as well as unexpected – workflows. When it comes to edge cases, you’ll need to consider more possibilities. For example, if your interface engine does not accept a certain range or type of data, you’ll need to send such data to it – e.g., a date of birth of 1850 or entered in reverse – and see if the interface triggers an error.

During testing, you’re testing the data format and confirming that you’re not introducing errors. When you code an interface, your specification will be based at least in part on sample messages. By definition, you know that these messages work. So don’t use only these sample messages in your texts. Let’s say your test patient in your sample messages is called John Smith – with four characters in the first name. You test your interface using these sample messages, and everything works. But three months from now, your hospital admits a patient named Benjamin O’Donnell, only no one tested for 8 characters in the first name and an apostrophe in the last name. The interface doesn’t like it, and you have a support call (and a none-too-happy clinician) to handle.

By automating your testing, you will feel freer to test at any time and you’ll be more confident about making changes because you’ll know you can easily test each time you change the interface as you’re coding.

Some vendors provide validation guides full of test scenarios. Use them. But check through them first – your workflows may differ.

Test Types

Make sure that your tests cover your interoperability requirements, and include the following:

1. Workflow. Confirm the interface engine handles your standard workflows as expected.

2. Edge cases: unexpected values. If you’re testing birth dates, include 1899 as well as 2017. Include dates with the month and day reversed. Try different abbreviations for the days of the week. Check all caps on names. Check accented names. Check hyphenated last names, and those with an apostrophe.

3. Performance, load, and network testing. Though interface developers don’t normally test network infrastructure, you may want to do this during the validation phase to see how workflows and data are impacting overall infrastructure performance. A high-volume interface may need more load testing than a low-volume interface, depending on your interface engine and connectivity infrastructure.

4. Individual systems. You should test each system on its own, kind of analogous to unit testing in software development. For instance, in addition to making sure the surgical and billing systems handle workflow end to end, make sure they work separately.

Create a Test System

Once you’ve developed a test plan and test scenarios, you need to configure your interface in a test system. It’s important that you do this in a test system, not a production system. It’s easy to think it can’t hurt to test in a live system, but here are three reasons why that’s a big mistake:

  • If you forget to cancel or delete all test transactions once you’re through with testing, you’ll end up with faulty transactions in your production system.
  • You run the risk of impacting ePHI or HIPAA-protected health data.
  • You don’t want phantom data turning up in a CMS audit. Your clinical systems contain data that constitute a legal record.

So what’s the right way to go about it? Set up your test system using the same configuration as your production system, including the same rights and versions (it’s OK if IP addresses are different). Make sure you upload enough patient data, and that your tests cover your requirements (we can’t say that often enough).

Test Reports

As part of the testing process, you’ll want to run reports. The reports should document the following:

  • Number of times the test was run, as well as test duration – if you’re sending messages, this helps you understand performance.
  • Test results, including positive validations and failures.
  • The messages that were used; note the data source (SQL queries pulling from a database, an HL7® message feed, a batch file).
  • Summary of test scenarios that were run.

Message Player for Basic Listening and Routing

When conducting development testing during the interface configuration phase, you need a basic listener/receiver tool as you are writing your interface. This allows you to play/test messages without implementing your interface engine in a production system. In fact, some interface engines come with a built-in player for testing. If you don’t have one, you can use Caristix Message Player (it’s free) to send or receive messages. Read about how we use Message Player here.

[caristixbtn style=”orange” text=”Download Message Player” url=”https://hl7-offers.caristix.com/download-message-player/” blank=”1″]

Why You Need These Artifacts

Test scenarios and reports make it possible for you to iterate more accurately and verify functionality immediately as you develop and test your interface. This not only saves you time, it helps ensure a better interface at go-live. Plus, it enables traceability so you can more easily troubleshoot and determine who is responsible for addressing any issues as you work with vendors and HIE partners.

Your Feedback Welcome

We’ll be publishing chapters from the HL7® Survival Guide over the upcoming weeks and months. See a topic that needs more detail? Have a different perspective on interfacing and interoperability? Tell us in the comments!

Read More in the HL7® Survival Guide

Introduction
Chapter 1: How to Integrate and Exchange Healthcare Data
Chapter 2: Pros and Cons of Interfacing Capabilities
Chapter 3: The Heart of the Matter: Data Formats, Workflows, and Meaning
Chapter 4: How to Work with Vendors and Developing Your EHR Strategy
Chapter 5: Vendors, Consultants, and HL7® Interface Specifications
Chapter 6: Interfacing Artifacts: HL7® Conformance Profiles or Interface Specifications
Chapter 7: Interfacing Artifacts: Gap Analysis
Chapter 8: Interfacing Artifacts: Test Scenarios and Test Systems
Chapter 9: Interfacing Artifacts: Message Samples and Test Messages
Chapter 10: Process and Workflow
Chapter 11: Maintenance, Troubleshooting, and Monitoring
Chapter 12: Definitions
Chapter 13: Contributors and Resources

Caristix Workgroup software for integration teams

HL7® Survival Guide — Chapter 7: Gap Analysis

HL7-interface-gap-analysis-templateThis chapter helps you set up a crucial HL7® requirements document: the gap analysis. Once you have profiles for your source and destination systems, you need to capture a list of all the gaps existing between the two systems in a requirements document. You unearth this list by conducting a gap analysis, which will tell you what’s missing and what needs to be bridged by the interface. In essence, a gap analysis captures the differences in messaging between the new system and the existing IT infrastructure so the systems can exchange data (see the table in Chapter 3 for a list of data and information challenges associated with gaps). A good gap analysis will also document which system and who (you, the vendor, or another third party) will handle any issues.

How to Develop an Interface Gap Analysis Document

Many analysts develop their own gap analysis templates in Microsoft Word or Excel. To fill in templates, they look at messages, run queries when they can, and manually document their findings. This can be a fairly onerous process if they’re basing the analysis on real-world messages (as opposed to doing a vendor spec walkthrough). Another option is to take advantage of software that automates the gap analysis process.

Whatever your approach, you want answers to the following questions so you can identify gaps related to messages:

1.    Does the destination system handle all of the message types from the sending system?
2.    Are there any differences between the message structures in each system?  If so, what are they?
3.    Are there any mandatory data elements on one side that are optional on the other?  If so, what are they?
4.    Do both systems use the same code sets? Are they the same values?  Which values do I need to map?
5.    Do both systems specify the same maximum length of characters for data fields?
6.    What z-segments are in use?
7.    Is the data semantically consistent? In other words, does the meaning or significance of an element always match across both systems?
8.    What are the requirements for encryption or de-identification, usage restrictions, and HIPAA compliance related to confidential information?

4 steps in interface gap analysis
The 4 steps to a gap analysis


(Keep reading to download a simple gap analysis template.)

Why You Need This Artifact

No interface matters unless those coding the engine can accurately scope the interfaces they need to build. You need a way to communicate who does what on an interface. Is the vendor changing a field? Is the interface engine handling the field transformation? It’s critical that you pin all this down before interface development begins, or you will be wasting time iterating through multiple changes later in the interface lifecycle.

Business Impact of Missing Gap Analysis

Without a gap analysis that details your requirements, you’ll end up implementing a generic interface that doesn’t address your organization’s unique needs. Your end users will be frustrated that they can’t easily access all the information they need. And you’ll end up wasting time, money, and effort troubleshooting after going live. With a gap analysis, you can avoid extended go-live periods, significant maintenance at increased cost, and unhappy clinician end-users who are unable to access the data they need to deliver appropriate patient care.

Downloadable Gap Analysis Template

The best course of action? Use this sample gap analysis template to get started on the right foot!

[caristixbtn style=”orange” text=”Download Template” url=”https://hl7-offers.caristix.com/hl7-interface-gap-analysis/” blank=”1″]


Your Feedback Welcome

We’ll be publishing chapters from the HL7® Survival Guide over the upcoming weeks and months. See a topic that needs more detail? Have a different perspective on interfacing and interoperability? Tell us in the comments!

Read More in the HL7® Survival Guide

Introduction
Chapter 1: How to Integrate and Exchange Healthcare Data
Chapter 2: Pros and Cons of Interfacing Capabilities
Chapter 3: The Heart of the Matter: Data Formats, Workflows, and Meaning
Chapter 4: How to Work with Vendors and Developing Your EHR Strategy
Chapter 5: Vendors, Consultants, and HL7® Interface Specifications
Chapter 6: Interfacing Artifacts: HL7® Conformance Profiles or Interface Specifications
Chapter 7: Interfacing Artifacts: Gap Analysis
Chapter 8: Interfacing Artifacts: Test Scenarios and Test Systems
Chapter 9: Interfacing Artifacts: Message Samples and Test Messages
Chapter 10: Process and Workflow
Chapter 11: Maintenance, Troubleshooting, and Monitoring
Chapter 12: Definitions
Chapter 13: Contributors and Resources

Caristix Workgroup software for integration teams

Caristix Message Player Software Now Available

Message-Player-free-hl7-utility
No-brainer Message Player buttons

Message Player, our free HL7 listener/router utility designed for HIT software developers, interface developers, and interface analysts, is now out.

You might have seen other HL7 listeners and routers out there. What makes Message Player different is that it’s dead-easy to use. There are no bells and whistles. It’s independent of other software and engines, so once you’ve downloaded the installation package, you can run it on a desktop machine and get going quickly.

Why Use Message Player

  • first and foremost, test connectivity: is the port working?
  • listen and record HL7 messages.
  • play and route HL7 messages, simulates an hl7 feed or interface
  • automate development testing: if you’re writing interfaces, you can test code hassle-free.

Learn more about Message Player here.

Dogfooding Message Player

We wouldn’t be much of a software team if we didn’t use our own applications (aka eat our own dog food). And do we ever use Message Player. Here’s how:

1. We’ve been developing an integration engine environment for a customer with a distributed scheduling application, and we use Message Player as a quick-and-dirty way to send test messages. During the project, we were working with about 30 test messages that covered our development test cases. So we did a portion of our software testing by playing and replaying those messages through Message Player whenever we needed to.

2. We do performance testing with Message Player. Whenever we develop an interface for a customer, we push bursts of messages through the TCP/IP connection and the interface to test transmission and connectivity under massive load conditions for scalability.

3. We’ve simulated inbound and outbound systems with Message Player. We helped a customer with architecting the integration environment within their application, and we used Message Player to simulate inbound and outbound feeds. So we had Message Player sending messages to their integration engine, which was essentiallly a simulation of an inbound feed. Then the engine transformed the message, and sent it to another instance of Message Player, which simulated the outbound system.

4. We work around the quirks of legacy interface engines with Message Player. One of our customers has an interface engine that sends every single message to separate file. So when we needed 10,000 messages, they gave us 10,000 files. Now, we could run a grep command to dump those 10,000 messages into a single file. But instead, we used Message Player, since it has a nifty File Split feature that lets you specify how you want to listen to messages. You can dump them into a single file, split them based on file size (for instance, 1 MB each), or split them based on message count (for instance, 5,000 messages per file).

Download

You can download Message Player  for free here.

Feedback

Feedback makes a huge difference to our products. Let us know how you’re using Message Player in the comments below.

HL7® Survival Guide — Chapter 6, Interfacing Artifacts: HL7® Conformance Profiles and Interface Specifications

HL7-profile-kit-for-specsThe first five chapters of this Survival Guide have helped you think strategically about your interfacing project. Now we’re going to dive into the nitty-gritty of what you need in an interface specification and/or HL7® profile (note: we use the terms specification, conformance profile, and profile interchangeably in this chapter).

An HL7® interface specification should list:

1. Interface name

How do you refer to your interface in your integration environment? Some organizations manage thousands of interfaces. If you’ve got 10 or 20 interfaces, no big deal. But if you’ve got thousands, devise a naming system for easy name recognition and tracking.

2. Source or destination system name and version

System versions (and even product names) change over time. Make sure you’ve got a way to track this in your spec.

3. Message types used in the interface

A message type is essentially a trigger event, such as patient admission, lab request, lab results available, new appointment, etc. How you use and implement events is completely up to you – it depends on your system and hospital workflow. Each of the HL7® v2.x reference specifications contain hundreds of trigger events. Just focus on the ones you need for your interface.

4. Message definitions including segments, fields, data types

You need a list of the segments, fields, and data types used in each message type.

5. Segment and field attributes

These are optionality, repeatability, data type associated with a field, field length, tables associated with field.

6. Z-segments

Custom segments, if a vendor or your facility uses them.

7. Data types

Apart from a list of data types, you will also need attributes and customizations.

8. HL7® tables

You need the real-world data or code sets that are actually implemented – such as gender, race, and lab codes – not what the standard provides. Otherwise you’ll find yourself wasting lots of time trying to figure out what’s really going on in your system, especially when data such as lab codes change over time. You can solve this problem by keeping track of the actual data and code sets used, along with where and how they’re used, and the meaning of the information.

9. Specialized interoperability challenges

Without getting all necessary information upfront (i.e., what we outline in this chapter), your challenges around interoperability become greater and more insurmountable. Consider lab interoperability and the example of Logical Observation Identifier Names and Codes (LOINC) codes – the LOINC dictionary contains more than 42,000 codes and some codes mean similar things. That means two systems exchanging data could refer to that data differently – leading to confusion and information-exchange problems. Read more about addressing the challenges of lab interoperability in this Clinical Innovation and Technology article: Lab Interoperability Plays Catch Up.

Spec = Interface Requirements

Combine the elements above with any necessary clinical or workflow constraints. This becomes your specification or profile, which is the key interface artifact you need as you can use this document to compile and validate requirements. Make sure internal customers and vendors see this. And ask tough questions (including the ones we supplied in chapters 4 and 5) as you review this spec so you can pin down the right answers for your environment.

Leverage your interface specifications (and other interfacing artifacts) to generate your interface code. In most cases, the spec is delivered as a Word document so look for tools that will help you connect the spec directly to your interface engine.

How to Develop an HL7® Conformance Profile

To build a profile, you have several options.

Messaging Workbench available via HL7 International (look for a file name that includes “MWB release”) is open-source software designed to build conformance profiles. But keep in mind, with Messaging Workbench you need to build out individual profiles for each message type. If you define 10 message types for an interface, you’ll be building 10 separate profiles. You’ll also have to read through messages to get the information you need.

You can also develop templates in Excel or Word and then populate them manually. Or you can take advantage of functionality in Caristix software that automatically creates profiles from HL7® messages. In our world, a profile corresponds to the spec for a source or destination system, with however many message types you need.

Regardless of how you develop a profile, you need to do it. The problem is that there’s no industry-standard template available. That’s why we’ve developed this HL7® profile template kit and made it available to you for download. With it, you can avoid the time and effort to set one up, and make sure you clearly and concisely communicate what your integration environment expects in terms of data exchange. Feel free to download the template and tweak it to suit your needs.

Why You Need a Conformance Profile

  • Gets analysts, developers, internal customers, vendors, and consultants on the same page
  • Helps identify risks before interface development
  • Eliminates time spent determining requirements, testing, and on trial and error during go-live
  • Makes it possible to easily generate your HL7® interface specification, gap analysis report, and test and validation plan

The Dangers of a Missing Interface Specification

Without an interface spec customized to your requirements, you’ll be stuck implementing a generic interface. If your organization is like most, your clinical resources are already stretched thin – and the last thing you can afford is to dedicate those resources to testing. But that’s what you’ll find yourself doing if you go with a generic spec. After all, your interface will likely be buggy when it goes live because your true requirements weren’t gathered up-front. As a result, you’ll find yourself bogged down with extensive troubleshooting after go-live, especially when you run into issues with clinical workflows because the interface doesn’t work as expected and clinicians report a lack of data, orders, lab results, and/or medication as a result.

Don’t take any chances – create those profiles. Get started with our HL7® Profile Kit.

[caristixbtn style=”orange” text=”DOWNLOAD HL7® PROFILE KIT” url=”https://hl7-offers.caristix.com/hl7-profile-kit/” blank=”1″]

Your Feedback Welcome

We’ll be publishing chapters from the HL7® Survival Guide over the upcoming weeks and months. See a topic that needs more detail? Have a different perspective on interfacing and interoperability? Tell us in the comments!

Read More in the HL7® Survival Guide

Introduction
Chapter 1: How to Integrate and Exchange Healthcare Data
Chapter 2: Pros and Cons of Interfacing Capabilities
Chapter 3: The Heart of the Matter: Data Formats, Workflows, and Meaning
Chapter 4: How to Work with Vendors and Developing Your EHR Strategy
Chapter 5: Vendors, Consultants, and HL7® Interface Specifications
Chapter 6: Interfacing Artifacts: HL7® Conformance Profiles or Interface Specifications
Chapter 7: Interfacing Artifacts: Gap Analysis
Chapter 8: Interfacing Artifacts: Test Scenarios and Test Systems
Chapter 9: Interfacing Artifacts: Message Samples and Test Messages
Chapter 10: Process and Workflow
Chapter 11: Maintenance, Troubleshooting, and Monitoring
Chapter 12: Definitions
Chapter 13: Contributors and Resources

Caristix Workgroup software for integration teams

HL7® Survival Guide — Chapter 5: Vendors, Consultants, and Interface Specifications

After you’ve assessed clinical interoperability issues (covered in Chapter 4 ), you’ll be ready to start building interfaces. If you’re building your interfaces in house, you’ll be dealing with clinical system vendors. And if you’re outsourcing interface development, you’ll be working with consultants. Either way, you want to know what issues to avoid. That’s where this chapter comes in handy.

Make Sure You Check Off These Boxes

Conduct your due diligence on the following points and your interface project is much more likely to run smoothly.

1. Negotiating an Interface

When a hospital buys a clinical system, interoperability and HL7® are usually not addressed during the negotiation. The vendor’s sales rep often glosses over the requirements and simply mentions the “thousands of interfaces they’ve got in a library.” The problem is that analysts like you get pulled into the project after the contract has been executed only to discover it’s challenging to interface with the new system – but you’re stuck with making it work. Approach your manager before the negotiation phase and ask to be involved. By highlighting the issues that can arise when interoperability and HL7® are not addressed during the vendor negotiation, you can help avoid lots of project complications and will set you and your manager up for a smoother, more successful project.

2. Black-box Syndrome

In this scenario, the vendor keeps control of the project and interface, leaving you to pay for any tweaks or additional needs going forward, including documentation. Just as painful is the fact that the knowledge walks out the door when the consultants leave. How do you ensure this doesn’t happen? Ask for documentation, including the interface specification, as part of the contract. This should detail which systems are linked/interfaced, which messages are exchanged, and which message formats are used, at a minimum.

3. Vendor Lock-in

Some interface vendors or consultants introduce their own intellectual property into the interface. In such cases, your organization has license to use the interface, but not full ownership of the interface, which means you need to pay the vendor for any required changes or updates you’d like to see.

4. Who Drives the Interface Specification?

In the past, the clinical technology vendor would drive the spec and customers had to conform to the requirements. Nowadays, the opposite approach is increasingly common: the hospital drives the spec and vendors must conform. While this approach is more expensive initially, down the road it makes the process smoother for the hospital, especially as hospitals are increasingly part of HIEs and merge to form large hospital groups or IDNs. This is good for hospitals and providers but you need the right infrastructure (i.e., the right HL7® software and integration engine, configured to meet your organization’s needs) and culture to support this approach, whether you handle interface implementation in house or outsource it.

5. Supporting Technology

A good integration engine is a great building block. But you also need supporting technology and a culture that help you – and anyone else who gets involved at any time – manage and update the engine and interfaces over time. Look for software and technology that simplify the process of generating, updating, and managing specifications, requirements, test scenarios and other documentation associated with your engine and data exchange work. You’ll also want a repository that provides a central location for anyone with permission to access the documentation. A detail that may seem nit-picky at the beginning of a project just might be the essential connectivity information you need a year later, when an interface goes down at 5 pm and you are the Tier 3 support on call.

6. Culture

Your organization’s culture and approach can make or break a consulting engagement or in-house project. Ideally you want to drive the show with consultants. Set clear expectations. Control deliverables by coming to clear agreement as to their definition and due dates. Use your project documentation from Point 5 above to ensure clarity and accountability throughout the interface lifecycle. Ensure a structured methodology is used to test the interface. And clearly define your acceptance criteria for the project.

Demand These Deliverables

Beyond addressing the issues above, regardless of whether you work with a vendor or a consultant, ask for these deliverables or interfacing artifacts:

HL7® conformance profiles (also known as profiles or interface specifications). HL7® profiles should at a minimum provide a list of messages, segments (including z-segments), fields, data types, and typical code sets or data.

Gap analysis between systems to connect. Gap analysis sets the scope of the interfacing project. Read more about gap analysis in this Caristix white paper.

Test scenarios. Vendors typically provide you with a boilerplate validation guide to ensure the interface works as expected. But your team needs to ensure that your organization’s clinical workflows are covered. For example , let’s say you have a duplicate patient record in the system. Some hospitals are going to perform a merge to get rid of the duplicate; others are going to ignore it; and yet another batch might delete one of the duplicates. But the boilerplate guide might just say to merge. So make sure the guide covers real-life and specific scenarios you encounter in your environment.

Test system. Understand how they’re going to document test results and don’t sign off on acceptance criteria unless your clinical workflows are covered.

Message samples and test messages. Critical for testing prior to go-live as well as post-go-live for troubleshooting.

Process and workflow maps. This rounds out your view of your interfacing ecosystem. Complement the message structure and content details from HL7® profiles with good process and workflow maps for future interfacing asset management.

Once you have a vendor or consultant strategy in place, and you’ve identified the artifacts you need, you’ll need to start developing the interfaces. The next chapters walk you through that process.

Your Feedback Welcome

We’ll be publishing chapters from the HL7® Survival Guide over the upcoming weeks and months. See a topic that needs more detail? Have a different perspective on interfacing and interoperability? Tell us in the comments!

Read More in the HL7® Survival Guide

Introduction
Chapter 1: How to Integrate and Exchange Healthcare Data
Chapter 2: Pros and Cons of Interfacing Capabilities
Chapter 3: The Heart of the Matter: Data Formats, Workflows, and Meaning
Chapter 4: How to Work with Vendors and Developing Your EHR Strategy
Chapter 5: Vendors, Consultants, and HL7® Interface Specifications
Chapter 6: Interfacing Artifacts: HL7® Conformance Profiles or Interface Specifications
Chapter 7: Interfacing Artifacts: Gap Analysis
Chapter 8: Interfacing Artifacts: Test Scenarios and Test Systems
Chapter 9: Interfacing Artifacts: Message Samples and Test Messages
Chapter 10: Process and Workflow
Chapter 11: Maintenance, Troubleshooting, and Monitoring
Chapter 12: Definitions
Chapter 13: Contributors and Resources

Caristix Workgroup software for integration teams

The HL7® Survival Guide — Chapter 4: Your EHR Strategy and Working with Vendors

With Meaningful Use in full swing, chances are your hospital organization is implementing an EHR or converting to a new system or upgrade. Watch out: when you implement a new system or migrate from one to another, it can impact your systems’ ability to continue exchanging information. That’s why many organizations call upon third-party vendors for guidance and project assistance. You just need to make sure you stay in control and avoid hidden expenses as you work with these vendors. By getting answers to the following interface-related questions from your clinical system vendor(s), you can maintain the upper hand in the relationship.

Nine Critical Questions You Need to Ask Your Clinical System and Interface Vendors

1.    “Who provides the hardware, if any?”

When you implement a new EHR or clinical system, validate it doesn’t need extra hardware for data exchange. If it does, find out about any hidden costs associated with this extra hardware, and who will maintain it (you or the vendor or another company?). If the vendor or a third party will provide support, what response times do they guarantee when you report an issue? And how does the vendor determine who is accountable for issues that arise? For example, if data exchanges are problematic between the interface and a medication distribution machine, is the vendor going to help troubleshoot it or offload you to the vendor of the third-party software?

2.    “What standard does your system use for data exchange? HL7®? Which HL7® 2.x version are you using?”

These questions lay the groundwork for the next one.

3.    “Can you supply a list of customizations you made to the HL7® v2.x standard you are using?”

While most vendors will claim they deviated very little from the standard, you will probably find they deviate in several ways (custom messages, Z-segments, customized data types, customized code sets, etc). The list of customizations will help you understand the overall interface and the amount of work required to integrate with the other systems.

4.    “Within your HL 7 2.x based interface, can you tell me which elements and values are configurable?”

You need the details. If they can’t provide details on configurability, you might be facing a longer test cycle than anticipated. Trial-and-error interface validation can slow down implementation.

5.    “When you send us the interface spec for sign-off, do we get a fully documented list of gaps and exceptions for specific data values and data elements?”

You want a full list, or you’ll be facing a lengthy validation process, waiting for super-users and clinical testers to flag bugs in the test system.  Also, if the vendor doesn’t share this knowledge, you are a candidate for black-box syndrome, wherein the vendor maintains control of the interface. This limits your flexibility and ability to negotiate with the provider, and also reduces your capability to evaluate impacts that a change within the ecosystem might have on this interface and the systems exchanging data.

6.    “Will you provide a list of the interface customizations you create for us?”

No interface specification works perfectly out of the box; it has to be customized to your environment. You need a list of those customizations for troubleshooting and maintenance, or your interface analysts will be waiting on vendor trouble tickets while clinician calls are piling up at the hospital IT help desk.

7.    “How do you document changes and upgrades throughout the lifecycle of the interface? Do you automatically provide us with updated documentation?”

If there’s anything worse than missing documentation, it’s partial or out-of-date documentation. What you get at go-live will not be usable two years out. Make sure the responsibility for documentation updates is clearly spelled out.

8.    “Does the interface you built contain any intellectual property?”

This is crucial! Validate if a license will apply to the code and you will own the interface – or if the vendor will own it. If the vendor owns it, you might not be able to change the interface or re-use the code for another, similar interface project. You will need to engage the vendor for every tweak or new project, and that will likely leaving you paying big bucks…

9.    “How guaranteed is message delivery? Does each message get an “acknowledge” (ACK) or “no acknowledge” (NACK) reply?”

This is part of the HL7® standard and is an important piece of the message delivery process as you cannot guarantee the message was delivered without it.

3 Bonus Technical Questions

While the following questions may not apply to all systems, be sure to ask them of the vendor so nothing is left to chance.

1.    “If an application makes an information request, does the replying system acknowledge that it received the message or does it just reply?”

In the case of information requests (query messages for instances), the system will respond with one or several messages containing the information. In most scenarios, no ACK/NACK is involved as few systems implement Query/Response messages.

2.    “What happens if the replying system does not have the requested information?”

The response format allows systems to return a message stating no information was available based on the criteria requested, rather than just sending a reply with blank fields.

3.    “What happens when a message requests data be updated or inserted?”

Let’s say the lab system sends results to the EHR but the patient ID is not recognized at the EHR – what happens? The role of a message is to publish an event once it occurs and provide related information. How the information is handled is system specific and in some cases, the system might do nothing. While the system is responsible for handling the information received, the interface needs to provide information the system can handle.

Next Steps

After you’ve assessed high-level clinical system interoperability issues, you need to actually build and implement the interfaces. That’s where the next sections of the HL7® Survival Guide come in.


Your Feedback Welcome

We’ll be publishing chapters from the HL7® Survival Guide over the upcoming weeks and months. See a topic that needs more detail? Have a different perspective on interfacing and interoperability? Tell us in the comments!

Read More in the HL7® Survival Guide

Introduction
Chapter 1: How to Integrate and Exchange Healthcare Data
Chapter 2: Pros and Cons of Interfacing Capabilities
Chapter 3: The Heart of the Matter: Data Formats, Workflows, and Meaning
Chapter 4: How to Work with Vendors and Developing Your EHR Strategy
Chapter 5: Vendors, Consultants, and HL7® Interface Specifications
Chapter 6: Interfacing Artifacts: HL7® Conformance Profiles or Interface Specifications
Chapter 7: Interfacing Artifacts: Gap Analysis
Chapter 8: Interfacing Artifacts: Test Scenarios and Test Systems
Chapter 9: Interfacing Artifacts: Message Samples and Test Messages
Chapter 10: Process and Workflow
Chapter 11: Maintenance, Troubleshooting, and Monitoring
Chapter 12: Definitions
Chapter 13: Contributors and Resources

Caristix Workgroup software for integration teams